Tis the season to craft for Christmas fa la la la la, la la la la.......
Last week I saw THIS fabulous tutorial over on Splitcoast Stampers. I knew I just HAD to make this! However, I don't have that particular non SU die and I wanted to make something similar using SU materials. So here is what I came up with.
Here is what you will need to create this beauty:
Cardstock: Textured Whisper White
Ink: Marina Mist
Acessories: Lattice Die, Brayer, Tombow Multi-Purpose Adhesive, Mini Glue Dots, 1/8" Marina Mist Taffeta Ribbon, Dazzling Details, shimmer mist (Shimmer Paint + rubbing alcohol in a misting bottle), Sticky Strip, Bone Folder
2. Brayer one side of the cardstock with Marina Mist ink. If you brayer on the back side of the textured cardstock you will get a more even coverage like the one on the right below. If you brayer on the front of the textured cardstock you will get one like the one of the left where you can see white spots from the texture. Either works, it is just a matter of preference.
3. Run all 18 pieces of cardstock through the Big Shot on the Lattice Die. This is the perfect project for when your Big Shot is feeling neglected because by the time you've cut out all 18 of these babies you will have spent some quality time cranking the Big Shot.
4. Fold the lattice pieces in half as shown below.
Imporant note: The color that you want to be primarily seen is the one that needs to be on the inside of the fold. The color that you want peeking out needs to be on the outside of the fold.
I wanted the white to be the primary color that shows so I folded my lattice pieces with the white on the inside and used a bone folder to get a nice crisp fold.
5. Add a teeny tiny spot of Tombow Multi-Purpose Adhesive in the locations shown with the black circles. It is very important to put the glue in the correct location on each layer! Fold the lattice over and press down in the spots where the glue is. Hold it there for 10 seconds or so and then continue on to the next step.
6. Here you have the same lattice that you glue together above. Apply more teeny tiny spots of glue in the locations shown below with the black circles.

7. Place a second lattice on top of the first one lining it up as best you can. Put glue in the locations shown below with the black circles. It is the same three locations that you used above in step 5. Fold the bottom section up and press down in the locations where the glue is for about 10 seconds.
8. Now you have two lattices folded in half stacked on top of one another. Set this stack of 2 aside and repeat steps 5 - 8 on the remaining lattices. You will now have 9 stacks of two lattices all glued and ready to go.
9. Take one stack of two and place glue in the locations shown below with the black circles. Line up another stack of two on top and press down in the locations where the glue is for about 10 seconds or so. Repeat until you have all of your lattices glued up in one tall stack.
11. I fanned out my layers a bit and just left it set for about 20 minutes or so just to let the glue completely dry before forming the ornament. When you form the ornament you are going to be pulling on those glue joints to create the shape and you want the glue really dry before pulling too hard.
12. Cut a 20" piece of 1/8" Marina Mist Taffeta Ribbon and adhere it to the sticky strip in the middle so that the ribbon is folded in half and will create a loop for the ornament to hang on. Using a Hobby Blade fold a Mini Glue Dot in half and place a mini glue dot in the four locations shown below with the black circles.
Now I'm a bit insane and think that anything on the tree should sparkle. So I sprayed my ornament with my shimmer mist which is just four drops of shimmer paint mixed with rubbing alcohol in a travel size hair spray bottle. This gives the ornament a subtle sparkle, but I wanted it MORE sparkly! So I used some Dazzling Details and spread it on all of the little pointy petals in the middle and the sections where the blue is showing at the top and bottom. So most all of the blue sections that you see are sparkly!
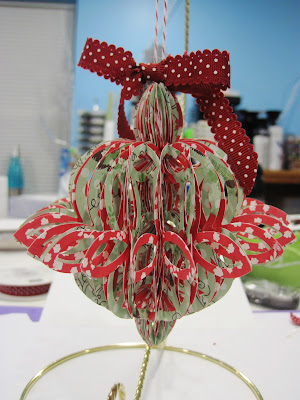
I would say that all in all this puppy probably took about 2 hours to make. Granted that is counting about 30 minutes just spreading on the Dazzling Details. But you end up with a pretty ornament. Below is one that I made using Holly Berry Bouquet DSP. I think it is pretty, but the pattern makes it so you can't see as much of the lattice detail as easily.
I personally prefer the simpler white and blue one. But whatever your taste I hope you get a chance to try one of these. It really isn't too hard, you just have to pay attention to where you're putting the glue.
Thanks for stopping by!


