
This is the masculine card my guests made at the Make & Take this month. I always try to do one masculine card each time because they are more difficult to come up with. This time I challenged them with some sponging. Everyone was really suprized about how easy it was, although I really had to convince one person to try it out. Everyone loved it! Take a look:

Stamps: Nature Silhouettes, Occasional Quotes
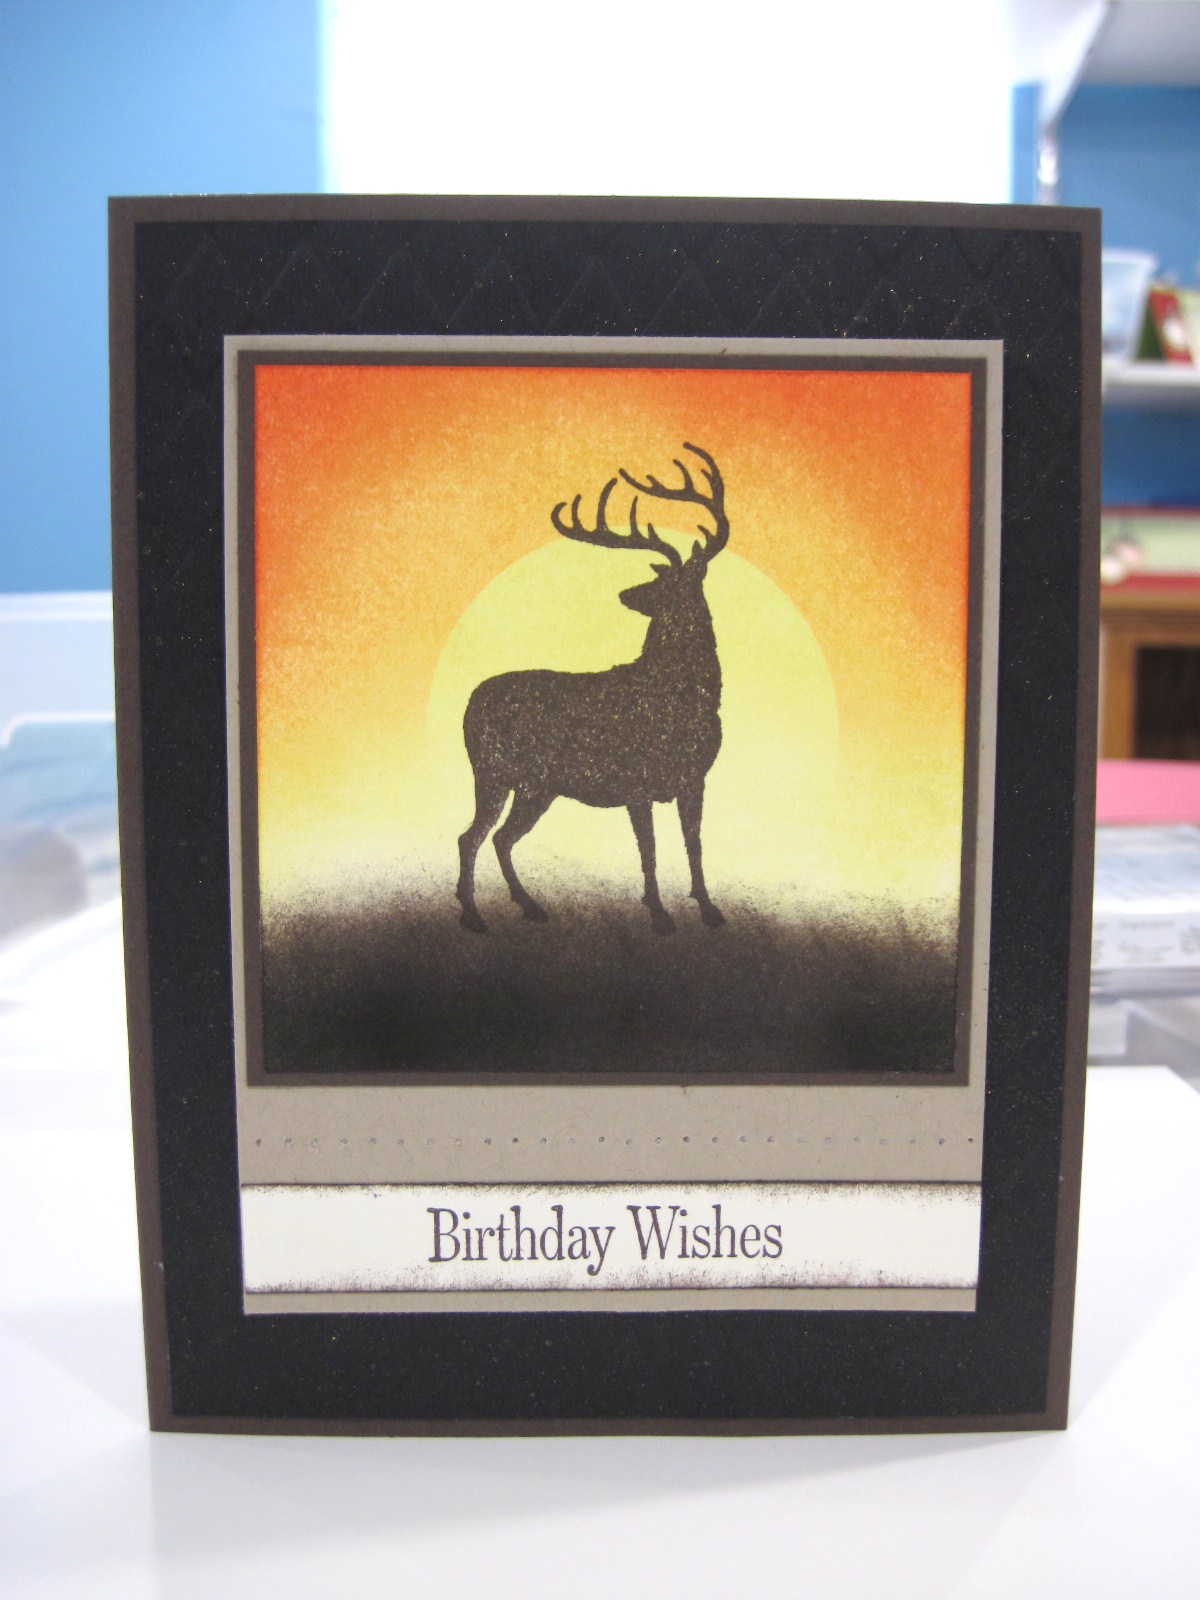
Cardstock: Early Espresso, Basic Black, Crumb Cake, Very Vanilla
Ink: Daffodil Delight, Peach Parfait, Poppy Parade, Early Espresso, Basic Black
Accessories: Stampin' Sponges, Needle Tool, Mat Pack, 1 3/4" Circle punch, post-it notes, Harlequin Texturz Plate, Log Cabin Smooch Spritz
The card base is Early Espress cardstock cut at 5 1/2" x 8 1/2" and scored at 4 1/4". The next layer is a piece of Basic Black cardstock cut at 4" x 5 1/4" that was run through the Big Shot with the Harlequin Texturz Plate and sprayed with Log Cabin Smooch Spritz to give it a nice coppery sparkle. After the Smooch dried this was adhered to the card front.
The image panel is a 3" x 3" piece of Very Vanilla cardstock. The entire panel was first sponged with Daffodil Delight ink. Then I put a post-it note on a piece of copy paper and punched out a 1 3/4" circle with the 1 3/4" Circle punch making sure to get some of the sticky part inside the circle punch. The post-it circle was removed from the copy paper and placed in the center of the image panel. The sticky part on the circle holds the post-it down while you sponge. Or at least helps you hold the circle down. Then Peach Parfait ink was sponged on the upper half of the cardstock. Then Poppy Parade ink was sponged on the top quarter of the cardstock. The post-it circle was then removed and voila! You have a beautiful sunset.
Next the deer (or wolf, I gave my guests the option) was stamped in Early Espresso ink in the center. Early Espresso ink was sponged by pouncing with the sponge to create the ground up to the deer (or wolf's) feet. Then Basic Black ink was sponged in the same way at the very bottom to add some depth to the color of the ground.
This panel was adhered to a 3 1/8" x 3 1/8" piece of Early Espresso cardstock and then to the top of a 3 1/4" x 4 1/4" piece of Crumb Cake cardstock. I used the Mat Pack and the Needle Tool to punch holes in a line across the Crumb Cake cardstock under the image panel. "Birthday Wishes" from Occasional Quotes was stamped in Early Espresso ink on a 1/2" x 3 1/4" piece of Very Vanilla cardstock. The top and bottom edge of the cardstock were sponged with Early Espresso ink and this was adhered to the bottom of the Crumb Cake cardstock.
Although this is a little involved for a Make & Take the result is a really pretty yet masculine card. I hope that you give sponging a try to see how truly easy it is to make a beautiful scene! Come back tomorrow to see the next Make & Take card!
Stamps: Nature Silhouettes, Occasional Quotes
Cardstock: Early Espresso, Basic Black, Crumb Cake, Very Vanilla
Ink: Daffodil Delight, Peach Parfait, Poppy Parade, Early Espresso, Basic Black
Accessories: Stampin' Sponges, Needle Tool, Mat Pack, 1 3/4" Circle punch, post-it notes, Harlequin Texturz Plate, Log Cabin Smooch Spritz
The card base is Early Espress cardstock cut at 5 1/2" x 8 1/2" and scored at 4 1/4". The next layer is a piece of Basic Black cardstock cut at 4" x 5 1/4" that was run through the Big Shot with the Harlequin Texturz Plate and sprayed with Log Cabin Smooch Spritz to give it a nice coppery sparkle. After the Smooch dried this was adhered to the card front.
The image panel is a 3" x 3" piece of Very Vanilla cardstock. The entire panel was first sponged with Daffodil Delight ink. Then I put a post-it note on a piece of copy paper and punched out a 1 3/4" circle with the 1 3/4" Circle punch making sure to get some of the sticky part inside the circle punch. The post-it circle was removed from the copy paper and placed in the center of the image panel. The sticky part on the circle holds the post-it down while you sponge. Or at least helps you hold the circle down. Then Peach Parfait ink was sponged on the upper half of the cardstock. Then Poppy Parade ink was sponged on the top quarter of the cardstock. The post-it circle was then removed and voila! You have a beautiful sunset.
Next the deer (or wolf, I gave my guests the option) was stamped in Early Espresso ink in the center. Early Espresso ink was sponged by pouncing with the sponge to create the ground up to the deer (or wolf's) feet. Then Basic Black ink was sponged in the same way at the very bottom to add some depth to the color of the ground.
This panel was adhered to a 3 1/8" x 3 1/8" piece of Early Espresso cardstock and then to the top of a 3 1/4" x 4 1/4" piece of Crumb Cake cardstock. I used the Mat Pack and the Needle Tool to punch holes in a line across the Crumb Cake cardstock under the image panel. "Birthday Wishes" from Occasional Quotes was stamped in Early Espresso ink on a 1/2" x 3 1/4" piece of Very Vanilla cardstock. The top and bottom edge of the cardstock were sponged with Early Espresso ink and this was adhered to the bottom of the Crumb Cake cardstock.
Although this is a little involved for a Make & Take the result is a really pretty yet masculine card. I hope that you give sponging a try to see how truly easy it is to make a beautiful scene! Come back tomorrow to see the next Make & Take card!