Thursday, March 8, 2012

Delicate Butterfly

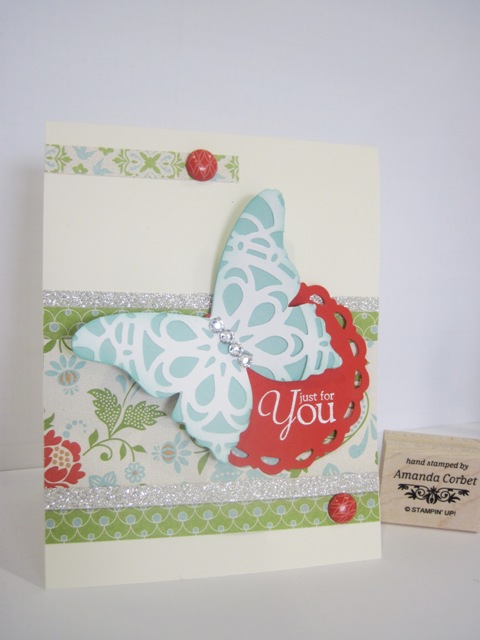
Here is another sketch challenge card I created a while ago. This was created for the SCCSC103 sketch challenge on Stampin' Connection. So many fun details to this card. Take a look: 

  • Stamps: Precious Butterflies
  • Card Stock: Very Vanilla, Poppy Parade, Pool Party, Whisper White
  • DSP: Everyday Enchantment (SAB)
  • Ink: Versamark, Pool Party
  • Accessories: White embossing powder, Heat Tool, Paper Piercer, Mat Pack, Everyday Enchantment Brads (SAB), Perfect Pennant Die, Beautiful Butterflies Die, Doily Sizzlit, Two Way Glue Pen, Mini Glue Dots, Stampin' Sponge, Rhinestones
Here is the sketch that was created by Liz Goldhawk:


I started off by cutting a piece of Very Vanilla card stock 4-1/4" x 11" and scored it at 5-1/2". I used three different patters of DSP from the Everyday Enchantment DSP that you can get FREE during Sale-A-Bration. The largest was cut at 2" x 4-1/4" and adhered onto the bottom portion of the card front. Next I cut two pieces of DSP 1/2" x 4-1/4" and two pieces of Silver Glimmer paper 1/4" x 4-1/4". I adhered the narrow strips of DSP and Glimer paper on either side of the wide DSP strip.

The last strip of DSP at the top was cut 1/4" x 2-1/2" and adhered at the top left corner of the card front. I used my Paper Piercer and Mat Pack to pierce a hole for the two Everyday Enchantment brads (another SAB item). I love how the brads add a bright pop of color!

Next I ran a scrap of Poppy Parade card stock through the Big Shot on the Perfect Pennants Die. The greeting from Precious Butterflies was stamped onto the Poppy Parade circle in Versamark, covered with White embossing powder, and heated with the Heat Tool. I adhered this bright scalloped circle onto the card front with Stampin' Dimensionals.


Now for the star of the card. The beautiful butterfly! I ran a scrap of Pool Party and a scrap of Whisper White card stock through the Big Shot on the Beautiful Butterflies die. Then took the Whisper White butterfly and ran it through the Big Shot again on the Doily Sizzlit. I adhered the doily butterfly on top of the Pool Party butterfly, then sponged around the edges with Pool Party ink. Four large rhinestones were added to create the butterfly's body. I adhered the butterfly onto the card front with Stampin' Dimensionals. 

I love the detail in the butterfly and the combination of DSP patterns and glimmer paper. This card is definitely one of my favorites! What fun things have you used the Doily Sizzlit for? 

Thanks for stopping by! 

Wednesday, March 7, 2012

Craft Project Central!

Elegant Bird Scrapbook Tin and Card: 

This altered CD in is a perfect way to preserve photos and special memories, complete with a little inside pocket to hold small mementos.  Pair it up with the coordinating card and this is a perfect gift for the bride-to-be, or a great shower or wedding favor!


This fantastic project was created by Laurie! If you have a chance please stop by Laurie's blog and leave her a comment on her wonderful project!

To subscribe for the March edition of Craft Project Central just click HERE! You get 10 wonderful tutorials for only $10! 

Thanks for stopping by! 


Tuesday, March 6, 2012

With Love Bag

Hello everyone! Today I am going to share with you the 3D project from the February Make and Take. This one is kind of a combination of a box and a bag. Take a look: 


When choosing what colors to use on this project I realized that I had never used Perfect Plum. Never! So I pulled it out and put it to use on this project. I like purple, I guess Perfect Plum just kind of fell off my radar. I will have to make sure I try to use this color more. It looked great on this project with Very Vanilla, Basic Grey, and Old Olive! 


  • Stamps: Inspired By Nature, Field Flowers
  • Card Stock: Perfect Plum, Very Vanilla, Old Olive
  • Ink: Elegant Eggplant, Old Olive
  • Accessories: 5/8" Basic Grey Satin Ribbon, Stampin' Dimensionals, Scallop Oval Punch, 1-3/4" x7/8" Oval Punch, 1-3/8" x 5/8" Oval Punch, SNAIL Adhesive, Sticky Strip


I will put together a tutorial for this project for you! Come back next Monday to see the tutorial!

     Update: The tutorial has been posted! You can find it HERE!

Thanks for stopping by! 


Monday, March 5, 2012

The sky's the limit!

Good morning everyone! I hope you had a fabulous weekend! Mine was fantastic! Today I want to share with you the final card from the February Make and Take. Take a look: 


  • Stamps: Up, Up, and Away
  • Card Stock: Basic Grey, Basic Black, Whisper White
  • DSP: Pocket full of Posies
  • Ink: Poppy Parade, Tempting Turquoise, Basic Black
  • Accessories: 1/4" Tempting Turquoise grosgrain ribbon, Silver brads, Stampin' Dimensionals

This was another pretty quick and easy card to put together. I started off with a Basic Grey card base cut at 5-1/2" x 8-1/2" and scored it at 4-1/4". Next I cut a piece of Whisper White card stock 3-5/8" x 4-7/8". I cut a piece of Pocket full of Posies DSP 2" x 4-7/8". The DSP was adhered on top of the Whisper White card stock. I stamped one balloon in Tempting Turquoise and one in Poppy Parade. The birds, basket, and greeting were all stamped in Basic Black ink.

Once all the stamping was done I adhered the Whisper White card stock layer onto a 3-3/4" x 5" Basic Black card stock. Then I used my Paper Piercer and Mat Pack to pierce a hole in the two corners of the DSP. Silver brads were added in the pierced holes. Then a piece of 1/4" Tempting Turquoise grosgrain ribbon was tied around the panel and into a knot. I adhered the finished panel onto the card front with Stampin' Dimensionals.

Quick and easy! The hardest part was trying to get the basket stamp lined up with the bottom of the balloon. I could have pulled out my Stamp-A-Ma-Jig, but oh well. I still think it looks cute!

Thanks for stopping by!

Craft Project Central!

Here is another fabulous and fun tutorial from the March edition of Craft Project Central!

Mouthwatering Purse and Cards: 

Winter is coming to an end and it’s time for something bright and cheery!  This Mouthwatering Purse & Love Notes set is just the gift to bring some color and cheer to someone special.  Each stamped image is embossed with a scented Stampin’ Emboss Powder, making this ensemble a delight for the senses!  Each love note has a matching designer envelope and envelope seal.  Put it all in the purse and you have a gift anyone would love!


This cheerful project was created by Carrie! If you have a chance please stop by Carrie's blog and leave her a comment on her cute project!

Subscribe to the March edition of Craft Project Central and get 10 fabulous tutorial s for just $10! Click HERE to subscribe! 


Thanks for stopping by! 

Thursday, March 1, 2012

Craft Project Central!

Exploding Gift Box and Card: 


Make this lovely exploding box with storage drawers inside that are perfect for storing your embellishments and/or sewing accessories!  It's also a perfect little gift box (fill with sewing accessories for your sewing friends, buttons and other embellishments for your crafty friends, or how about paper clips, push pins, etc. for a teacher gift) that can hold small surprises.  In this project you'll also make two fabric flowers.  One to decorate your box and another that can be turned into a pin or used as an embellishment on anything you'd like!


This fabulous project was created by Monika! If you have a chance please stop by Monika's blog and leave her a comment on her wonderful project!


To get this and all the other wonderful tutorials for March just click HERE and subscribe! 


Thanks for stopping by!