
I was playing around with a fabulous Milk Carton Box tutorial that was created by Sunghee at Creativity In Progress. I will have the links to both of the tutorials that I used on this project at the end of the post.
Cardstock: Basic Black, Concord Crush, Lucky Limeade
DSP: Spice Cake
Ink: Basic Black, Early Espresso
Accessories: Mini Milk Carton Die, Owl Punch, 1 ¾” x 7/8” Oval Punch, Crimper, Tombow Multi-Purpose Adhesive, Dazzling Diamonds, Dazzling Details, Mini Glue Dots, Stampin’ Sponge, Scallop Edge Border Punch, 2 3/8” Scalloped Circle Punch, Paper Snips, Sticky Strip
For the rose I used Valita’s Owl Punch Rose tutorial. I used Concord Crush cardstock sponged with Basic Black ink for the flower petals. After the rose was completely formed I edged each petal and the center with Tombow Multi-Purpose Adhesive and then sprinkled Dazzling Diamonds glitter over the glue and tapped off the excess. The rose was set aside to dry while I created the leaves.

I LOVE, LOVE, LOVE how this black rose looks! Such a deep pretty purple with sparkles! Okay…so I’m really excited about this project. Anyway… here are the tutorials I used:
Mini Milk Carton Boxes by Sungee
Owl Punch Rose by Valita
Thanks for stopping by and I hope you’ve enjoyed all of my Halloween projects!


Cardstock: Basic Black, Concord Crush, Lucky Limeade
DSP: Spice Cake
Ink: Basic Black, Early Espresso
Accessories: Mini Milk Carton Die, Owl Punch, 1 ¾” x 7/8” Oval Punch, Crimper, Tombow Multi-Purpose Adhesive, Dazzling Diamonds, Dazzling Details, Mini Glue Dots, Stampin’ Sponge, Scallop Edge Border Punch, 2 3/8” Scalloped Circle Punch, Paper Snips, Sticky Strip
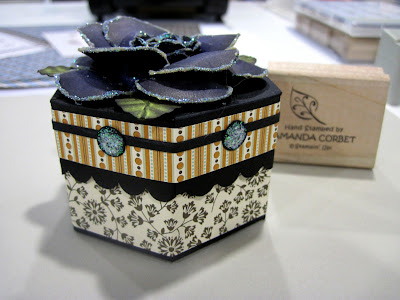
Anyway… I made this little black milk carton box out of Basic Black cardstock just to try out the tutorial and it was sitting there on my work table. I just had to decorate it, so I decided to make a Halloween themed gift box. I wrapped the box bottom with a strip of Spice Cake DSP. Then I wrapped the top of the box with another pattern from the Spice Cake DSP.
I had another one of those 1/8” strips of cardstock on my table so I adhered that to the box top. The width was a little uneven where the strip ends met, so that meant I had to use something to cover the seam, which also means adding one to the center of all six sides. So I punched out six circles from Basic Black cardstock using the largest circle in the Owl Punch. I glued the circles on the sides of the lid and applied Dazzling Details to the circles to give them some sparkle.
For the rose I used Valita’s Owl Punch Rose tutorial. I used Concord Crush cardstock sponged with Basic Black ink for the flower petals. After the rose was completely formed I edged each petal and the center with Tombow Multi-Purpose Adhesive and then sprinkled Dazzling Diamonds glitter over the glue and tapped off the excess. The rose was set aside to dry while I created the leaves.
The leaves were made by punching Lucky Limeade cardstock three times with the 1 ¾” x 7/8” Oval Punch. The leaves were then folded in half and run through the crimper at an angle. Once you un-fold the cardstock you now have a leaf with veins! The leaves were sponged with Early Espresso ink and adhered underneath the rose. The rose was adhered to the box top with LOTS of Sticky Strip.

Mini Milk Carton Boxes by Sungee
Owl Punch Rose by Valita
Thanks for stopping by and I hope you’ve enjoyed all of my Halloween projects!
