
Good morning everyone!!! Here is the first card from the July Make and Take. Although the fabulous stamp Sail Away has sailed away with the Summer Mini catalog my guests got the chance to make this wonderful card before it went away. Even though everyone was intimidated by this card it really is easy. Take a look:

Stamps: Sail Away (retired), Woodgrain, Word Play
Cardstock: Pool Party, Island Indigo, Whisper White
Ink: Daffodil Delight, Peach Parfait, Basic Black, Marina Mist, Early Espresso
Accessories: 5/8" Basic Black Satin ribbon, Basic Black Marker, 1 3/4" Circle punch, Paper Snips, Stampin' Sponge, Top Note Die, Post-It Notes, Stampin' Dimensionals, Hobby Blade
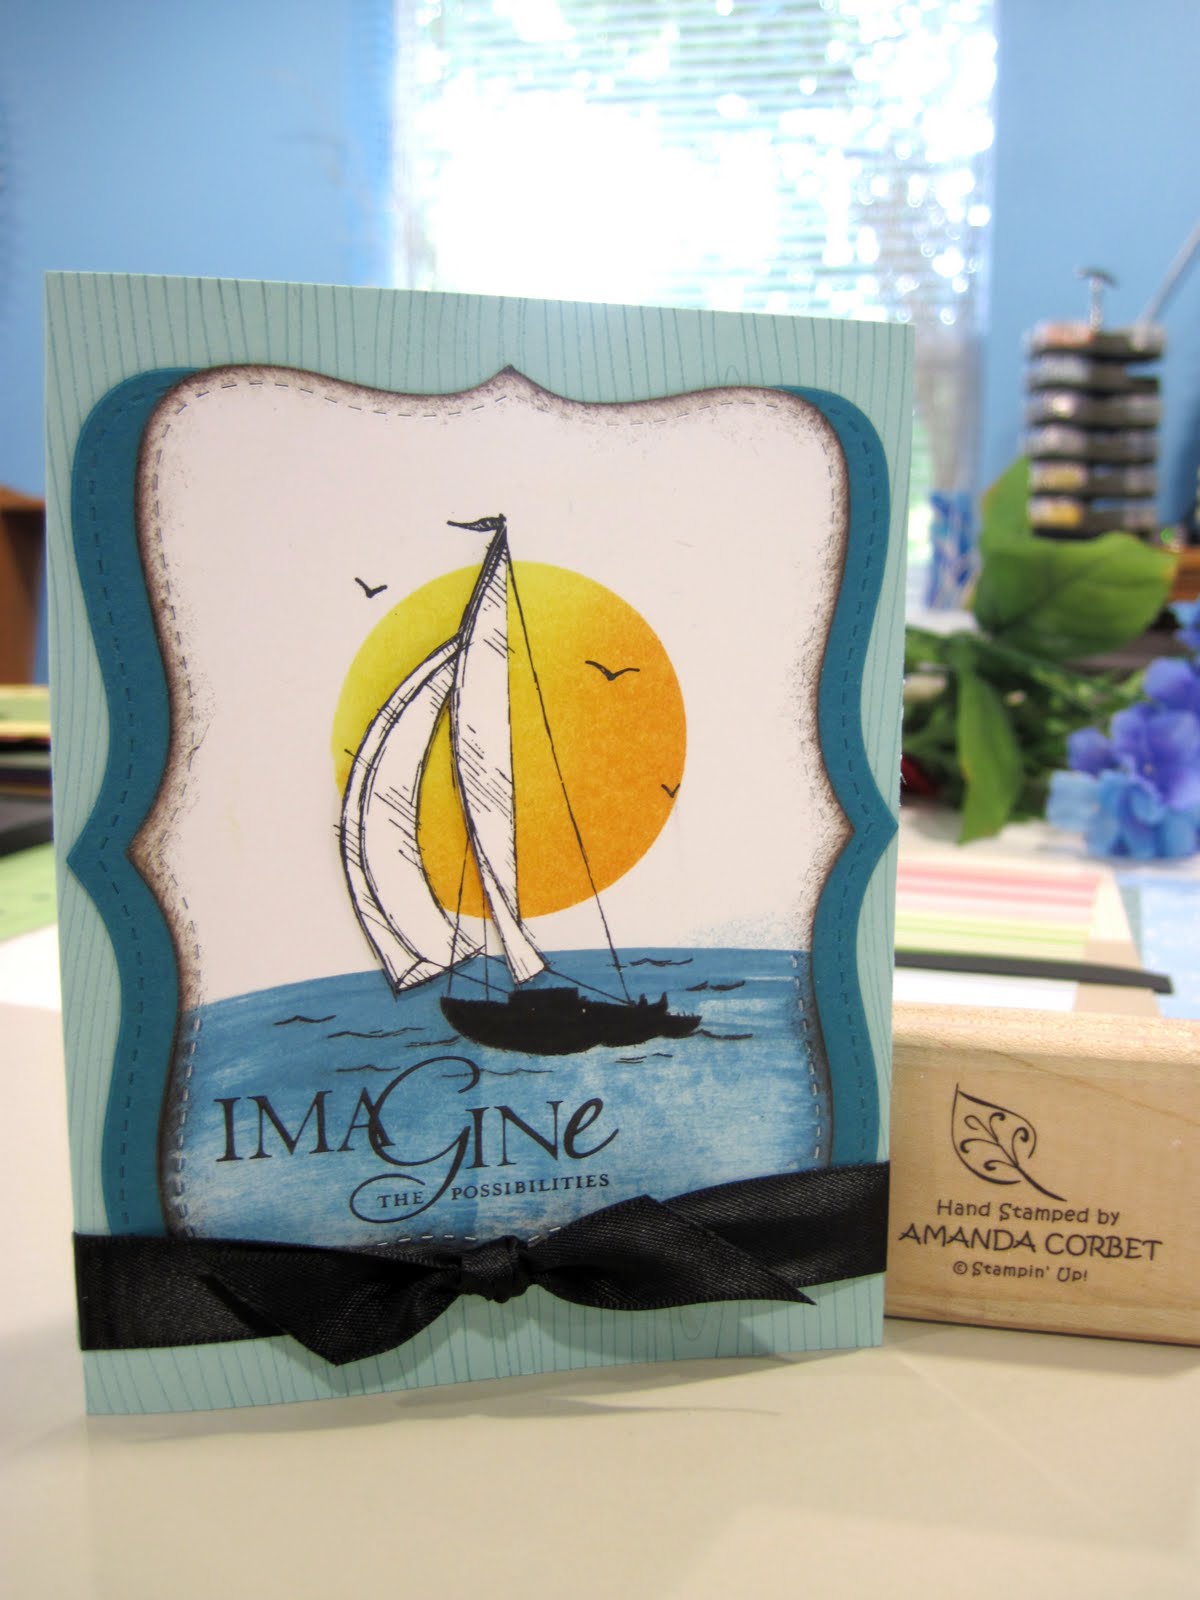
The card base is Pool Party cardstock cut at 5 1/2" x 8 1/2" and scored at 4 1/4". The card front was stamped with the Woodgrain background stamp with Pool Party ink. Next a piece of Whisper White and a piece of Island Indigo cardstock were cut at 4" x 5" and were both run through the Big Shot with the Top Note Die.
Cut the Island Indigo top note in half length-wise and trim off the points that were in the middle of the short sides. Adhere each top note half behind the stamped top note to create a mat on each side. Adhere this layer to the card front.

Thanks for stopping by!

Stamps: Sail Away (retired), Woodgrain, Word Play
Cardstock: Pool Party, Island Indigo, Whisper White
Ink: Daffodil Delight, Peach Parfait, Basic Black, Marina Mist, Early Espresso
Accessories: 5/8" Basic Black Satin ribbon, Basic Black Marker, 1 3/4" Circle punch, Paper Snips, Stampin' Sponge, Top Note Die, Post-It Notes, Stampin' Dimensionals, Hobby Blade
The card base is Pool Party cardstock cut at 5 1/2" x 8 1/2" and scored at 4 1/4". The card front was stamped with the Woodgrain background stamp with Pool Party ink. Next a piece of Whisper White and a piece of Island Indigo cardstock were cut at 4" x 5" and were both run through the Big Shot with the Top Note Die.
Right now we are going to use the Whisper White top note, so everything else can be set aside. Place a Post-It Note on a piece of copy paper and use the 1 3/4" Circle punch to punch a circle through the middle of the Post-It Note. Remove the Post-It Note from the copy paper. You do not want the circle, that can be put in the trash. You want the Post-It Note with the circle cut in the middle. Place the Post-It on top of your Whisper White cardstock with the circle where you want your sun to be. Use a Stampin' Sponge to sponge Daffodil Delight ink inside the entire circle. Now sponge Peach Parfait ink just on the bottom and right side of the circle. Now remove the Post-It note. Voila! You have a nice clean and perfectly shaded sun!
Ink up the Sail Away image with Black Stazon ink and stamp the sail boat where you want it on the card. Let the ink dry completely or use a heat tool to set the ink before continuing. Sponge the bottom portion of the Whisper White top note with Marina Mist ink to fill in the ocean area. Then take the ink pad directly to the paper and swipe the ink pad across the cardstock to create the horizon line. Next sponge the edges of the Whisper White top note with Early Espresso ink then stamp the greeting from Word Play in Basic Black ink. Color in the base of the boat with the Basic Black marker and set aside your beautiful top note.
Cut the Island Indigo top note in half length-wise and trim off the points that were in the middle of the short sides. Adhere each top note half behind the stamped top note to create a mat on each side. Adhere this layer to the card front.
Now stamp another sail boat in Black Stazon ink onto a scrap of Whisper White cardstock. Cut out the sails with Paper Snips and adhere the sails on top of the stamped top note image with Stampin' Dimensionals. Now open up your card and use a Hobby Blade to cut the fold of the card where you want your ribbon to go. Insert your Basic Black Satin ribbon through the slit in the card fold, wrap it around the card front, and tie it into a knot. Now you're done!

It really isn't that hard, you just have to be brave and trust my instructions. Anything you aren't sure about doing, like swiping the ink pad across the cardstock, try it out on a piece of copy paper first to get the hang of it. Also remember, if it was perfect it would be Hallmark not handmade! I hope you give this wonderful card a try if you have this stamp set!
Thanks for stopping by!
