Tuesday, November 19, 2013

Merry Little Christmas

It seems like this year is just flying by now. It's less than two weeks till Thanksgiving and it seems like it's just getting busier and busier. So many things to do... so little time. Well I have another card from the October Make and Take to share with you today. This one was inspired by Chiaki's card that you can find HERE


  • Stamps: Merry Little Christmas, Wishing  You
  • DSP: Season of Style
  • Card Stock: Gumball Green, Cherry Cobbler, Crumb Cake, Whisper White
  • Ink: Gumball Green
  • Markers: Gumball Green, Cherry Cobbler
  • Accessories: Season of Style Washi Tape, Brights Glimmer Brads, Chalk Talk Framelits, Stylish Stripes embossing folder, Paper Piercing Tool, Stampin' Pierce Mat, Stampin' Dimensionals

For this fun Christmas card start off with a 5-1/2" x 8-1/2" piece of Gumball Green card stock and score it at 4-1/4". Next cut a piece of polka dot Season of Style DSP 4" x 5-1/4" and adhere it onto the card front. 


Next cut a piece of Crumb Cake card stock 2-7/8" x 4-1/8" and run it through the Big Shot in the Stylish Stripes embossing folder. Add two strips of Season of Style Washi tape over two of the wide lines and use Paper Snips to trim the tape even with the edge of the card stock. Then adhere this onto a 3" x 4-1/4" piece of Cherry Cobbler card stock. Add this layer onto the card front with Stampin' Dimensionals. 


For the greeting ink up the image from Merry Little Christmas with Gumball Green and Cherry Cobbler markers. Breathe on the stamp to re-moisten the ink and stamp it onto a scrap of Whisper White card stock. Cut out the greeting in the Big Shot with the Chalk Talk framelits. Use a Paper Piercing Tool and Stampin' Pierce Mat to add a hole in the top and bottom of the label and insert two Glimmer Brads. Adhere this onto the card front with more Stampin' Dimensionals. 


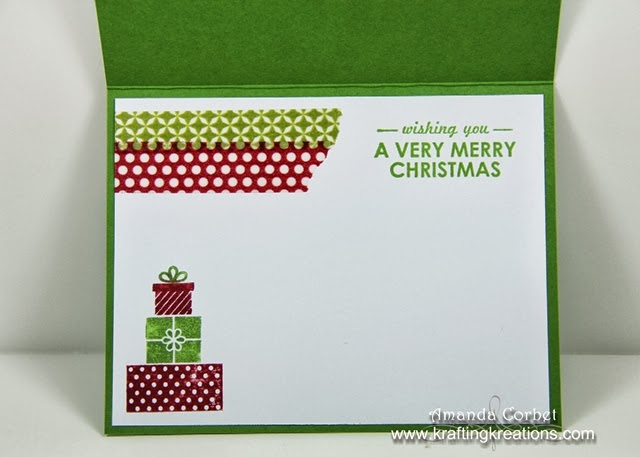
For the inside cut a piece of Whisper White card stock 4" x 5-1/4". Add two pieces of Season of Style Washi tape at the top. Stamp the greeting from Wishing You in Gumball Green ink next to the Washi Tape. Ink up the stack of presents from Wishing You with your markers, breathe on the stamp to re-moisten the ink and stamp the presents in the bottom left corner of the card stock. Adhere this inside the card and you're done! 

I absolutely LOVE the Wishing You stamp set! I can see it being used for much more than just Christmas cards. Birthday cards anyone???? Maybe even a wedding card? It's so versatile, just switch out the greetings with something else that fits! What other occasions could you use this stamp set for? 


Wednesday, November 13, 2013

Trick or Treat!

I wanted to make a fun candy pouch for Halloween. My Envelope Punch Board happened to be on the table and a light bulb went off. Why not use an envelope with just a belly band! So I started putting it together and in no time I was done! The Envelope Punch Board really did all the hard work.


  • Stamps: Halloween Bash
  • DSP: Witches' Brew
  • Card Stock: Pumpkin Pie, Whisper White, Summer Starfruit
  • Ink: Rich Razzleberry, Basic Gray
  • Accessories: Envelope Punch Board, Rhinestones, Stampin' Dimensionals, Labels Framelits, Sticky Strip, Stampin' Sponge, black permanent marker

For the envelope I just cut a piece of Pumpkin Pie card stock 5-1/2" x 5-1/2" and followed the directions on the Envelope Punch Board for a 2-1/2" x 3-1/2" envelope.


To make the Belly Band I cut a two pieces of DSP. The striped DSP was 1" x 7" and the black DSP was 1-1/4" x 7". I adhered the DSP together, then added a piece of Sticky Strip on one end. I put two small Kit Kat bars inside my envelope and folded it closed then wrapped the DSP around the middle of the envelope and adhered the Sticky Strip end onto the other end of the DSP. This makes the belly band. 


To decorate the Belly Band I stamped the greeting from Halloween Bash onto a scrap of Whisper White card stock in Rich Razzleberry ink. This was cut out with the smallest Labels Framelit. I used the second from smallest Labels Framelit on a scrap of Summer Starfruit card stock to cut out the larger label. I sponged both with Basic Gray ink and a Stampin' Sponge then adhered them together. I added the label onto the belly band with a couple Stampin' Dimensionals. Next I took a permanent marker and colored two large Rhinestones and added them onto the label. 

This was a super fast and really fun little pouch for some spooky treats! 


Tuesday, November 12, 2013

Designer Feathers!

Ever since I saw the presentation at the Stampin' Up! convention that showed us how to make feathers from DSP I knew I wanted to include that in a Make and Take project. Well the Sweater Weather DSP seemed like the perfect patterns to use. Although I cheated a little bit and just made fatter feathers. 


  • Stamps: Loving Thoughts, Truly Grateful
  • DSP: Sweater Weather
  • Card Stock: Soft Sky, Chocolate Chip, Very Vanilla
  • Ink: Chocolate Chip, Crushed Curry
  • Accessories: Summer Starfruit Stitched Satin Ribbon, Neutrals Buttons, Linen Thread, Multipurpose Liquid Adhesive, Paper Snips, XL Oval Punch, Large Oval Punch


For this card I started off with a 5-1/2" x 8-1/2" piece of Soft Sky card stock and scored it at 4-1/4". Next I cut a piece Chocolate Chip card stock 3-7/8" x 5-1/8" and a piece of Very Vanilla 5" x 3-3/4". I stamped the chevron image from Truly Grateful onto the card stock in Crushed Curry ink. Then I stamped the greeting from Loving Thoughts onto the bottom left hand corner in Chocolate Chip ink. 


I adhered the Very Vanilla card stock onto the Chocolate Chip card stock then wrapped a piece of Summer Starfruit Stitched Satin ribbon around the card stock panel and tied it into a knot. I adhered this layer onto the card front. Next I took some Linen Thread and wrapped it around the knot in the Summer Starfruit ribbon, tied the thread into a knot, threaded it through a Crumb Cake button and tied the linen thread into a bow. I find this is the best way to attach a button onto a bow or knot so that it won't fall off ever! I hate it when I pick up a card later and see that something has fallen off.  


For the feathers I used the XL Oval Punch twice and the Large Oval Punch once on Sweater Weather DSP. Then Fold the DSP long ways and use Paper Snips to cut in fringe at an angle almost all the way to the fold of the DSP. Unfold it, fluff the edges a little bit and you've got an instant feather! I used some Multipurpose Liquid Adhesive to glue the feathers behind the knot in the ribbon. 


On the inside I added a 1/4" x 5-1/2" strip of Sweater Weather DSP and stamped a few acorns from Truly Grateful in Chocolate Chip ink. I just love those fun feathers!


Sunday, November 3, 2013

Beautiful Butterfly

Back during the July Make and Take, I think, my sister made the comment that the card we were making was so pretty that she could almost put it in a frame. So.... for her birthday I did just that! Well almost. 


  • Stamps: Creative Elements, Swallowtail, Everything Eleanor
  • Card Stock: Pink Pirouette
  • Ink: Pink Pirouette, Strawberry Slush, Versamark
  • Accessories: White embossing powder, Heat Tool, Embossing Buddy, Aqua Painter, Frost White Shimmer Paint, Rhinestones, Whisper White organza ribbon, Sponge Dauber


For this project I started off with a 5" x 7" piece of Pink Pirouette card stock. I stamped the swirls from Everything Eleanor all over the card stock in Pink Pirouette ink. Next I ran my Embossing Buddy all over the card stock then stamped the Swallowtail image in Versamark ink. I covered the image with White embossing powder, tapped off the excess, and heated it with my Heat Tool.


Next up I took a Sponge Dauber and sponged Strawberry Slush ink inside the butterfly. Then I took an Aqua Painter filled with rubbing alcohol and painted on some Frost White Shimmer Paint to make the butterfly sparkly. 


I stamped the "create" image from Creative Elements onto the card stock in Strawberry Slush ink. Some Rhinestones under the word "create" and in the upper left hand corner added just the right amount of sparkle. Then to finish it off I wrapped a piece of Whisper White organza ribbon around the card stock and tied into a bow. 


All that was left was to pop it into a 5" x 7" picture frame. I knew I wanted a really chunky over the top frame in a bright pink. However, I didn't want to take the time to spray paint it and seal it. So I went browsing on Etsy and found this one at Frame It by Jill. THIS is the same style of frame I ordered, but obviously a different color.

I might just have to make another one for myself to display in my craft room... Except in blue or turquoise of course!


Saturday, November 2, 2013

Kelly's Birthday Presents!

I made my wonderful sister a few different presents for her birthday this year. First is a camera strap that hopefully has a expandable pocket large enough for her big camera lens caps. I don't have any large lens caps to test it with, but it was big enough for my iPhone and case! 


Next was a drip art canvas in colors for her office. I was going to frame it, but thought she would rather have a frame that matched the rest of her decor instead of whatever I might find. 


I just love the texture that the water creates with the paint. 


And the sparkle of the glitter paint! Everything has to sparkle at least a little bit. It's a rule. I promise!


I also made her another smaller piece of framed art that I will be sharing tomorrow. Make sure you come back to see it! 


Thursday, October 31, 2013

Merry Christmas!

I have had the idea for this card bouncing around in my head for the last two weeks! But I couldn't manage to get into my craft room long enough to make it until last night. Yes, it's been two weeks since I've made a card. Gasp! I know.... it's just terrible! I have had a moment here or there to work some on Christmas gifts, but you can't see those until after Christmas. 


  • Stamps: Very Merry, Endless Wishes photopolymer
  • Card Stock: Coastal Cabana, Whisper White, Pool Party Coredinations
  • Ink: Pool Party, Coastal Cabana, Midnight Muse
  • Accessories: Mosaic Punch, Large Oval Punch, Silver Glimmer Paper, Rhinestones, Stampin' Dimensionals, Pretty Print embossing folder, Silver 1/8" Ribbon, Glue Dot, Sanding Block


I created this card for the Craft Project Central Creating Pretty Cards challenge #28. Today is the deadline for it so I'm just barely squeaking by on this one! Take a look at the other wonderful cards that were entered! 

This card was pretty simple to put together. I wasn't entirely feeling the mojo last night so I just stuck with the first card front piece that I found on my desk and stuck with a monochromatic look. So if you want to recreate this start off by cutting a piece of Coastal Cabana card stock 4-1/4" x 11" and score it at 5-1/2". Next cut a piece of Pool Party coredinations card stock 3-3/4" x 5" and run it through the Big Shot in the Pretty Print embossing folder. Use the Sanding Block to sand off some of the raised texture then adhere this onto a 4" x 5-1/4" piece of Whisper White. Then adhere this onto the card front. 

Next cut three strips of Silver Glimmer paper 1/8" x 3-3/4" and use 2-Way Glue Pen to adhere the strips evenly across the card front. Next stamp the image from Very Merry onto a scrap of Whisper White card stock in Coastal Cabana ink three times. Punch out each ornament with the Mosaic punch and adhere them onto the card front with a Stampin' Dimensional. Add a small Rhinestone into the center of each ornament. Next tie a small bow in the 1/8" Silver ribbon and use a Glue Dot to adhere it just above the middle ornament. 

For the greeting I stamped the "Merry" in Coastal Cabana ink, the "Christmas" in Midnight Muse ink, and the snowflakes in Pool Party ink. I just love these Photopolymer stamps! It is so easy to get the stamp in exactly the right spot! Love it! Anyway, after I got all my stamping for my greeting done I punched it out with the Large Oval punch. I also used the Large Oval punch on a scrap of Coastal Cabana card stock. I used some Paper Snips to cut the oval in half and adhered the two halves behind the greeting oval. This was finally adhered onto the card front with a Stampin' Dimensional. 

Done! A fun and simple Christmas card all ready to go!