Saturday, December 24, 2011

24 Days of Christmas Day 24

Here is what I recieved for Day 24!


It's a beautifully decorated bottle filled with instant coffee. I'm not a coffee drinker but the bottle is super cute!


And here is a little gift that I recieved from the hostess of the swap. It's an adorable mini milk carton box.


Inside were some Hershey's Kisses!


Thanks for stopping by!

Friday, December 23, 2011

24 Days of Christmas Day 23

Here is what I received on Day 23!


Inside is a snowman air freshener!


Thanks for stopping by!

Fancy Favor Christmas Luminaries

This is actually a project that I made for a Make and Take last year, but never got around to posting. It's amazing what you'll find when you start cleaning up your photo folders!


Stamps: Simple Snowflake, Jolliest Time of the Year
Card Stock: Cherry Cobbler, Old Olive, Whisper White
Ink: Basic Black
Accessories: 2-3/8" Scalloped Circle punch, 1-3/4" Circle punch, Northern Flurries Die, Fancy Favor die, Paper Piercer, Mat Pack, Gold Brad, Vellum card stock, battery operated tea light, Two-Way Glue Pen, Tombow Multi-Purpose Adhesive


The other side is stamped with a snowman.

This was super easy to make. Just cut out the Cherry Cobbler card stock large enough to fit on the Fancy Favor die. Run the card stock through the Big Shot with the die to cut out the box. Stamp the card stock with the Simple Snowflake image in Basic Black ink to give it a background pattern. Use the 1-3/4" Circle punch to punch a hole in both of the large side panels of the box.

For the Old Olive frame punch a 1-3/4" Circle from Old Olive card stock. Then line up the 2-3/8" Scalloped Circle punch so that the 1-3/4" circle hole is in the center, then punch. This will create your frame. You will need two of these. Adhere the frame onto the outside of the box with Two-Way Glue Pen. Next stamp the tree and snowman image onto a piece of Vellum card stock. Punch out the tree and the snowman with the 2-3/8" Scalloped Circle punch. Adhere these onto the inside of the box with Tombow Multi-Purpose Adhesive.

Next run a piece of card stock through the Big Shot on the Northern Flurries die. Pick out two snowflakes and pierce a hole through the center of each snowflake with the Paper Piercer and Mat Pack. Then use the Paper Piercer and Mat Pack to pierce a hole in the side of your box next to the "window frame" where you want your snowflakes. Use a gold brad to attach the two snowflakes onto the box.

Fold on all of the score lines, add sticky strip to the side flap and one of the bottom flaps. Form the box by adhere the sides together first, then closing up the bottom.


This creates a cute little lumiary to decorate for the holiday season and they are quick and easy to whip up for a last minute gift!
 
Thanks for stopping by!

Thursday, December 22, 2011

24 Days of Christmas Day 22

This is what I recieved for Day 22!


Three great gift tags for homeade goodies! Although they will go into my stash for next year because I've been too busy working on Christmas presents to bake anything!


Thanks for stopping by!

Stocking Punch and Card Class

Unfortunately the Stocking Builder Punch will NOT be carried over into the Idea Book and Catalog next year. Once the current stock is depleted you will not be able to order it! So if you don't already have it then make sure you order it soon before it's too later and there are no more!

I also wanted to share with you the project from the Stocking Punch Class that I never posted. So here they are:

*********************************************************************************

Merry and Bright


Stamps: Stitched Stockings
Card Stock: Old Olive, Whisper White
DSP: Letters to Santa
Ink: Old Olive
Accessories: Snow Burst embossing folder, Stocking Builder Punch, 5/8" Chocolate Chip Satin ribbon, Stampin' Dimensionals, Simply Score, craft knife


*********************************************************************************

Hobby Horse 


Stamps: Stitched Stockings
Card Stock: Very Vanilla, Early Espresso, Crumb Cake
DSP: Letters to Santa
Ink: Pretty in Pink, Early Espresso
Accessories: Perfect Polka Dots embossing folder, Stocking Builder Punch, 1/8" Rich Razzleberry Taffeta ribbon, Basic Black Marker, Two-Way Glue Pen, Stampin' Dimensionals


*********************************************************************************

Stockings All in a Row


Stamps: Curly Cute
Card Stock: Early Espresso, Cherry Cobbler, Very Vanilla, Old Olive
DSP: Letters to Santa
Ink: Early Espresso
Accessories: Stocking Builder Punch, Scallop Edge Border Punch, Paper Piercer, Mat Pack, Mini Jingle Bells, Cherry Cobbler Baker's Twine, Stampin' Dimensionals, Two-Way Glue Pen, Corner Rounder Punch


*********************************************************************************


Ice Skates 


Stamps: Simple Snowflake, Stitched Stockings, Teeny Tiny Wishes
Card Stock: Night of Navy, Bashful Blue, Whisper White, Brushed Silver
DSP: Letters to Santa
Ink: Bashful Blue, Night of Navy
Accessories: Basic Black Marker, Scallop Trim Border Punch, Stocking Builder Punch, Bird Punch, Modern Label Punch, Word Window Punch, 5/8" Bashful Blue Satin ribbon, Silver Mini Brads, Stampin' Dimensionals, Two-Way Glue Pen, Paper Snips, Paper Piercer, Mat Pack


*********************************************************************************


Baby Booties 


Stamps: Stitched Stockings, Teeny Tiny Wishes
Card Stock: Marina Mist, Whisper White, Early Espresso, Bashful Blue
DSP: Letters to Santa
Ink: Marina Mist
Accessories: Stocking Builder Punch, Dotted Scallop Ribbon Punch, 5/8" Bashful Blue Satin Ribbon, Curly Label Punch, Perfect Polka Dots embossing folder, Basic Rhinestones, Scallop Square Duo die, Stampin' Dimensionals, Paper Snips, Two-Way Glue Pen


*********************************************************************************


Noel 


Stamps: None
Card Stock: Always Artichoke, Old Olive
DSP: Letters to Santa, Red Glimmer Paper
Ink: None
Accessories: Lucky Limeade Marker, Dazzling Details, Stocking Builder Punch, Two-Way Glue Pen, Tombow Multi-Purpose Adhesive, Lucky Limeade ribbon, Stampin' Dimensionals


*********************************************************************************


 Vintage Christmas Stocking


Stamps: Stitched Stockings, Season of Joy
Card Stock: Crumb Cake, Very Vanilla, Early Espresso
DSP: Letters to Santa
Ink: Cherry Cobbler
Accessories: Decorative Label Punch, Stocking Builder Punch, Snow Burst Folder, 5/8" Very Vanilla Satin Ribbon, Stampin' Dimensionals, Stampin' Sponge, Two-Way Glue Pen


*********************************************************************************

There are so many wonderful things you can create with the Stocking Punch so make sure to get yours on order soon if you don't already have it!

Thanks for stopping by!


Wednesday, December 21, 2011

24 Days of Christmas Day 21

Here is what I recieved on day 21! Another beautifully wrapped package!


Inside was.... a KitKat bar! Yum! More chocolate!


Thanks for stopping by!

24 Days of Christmas Day 10

I had previously forgotten to take a picture of what I recieved for Day 10 of the 24 Days of Christmas! Then after I remembered to take the picture, I forgot to post it for you too see! There is just way too much going on this time of year!

Anyway... this is what I recieved for Day 10.


An adorable snowman Tic-Tac holder!

Thanks for stopping by!

Winter Lake

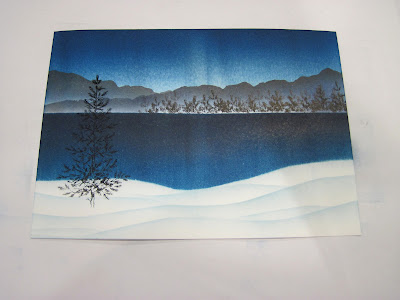
Since I did two groups of projects for the 12 Days of Christmas Swap I wanted to give two different pictures for the 12th gift. Yesterday I posted the first one which you can find HERE. Here is the second picture from day 12 of the 12 Days of Christmas swap. This one is a cold winter lake.


Stamps: Lovely as a Tree
Cardstock: Whisper White
Ink: Bashful Blue, Pacific Point, Not Quite Navy, Night of Navy, Basic Black, Black Stazon
Markers: Always Artichoke, Basic Black
Accessories: 5/8" Bashful Blue Satin Ribbon, Northern Flurries Die, Glimmer Brad, Mini Glue Dots, Tombow Multi-Purpose Adhesive, Dazzling Diamonds glitter, Post-It Notes, Brayer, Paper Snips, Paper Piercer, Mat Pack, White Gel Pen, Stampin' Sponge


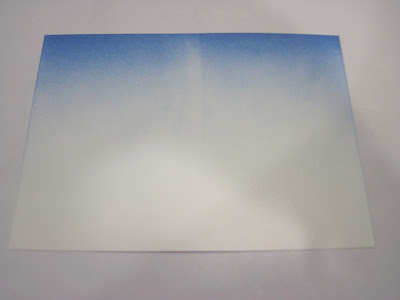
1. Cut a piece of Whisper White card stock 5" x 7". Brayer to top of the card stock with Bashful Blue ink.

2. Place two post it notes where you want your horizon line to be.


3. Brayer across the top of the card stock with Pacific Point ink not covering the Bashful Blue ink entirely.


4. Brayer across the top of the card stock with Not Quite Navy ink not covering the Pacific Point ink entirely.


5. Brayer across the top of the card stock with Night of Navy ink not covering the Pacfic Point ink entirely.


6. Tear the sticky portion of two more Post-It notes and position them where you want your first row of mountains to be.

7. Sponge Night of Navy ink in the entire exposed area. Sponge Basic Black ink right at the torn Post-It note edge.

8. Remove the moutain mask.


9. Re-position one of the Post-It notes to create a seond mountain. Sponge the entire area with Night of Navy ink and then sponge along the Post-It note edge with Basic Black ink.


10. Remove the Post-It note mask.


11. Remove the Post-It notes from the bottom and re-position them to cover the top portion of the card stock. Cut the sticky part of two Post-It notes with Paper Snips in a curvy line. Place these over the bottom of the card stock. This will be the snowy bank of the lake.


12. Brayer the entire area with Pacific Point ink.


13. Brayer the top portion of the water with Not Quite Navy ink not covering the Pacific Point ink entirely.


14. Brayer the top portion of the water with Night of Navy ink not covering the Not Quite Navy ink entirely.


15. Remove all of the Post-It note masks.


16. Place two more Post-It notes along the horizon line covering the bottom portion of the card stock.


17. Ink up the top of the pine tree from Lovely as a tree with Basic Black ink. Stamp just the top portion of the tree several times across the edge of the Post-It note. Remove the mask. This creates a forest on the far side of the lake.


18. Take one of the curvy Post-It notes and position it in the remaining white portion of the card stock.

19. Sponge Bashful Blue ink just at the Post-It note edge to create a snow mound.


20. Remove the mask, re-position it, and sponge another snow mound. Repeat until you have the desired look.

21. Stamp the pine tree from Lovely as a Tree in Black Stazon ink onto the card stock.


22. Color in the trunk of the tree with Basic Black Marker. Color in the pine needles with Always Artichoke, add snow onto the pine branches with the White Gel Pen. Add lines to the water with the White Gel Pen. Apply Tombow Multi-Purpose Adhesive onto the snow mounds and the snow on the tree and cover with Dazzling Diamonds glitter. Allow the adhesive to dry completely. Insert the card stock into the picture frame.

Tie a bow with 5/8" Bashful Blue Satin ribbon. Adhere to the frame with Mini Glue Dots. Cut one snowflake from Bashful Blue card stock and one from Whisper White card stock using the Northern Flurries Die in the Big Shot. Spray the snowflakes with shimmer mist. Use the Paper Piercer and Mat Pack to pierce a hole in the center of the snowflakes. Insert a silver Glimmer Brad into the hole. Adhere the snowflakes onto the bow with Mini Glue Dots.


Thanks for stopping by!