Friday, July 9, 2010

Trendy Masculine Birthday

Today I have another Birthday card for you to enjoy! This one is a more masculine card that will go to my wonderful husband for his Birthday on Saturday. It's always harder to come up with masculine cards for some reason. Take a look!


Stamps: Trendy Trees, Solid Stripes, Perfect Punches
Cardstock: Basic Grey, Sahara Sand, Whisper White, Cajun Craze
Ink: Early Espresso, Sahara Sand, Always Artichoke, Old Olive, Basic Black
Accessories: Square Lattice Textured Impressions ie, 5/8" Basic Black Satin ribbon

The card base is Basic Grey cardstock cut at 5 1/2" x 8 1/2" and scored at 4 1/4". Then a piece of Sahara Sand cardstock is cut at 4" x 5 1/4" and run through the Big Shot with the Square Lattice Textured Impressions die. The brayer is used with Early Espresso ink to add ink to the raised texture. A piece of 5/8" Basic Black Satin ribbon is added around the textured cardstock and this is adhered to the card base.


The image panel is a piece of Whisper White cardstock cut at 2 7/8" x 4 1/8". I used the Solid Stripes stamp with the Stamp-A-Ma-Jig to stamp across the bottom of the cardstock in Sahara Sand ink. Then I stamped the stripes again with Always Artichoke ink with the darker stripes slightly offset from the other. The trees from Trendy Trees were stamped above the stripes in Old Olive ink for the tree tops and Early Espresso for the tree trunks.


To complete the panel I used the direct to paper technique with Old Olive and Always Artichoke ink by swiping across the center of the panel. This creates the ground under the trees. The sentiment from Perfect Punches was stamped in Basic Black ink right on top of the image panel. This panel was adhered to a piece of 3" x 4 1/4" Cajun Craze cardstock and then adhered to the card front using Stampin Dimensionals to pop it up.


I will try to have a fun tutorial for you tomorrow! Have fun stamping!

Thursday, July 8, 2010

New Color Birthday Card

Hello all my blog-world friends. I said yesterday that I didn't know what I would have for you today. So after thinking about it for a while I decided to do a couple of Birthday cards since I will be needing some this weekend anyway. Besides...I don't always have to wait until the day of to make the Birthday cards. It's nice to have things done ahead of time once and a while...

Anyway here is the first Birthday card I created and it uses the New Colors: Early Espresso, Cajun Craze, Cherry Cobbler, Marina Mist, and Daffodil Delight!


Stamps: Cute By The Inch, Occasional Quotes, Because I care
Cardstock: Whisper White, Early Espresso, Cajun Craze, Cherry Cobbler, Marina Mist, Daffodil Delight
Inks: Whisper White Craft, Cherry Cobbler, Marina Mist, Daffodil Delight
Accessories: Vintage Wallpaper Textured Impressions die, 1/8" Marina Mist Taffeta ribbon, Gold Glow Smooch Spritz, Stampin Dimensionals, Curly Label Punch.

The stamp sets I used for this card are all Hostess sets in the new catalog. Check out the bar to the right if you haven't seen the wonderful new catalog with all the new products and stamp sets! You can earn these stamp sets for FREE by hosting a workshop. What could be better than getting free stamps and free SU products right? Now back to the card.

The card base is Whisper White cardstock cut at 5 1/2" x 8 1/2" and scored at 4 1/4". I cut a piece of Early Expresso cardstock 2 1/2" x 5 1/2" and used the Big Shot and the new Vintage Wallpaper Textured Impressions die to give the cardstock some texture. Then I used the direct to paper technique on the debossed side of the cardstock with Whisper White Craft ink. This takes a while to dry but I just love the way it looks. This was then layered on a piece of Cajun Craze cardstock cut at 2 5/8" x 5 1/2".

I stamped the three images from Cute By The Inch in Cherry Cobbler, Marina Mist, and Daffodil Delight ink on a scrap piece of Whisper White cardstock and used Paper Snips to cut around them. I just love these little scissors because they cut through cardstock so easy and they are small so they work great for cutting out detailed images. I then glued these on a scrap piece of Early Espresso cardstock and cut around it with the Paper Snips leaving a small border.

I used the Curly Label Punch to punch a label from Cherry Cobbler, Marina Mist, and Daffodil Delight cardstock. 1/8" Marina Mist Taffeta ribbon was wrapped around this panel and tied into a knot in between where the Marina Mist and Daffodil Delight labels were going. The stamped images were glued to their corresponding color curly label and then glued to the textured Early Espresso piece. For the Daffodil Delight label I really wanted to make it stand out from the other two. So I sprayed it with Gold Glow Smooch Spritz before adding the image to the center then adhered this to the card with Stampin Dimensionals to make it pop up off the card.


This panel was added to the Whisper White card base. The sentiment from Occasional Quotes was stamped in Daffodil Delight ink on the card base. Underneath the sentiment I stamped the border from Because I Care in Marina Mist. What do you think?

Come back tomorrow to see a masculine birthday card! Its gonna be great!

Wednesday, July 7, 2010

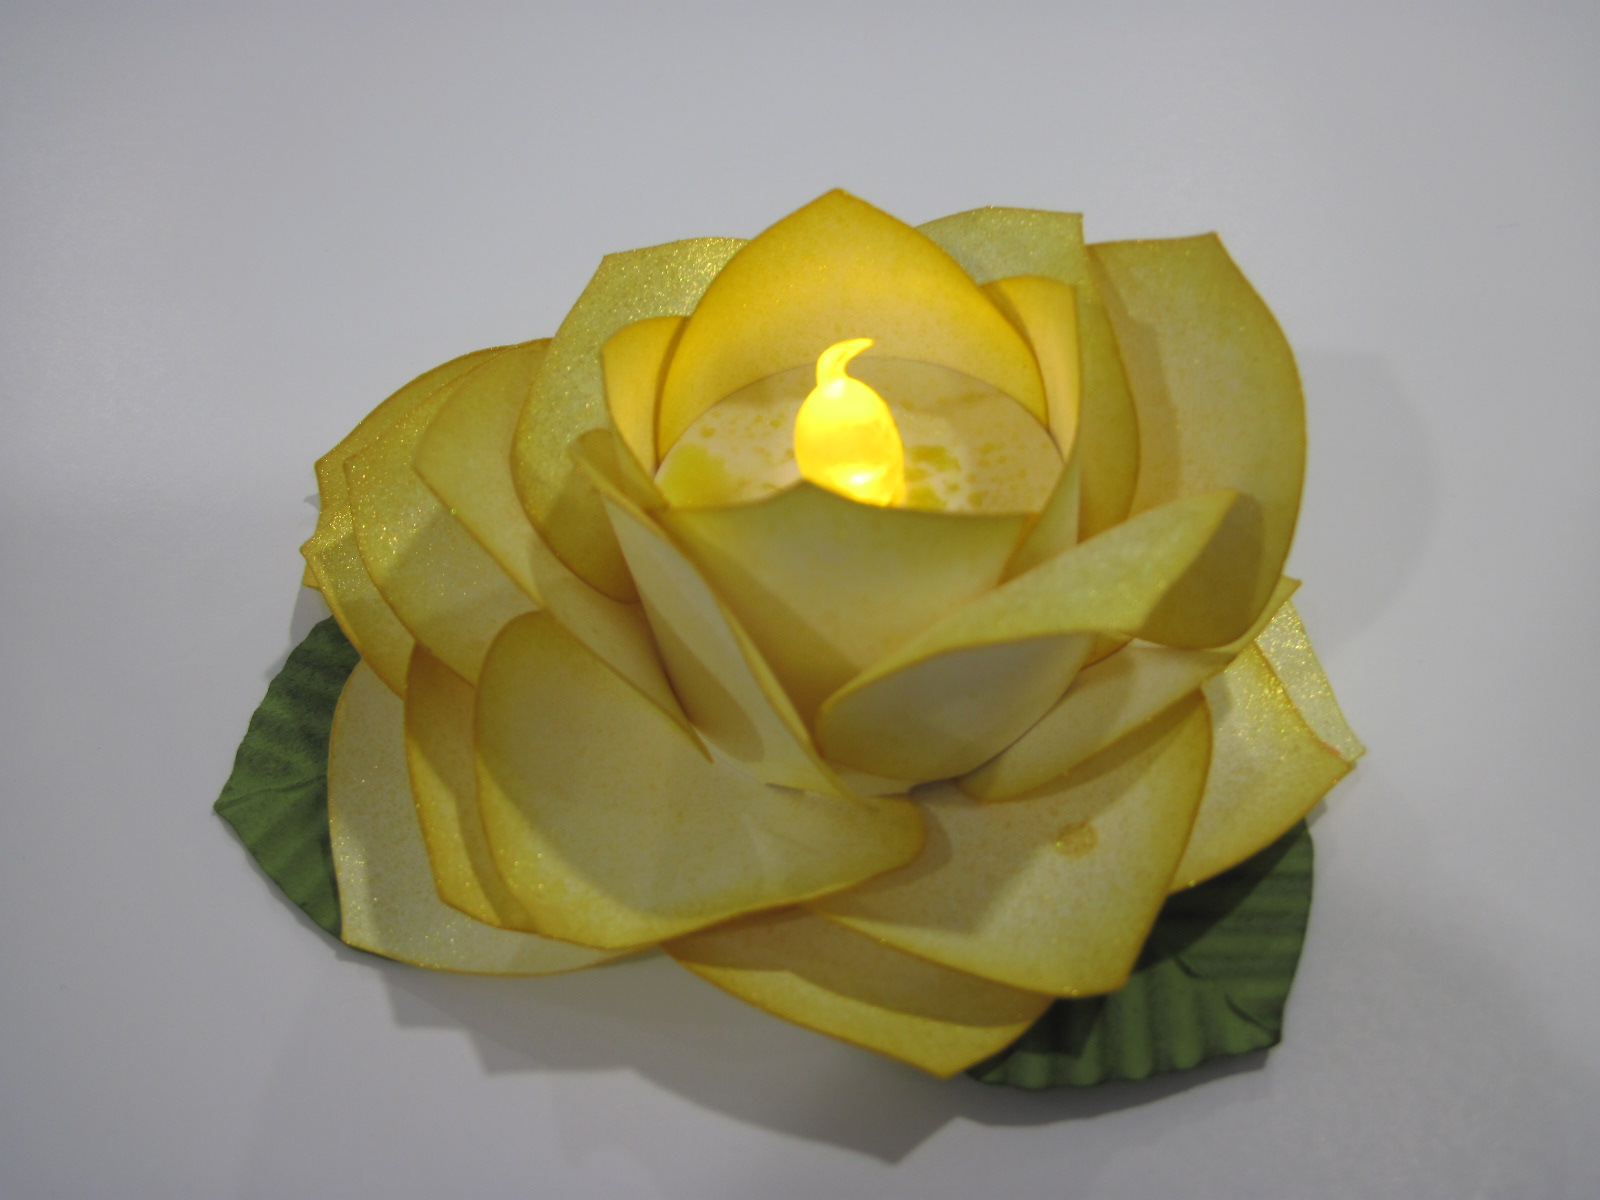
Candlelight Rose

I have seen several of these roses made with the Ornament Punch. They are all absolutely beautiful! But when I saw the one that Kathy Braun posted on her blog. Here you will find a fantastic video tutuorial showing you how to make your own Candlelight rose.

Here is the first one I made and I just absolutely LOVE how this turned out! I will definitely be making more of these!

Cardstock: Very Vanilla, Old Olive
Ink: Daffodil Delight, Always Artichoke
Accessories: Ornament Punch, 2 3/8" Scalloped Circle Punch, Gold Glow Smooch Spritz, Sticky Strip, Crimper


Now I did a couple of things differently than Kathy did. I punched 25 ornaments from Very Vanilla cardstock using the Ornament Punch. Then I sponge both sides of the ornaments with Daffodil Delght ink. I just love this new yellow! I used the 2 3/8" Scalloped Circle Punch to punch a piece of Old Olive cardstock fo the base to adhere all the petals and leaves onto.

The leaves are made by punching Old Olive cardstock with the Ornament Punch. Then score right down the center of your ornaent from the point to the center of the top of the ornament.

Fold the ornament in half and run through the Crimper at approximately a 45 degree angle starting with the fold touching the crimper. Then unfold your leaf and sponge lightly across the ridges with Always Artichoke ink. This will give you very nice leaves.

Instead of keeping the center "bud" of the rose seperate from the base I used my Crop-A-Dile to punch the larger hole in the bottom approximately where the switch would go with the candle centered. Then I glued the center down with Sticky Strip making sure that the switch lines up with the hole.  After I assembled the rose completely I covered the leaves with post-it notes and sprayed the entire rose with Gold Glow Smooch Spritz to give it a nice gold sparkle.

You have to use a needle tool or a pen to turn on the tea-light, but at least you don't have to worry about the center of the rose falling out.

I'm not sure what I'll have for you tomorrow, but come back to check out whatever crafty thing I come up with tonight!

Tuesday, July 6, 2010

Bashful Black and White Butterfly

This is the second and final card I made for the Black and White with a Splash Swap that was posted on Stampin’ Connection. These were a little difficult to design but I really like the effects of working with limited supplies while still trying to make the card exciting. Take a look!


Stamps: Baroque Motifs
Cardstock: Whisper White, Basic Black
Ink: Basic Black, Whisper White Craft
Accessories: 5/8” Bashful Blue Satin ribbon, Bashful Blue brads, Designer Label punch, Beautiful Wings Embosslit Die, Dazzling Diamonds glitter, Crystal Effects

The card base is Whisper White cardstock cut at 5 ½” x 8 ½” and scored at 4 ¼”. The next layer is a piece of Whisper White cardstock cut at 4” x 5 ¼”. I then ran this piece of cardstock through the Big Shot with the Square Lattice Texture Impressions die. Then the brayer was used to add Basic Black ink to the raised texture to make it stand out more.

Then I used the Big Shot with the Top Note die to cut out a piece of Basic Black cardstock. This was then stamped with the swirls from Baroque Motifs in Whisper White craft ink. After the craft ink dried added a piece of 5/8” Bashful Blue Satin ribbon around the top note.

On a scrap piece of Whisper White cardstock I stamped the sentiment in Basic Black ink and next to the sentiment I stamped the flower by stamping off (Inking up once, stamping on a piece of scrap paper, and then stamping on your project). This was punched out with the Designer Label punch. I also punched out another Designer Label from Basic Black cardstock and another from Whisper White cardstock. The two non-stamped labels were cut in half long-ways with scissors and adhered behind the stamped Designer Label to add layers. This was adhered to the Basic Black top note.


The butterfly was cut with the Big Shot and the Beautiful Wings Embosslit Die from Whisper White cardstock. I used Crystal Effects to color in the embossed lines and added Dazzling Diamonds glitter. Then after that was dry I covered the entire butterfly with a layer of Crystal Effects to make it shiny. After the butterfly was dry the needle tool was used to pierce two holes through the center of the butterfly. Two Bashful Blue brads were inserted into the holes to make the butterfly body. Then I used the needle tool to curl the butterfly wings and give them some shape. This was adhered to the Basic Black top note with a couple of Mini Glue Dots.


The main image panel was adhered to the card front and it was done! This one involved some drying time but was well worth the wait!

On a side note to the other demonstrators who participated in the swap. I apologize for using Bashful Blue ribbon and brads. I knew that Bashful Blue was not a retiring color, but did not realize until now that the Bashful Blue 5/8” Satin ribbon and brads were retiring. However, this could easily be duplicated with 5/8” Marina Mist Satin ribbon and Marina Mist brads.

I hope you’ve enjoyed taking a peek at this creation! Come back tomorrow to see something fabulous created with the Ornament Punch!

Monday, July 5, 2010

Black and Grey Flourishes

Recently I participated in a swap on Stampin’ Connection. The idea was to make a card that was entirely black and white with a little splash of color. But the color could not be ink or cardstock. Tricky huh? Well this is the first of the cards that I came up with and the “splash” of color is Very Vanilla!


Stamps: Friends 24-7, Baroque Motifs
Cardstock: Basic Black, Whisper White
Ink: Basic Black
Accessories: Vanilla Hodgepodge Hardware, 5/8” Vanilla Satin ribbon, Stamp-A-Ma-Jig, Designer Label Punch


The card base is Whisper White cardstock cut at 4 ¼” x 11” and scored at 5 ½”. The image panel is a piece of Whisper White cardstock cut at 3 7/8” x 5 1/8”. I then used the Stamp-A-Ma-Jig with the flourish from Friends 24-7 and Basic Black ink to make my own designer paper. After the patterned paper was completed I used the swirls from Baroque Motifs inked up with Basic Black, but before I stamped the image panel I stamped a couple of times on a piece of scrap paper and then stamped on the image panel. This made the image in a shade of grey that looks to be behind the Basic Black flourishes even though it was from the same ink pad. This technique is called stamping off.

The image panel was then adhered to a piece of Basic Black cardstock cut at 4 1/8” x 5 3/8”. On a piece of scrap Whisper White cardstock I stamped the swirls from Baroque Motifs just like I did earlier by stamping off. Then I used the sentiment from Friends 24-7 in Basic Black ink on top of the swirls. This was then punched out with the Designer Label punch. I added the label to the front of the image panel using the Designer Label hardware and brads from the Very Vanilla Hodgepodge Hardware kit.

The image panel was adhered to the card base and a piece of 5/8” Very Vanilla Satin ribbon was added and tied into a knot. I really like how elegant this one turned out. Making the designer paper took a little while, but it was well worth it!

Come back tomorrow to see the other card I made for the Black and White with a Splash Swap! I just know you’ll love it!

Sunday, July 4, 2010

Father's Day Light

First off let me say HAPPY 4TH OF JULY!!!!!


I really love 4th of July, but I will be glad when people in my neighborhood quit shooting off fireworks. Now on to crafty stuff!

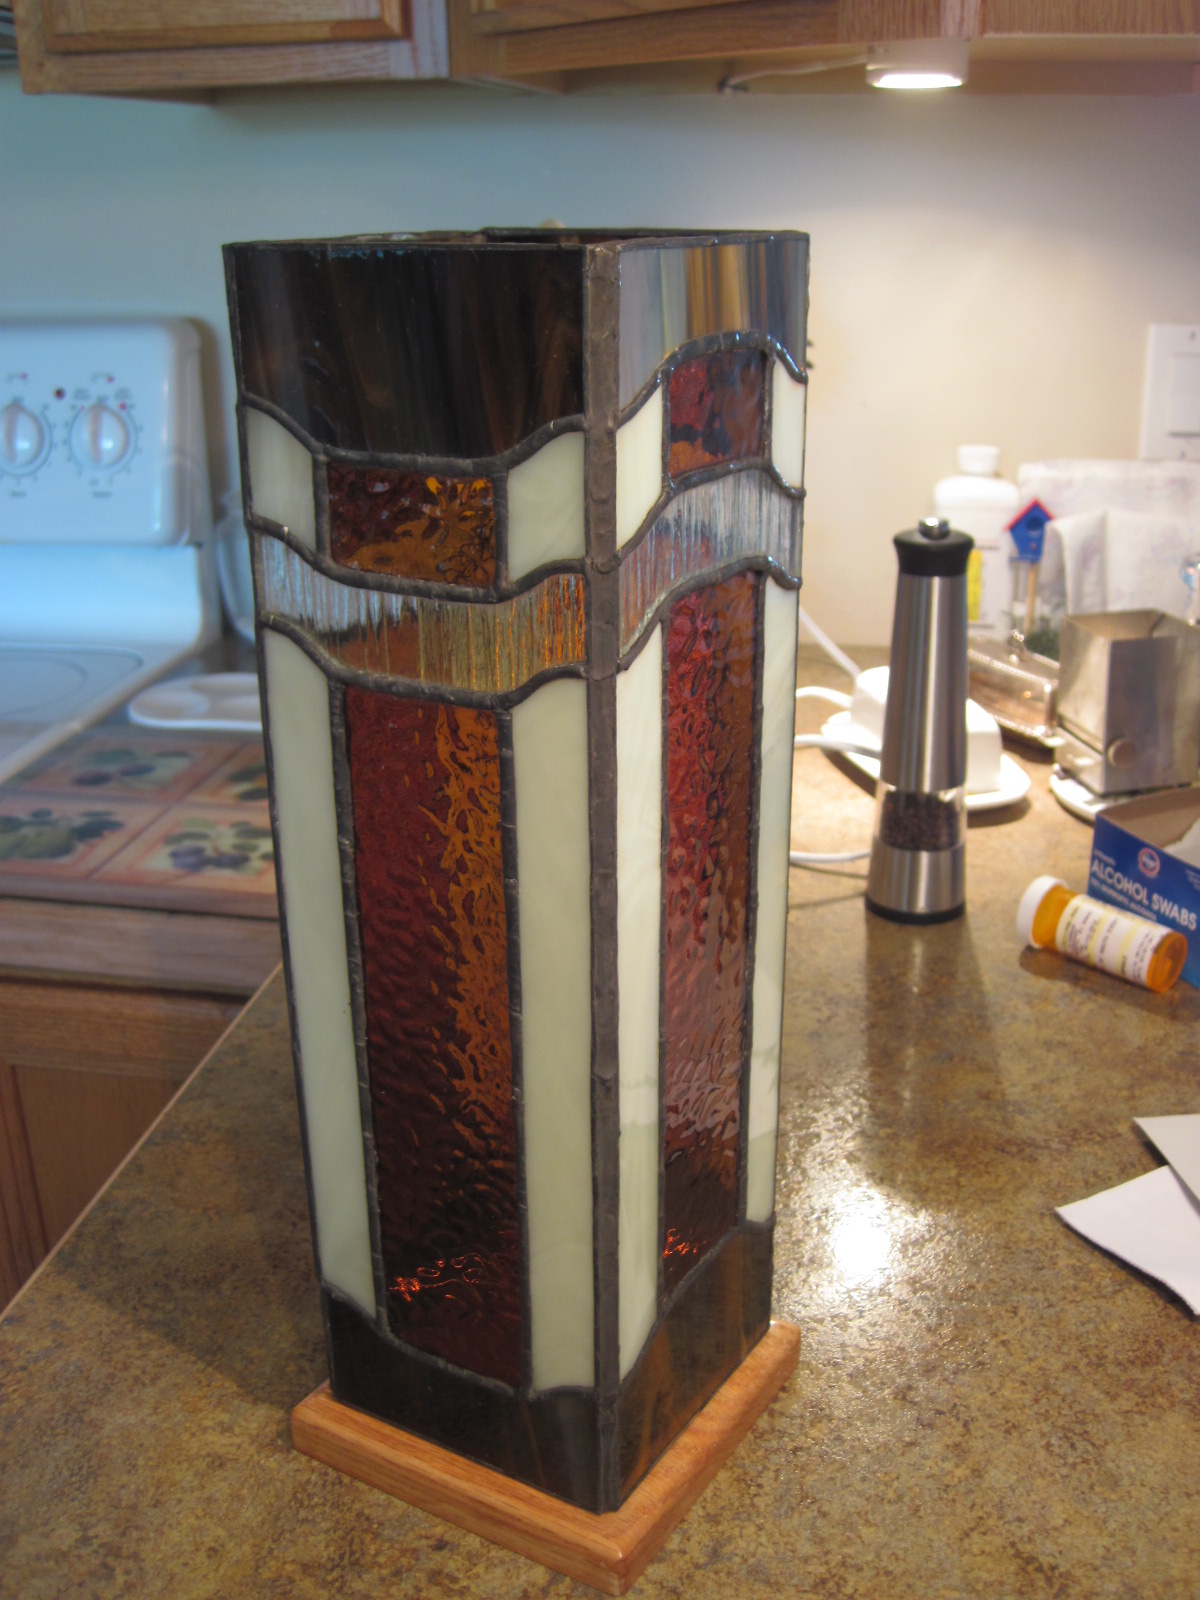
One of my many other hobbies other than paper crafting is stained glass. I just love how the rich colors look with the light behind them. Well...here is an accent lamp that I made for my Dad for Father's Day.


The pattern came from the "Box Column Lanterns" book by Jill Williams. I used tones of white, amber, and brown with a textured clear glass. The wooden base was made and finished by my husband.

I enjoy a large variety of crafts, but paper crafting is the one I do the most of because it is much faster and more instant gratification than others, but I truly love the results of time well spent carefully crafting things such as this lamp. Now, maybe someday soon I will make myself an accent lamp.

Don't worry, I will have more paper craft goodies to show you tomorrow. I just had to get this one in here.