Tuesday, November 8, 2011

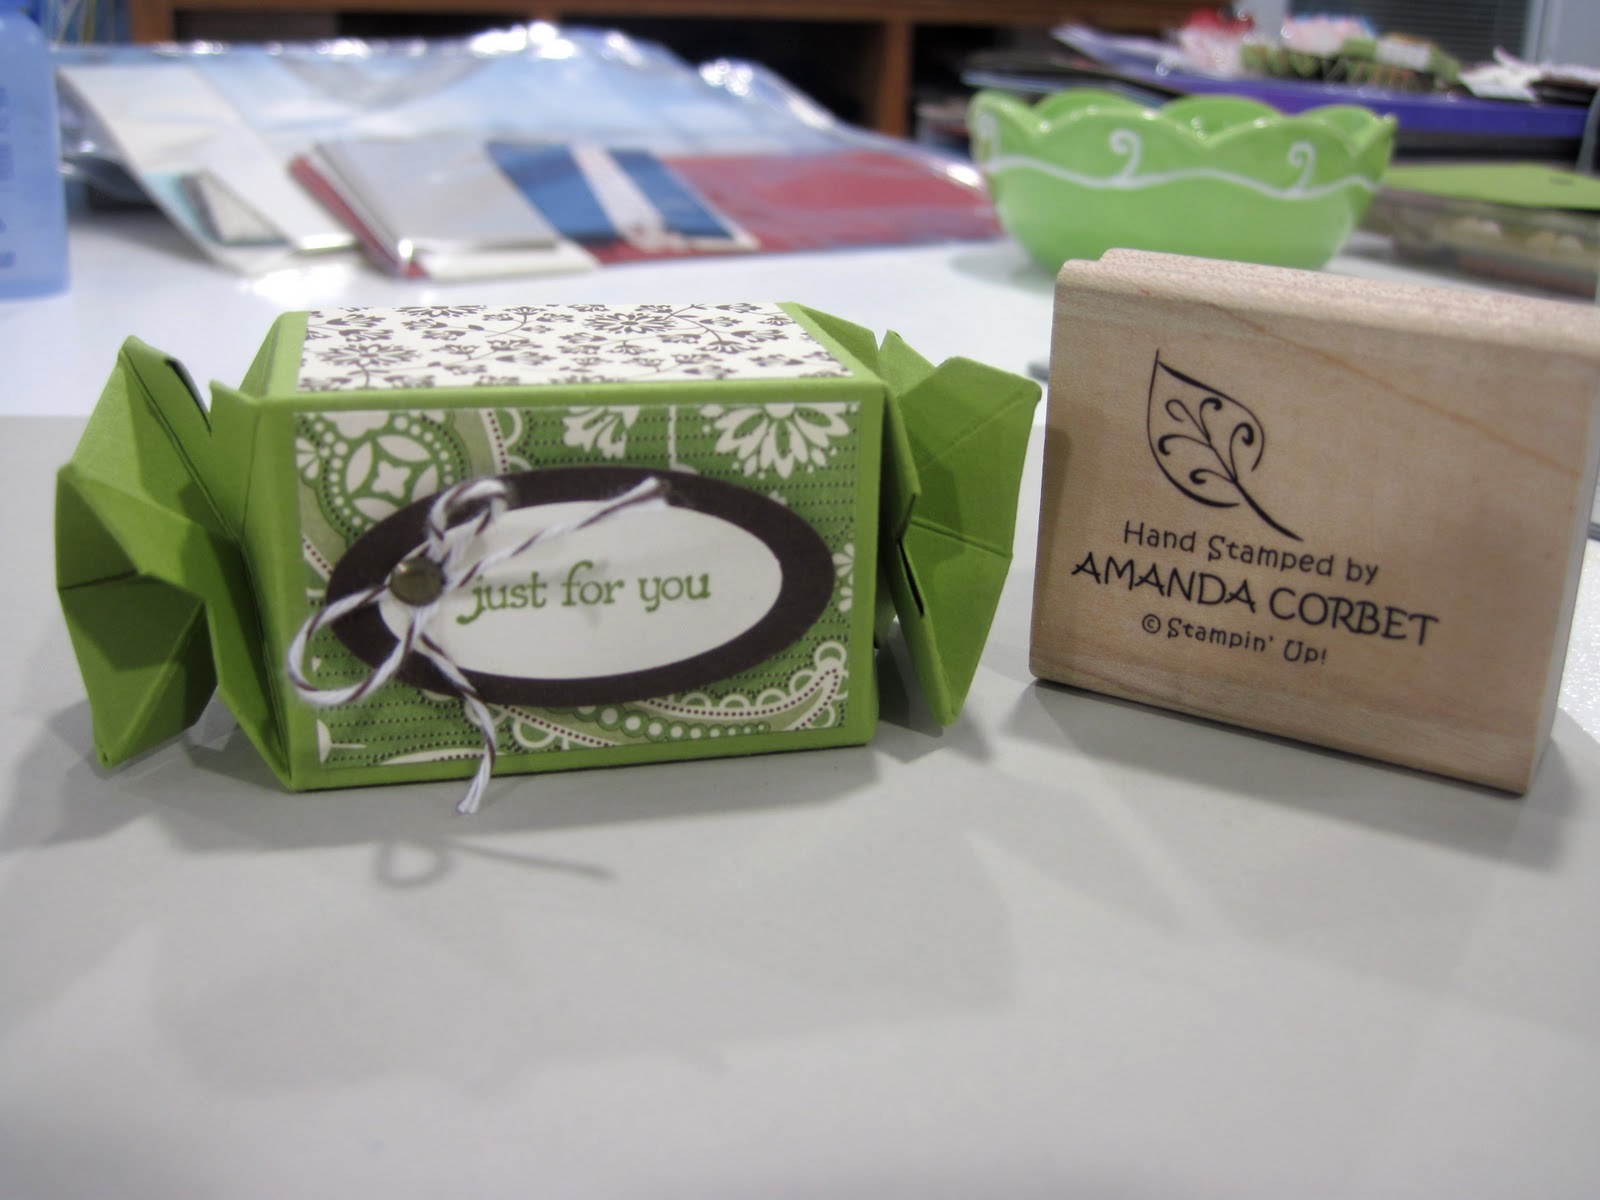
Spice Cake Candy Wrapper Box

Here is the 3D project from the September Make and Take. I just wanted to use the Candy Wrapper die because it is so cute! So here it is:


Stamps: Teeny Tiny Wishes
Cardstock: Lucky Limeade, Very Vanilla, Early Espresso
DSP: Spice Cake Designer Series Paper
Ink: Old Olive
Accessories: 1 3/8” x 5/8” Oval Punch, 1 ¾” x 7/8” Oval Punch, Early Espresso Baker’s Twine, Needle Tool, Mat Pack, Neutrals Brads (bronze), Sticky Strip, Paper Snips

The Lucky Limeade cardstock was cut at 5 ½” x 6 ½” and was run through the Big Shot on the Candy Wrapper Die. Four pieces of Spice Cake DSP were cut at 1 ¼” x 2”. These were adhered to all four of the large panels on the candy wrapper. The cardstock was folded on all of the score lines.

Note: If you fold ALL of your score lines REALLY well it will be easier to get this box to close.

Sticky Strip was added to the ¼” section along one end and the ends were adhered together. At this point you have a square tube. Now carefully push the bottom of the sides on the end in and twist to close the box. If your diagonal folds here are done really well the box will almost close its self. If they aren’t folded really well you will have to fight it a bit. Maybe this video here will help.

The greeting from Teeny Tiny Wishes was stamped in Old Olive ink onto a scrap of Very Vanilla cardstock. The greeting was punched out with the 1 3/8” x 5/8” Oval Punch. The 1 ¾” x 7/8” Oval Punch was used on a scrap of Early Espresso cardstock. The greeting oval was adhered to the Vanilla oval. Then the Crop-A-Dile was used to punch the smallest hole in the stacked ovals. Yes this is a bit of a large hole, but it will work, trust me. Tie some Early Espresso Baker’s Twine into a bow. Spread apart the prongs on a brad and insert the knot of the bow between the prongs. Close the prongs of the brad just enough to get the prongs through the hole in the oval layers. Once the brad is inserted completely into the hole open up the prongs on the brad like you normally would. The brad holds the bow in place and the larger hole allows for the knot in the brad to go through the cardstock instead of holding the brad up off the cardstock. Adhere the oval label to one of the candy wrapper sides with Stampin’ Dimensionals.


Now all you have to do is open up one of the ends and stash some goodies inside. Don’t worry, once you’ve gotten the ends closed once they close again very easily. Also, once you get used to closing this box it’s not so bad. Trust me. After helping all of my guests get it closed I can get them closed without a problem. I still wouldn’t want to have to make 100 of these, but it is easier to do after practicing.

I hope you will give this adorable little gift box a try! I know you can do it!

Thanks for stopping by!


Monday, November 7, 2011

Wisteria Doily

Here is the fourth and final card from the September Make and Take. After doing cards with lots of sponging, and cards with lots of steps I had to create a simple card. I do want everyone to come back after all. So here is the easiest and quickest card!


Stamps: Hello Doily, Thank You Kindly
Cardstock: Wisteria Wonder, Whisper White, Elegant Eggplant
DSP: Flirtatious Designer Series Paper
Ink: Wisteria Wonder, Concord Crush
Accessories: Scallop Edge Border Punch, Basic Black Dotted Scalloped Ribbon

The card base is Wisteria Wonder cardstock cut at 5 ½” x 8 ½”, and scored at 4 ¼”. A piece of Whisper White cardstock was cut at 4” x 5 ¼”. The Hello Doily stamp was inked up with Wisteria Wonder ink and stamped onto the Whisper White cardstock. This was adhered to the card front.

A piece of Elegant Eggplant cardstock was cut at 1 ¾” x 5 ¼”. One side was punched with the Scallop Edge Border Punch. A piece of Flirtatious DSP was cut at 1 1/8” x 5 ¼”. The greeting from Thank You Kindly was stamped in Concord Crush ink onto the DSP and the DSP was adhered to the Elegant Eggplant cardstock. A piece of Basic Black Dotted Scalloped Ribbon was wrapped around the panel and tied into a knot. This panel was adhered to the card front.


That’s it! Yep, that is it! Super simple, super easy, and pretty too! I told you it was easy!

Thanks for stopping by!

Friday, November 4, 2011

Foliage Spiced Birthday

This is the second card from the September Make and Take! This one is a fall birthday card.


Stamps: French Foliage, Perfect Punches
Cardstock: Very Vanilla, Pool Party, Early Espresso, Peach Parfait
DSP: Spice Cake Designer Series Paper
Ink: Crumb Cake, Basic Black
Accessories: Simply Score, 2” x 1 3/8” Oval Punch, Small Flower Punch (Punch Pack), Stampin’ Sponge, Designer Frames Textured Impressions Embossing Folder, Tombow Multi-Purpose Adhesive, Basic Pearls Jewel Accents, Paper Snips

The card base is Very Vanilla cardstock cut at 5 ½” x 8 ½”, and scored at 4 ¼”. The leaf image from French Foliage was stamped all around the card front in Crumb Cake ink. If you stamp the image onto the cardstock twice before inking it again you get the two varied shades of leaves that you can see on the card. Then the edges of the card front were sponged with Early Espresso cardstock. Now I had to let my guests play with the new Simply Score, so I added three score lines at ¼”, ½”, and ¾” on the bottom edge of the card front. It creates a very subtle line detail.


A piece of Spice Cake DSP was cut at 2” x 5 ½” and was sponged around the edges with Early Espresso ink. This was adhered to a 2 1/8” x 5 ½” piece of Early Espresso cardstock. Then this layer was adhered to a 2 3/8” x 5 ½” piece of Pool Party cardstock that also had the edges sponged with Early Espresso ink. This was adhered to the card front.

Next I used the Designer Frames Textured Impressions Embossing Folder on a 3” x 2 ¼” piece of Very Vanilla cardstock. Then I cut out around the embossed shape with Paper Snips. The edge of the embossed oval was sponged in Early Espresso ink.

Then the greeting from Perfect Punches was stamped in Basic Black ink onto a scrap of Spice Cake DSP. The greeting was punched out with the 2” x 1 3/8” Oval Punch. The edges were sponged with Early Espresso ink and it was adhered into the center of the embossed oval. This oval was adhered to the card front with Stampin’ Dimensionals.

Finally, just to finish it off I punched two small flowers from a scrap of Peach Parfait cardstock, sponged the edges with Early Espresso ink, folded the petal up to give it some dimension, adhered them together with Tombow Multi-Purpose adhesive, and adhered them to the DSP oval above the greeting with more Tombow Multi-Purpose adhesive. A single small pearl was added to the center of the flower.


I think my guests were tired of sponging by this point, but the result is a beautiful fall inspired birthday card. It truly is one of my favorites!

Thanks for stopping by!


Thursday, November 3, 2011

Christmas Snowman

Here is the second, and probably the most complicated, card from the September Make and Take. I’ve been seeing a lot of these center step cards in the online galleries and wanted to share this style of card with my Make and Take ladies. There were lots of steps to go through to complete this card, but I really love the end result! So did my guests!


Stamps: Snow Much Fun, Christmas Greeting, Serene Snowflakes
Cardstock: Cherry Cobbler, Very Vanilla, Crumb Cake, Night of Navy
DSP: Holly Berry Bouquet Designer Series Paper
Ink: Black Stazon, Night of Navy, Sahara Sand, Versamark
Merkers: Basic Black, Cherry Cobbler, Night of Navy, Pumpkin Pie
Accessories: Dazzling Details, Pewter Embossing Powder, Heat Tool, Stampin’ Sponge, Whisper White Craft Re-Inker, Aqua Painter, Northern Flurries Die, Paper Piercer, Mat Pack, Silver Brad, White Gel Pen

The card base is Cherry Cobbler cardstock cut at 4 ¼” x 11”. I used THIS TEMPLATE created by Connie Babbert for my cut and score lines. After you get your cardstock scored and cut properly fold on the score lines so that you have the center panel in front, and the side panels folded back. It’s a little tricky at first, but not too difficult to get the hang of.

For the two side panels I cut two pieces of the glittery polka-dot DSP ¾” x 4 ¼”. The edges were sponged with Night of Navy ink. These were adhered to two pieces of Night of Navy cardstock cut at 7/8” x 4 ¼”. Then the panels were adhered to the sides of the card that get folded back.

For the greeting panel I cut out a piece of Night of Navy cardstock ¾” x 4”. The snowflake from Serene Snowflakes was stamped onto the cardstock in Night of Navy ink to create a subtle background pattern. The greeting from Christmas Greeting was stamped onto the cardstock in Versamark, covered with Pewter Embossing Powder, the excess powder was tapped off, then the greeting was heated with the Heat Tool. This cardstock was adhered to a 7/8” x 4 1/8” piece of Very Vanilla cardstock and was then adhered to the bottom of the card front.

For the snowman panel I started by cutting out a piece of Crumb Cake cardstock 2” x 4 ¼”. The snowflake image from Serene Snowflakes was stamped in Sahara Sand ink to create a background pattern. The snowman from Snow Much Fun was stamped in Black Stazon ink. Next I put a couple of drops of Whisper White craft ink into a plastic packaging that was heading for the trash can, you just need something to contain your ink while you work with it. I picked up the ink with the Aqua Painter and painted in the snowman and painted the snow on the ground. It dries a little bit lighter than what you have applied it on. After the white was completely colored in I heated it with the Heat Tool to get the ink to dry faster. Don’t worry if you cover up part of the buttons, eyes, mouth, or nose. We’ll be coloring those in later with markers.

After the snowman is completely dry I colored in the boots, hat, buttons, eyes, and mouth with a Basic Black marker. The birds and band on the hat were colored in with a Cherry Cobbler marker. Pumpkin Pie was used for the nose, and the scarf was colored in with the Night of Navy marker. The White Gel Pen was used to color the dots on the scarf. This panel was sponged around the edges with Night of Navy ink and was adhered to a 2 1/8” x 4 3/8” piece of Very Vanilla cardstock before being adhered to the card front center panel.


A snowflake was cut from a scrap of Whisper White cardstock using the Big Shot and the Northern Flurries strip die. The Paper Piercer and Mat Pack were used to pierce a hole through the center of the snowflake and the image panel. A silver brad was added to hold the snowflake onto the card. Dazzling Details was applied to the hills of snow that the snowman is standing on, the sides of the snowman body and face, and dots were added around the snowflake to give the card some sparkle. The card was set aside to dry.


Somewhat time consuming, but loads of fun to create! I hope you will give the center step card fold a try! It’s so much fun figuring out what to add to each of the panels!

Thanks for stopping by!

Wednesday, November 2, 2011

Up, Up, and Away!

Here is the third card from the September Make and Take. I knew when I saw the set Up, Up, and Away I just HAD to have it! It has so many wonderful possibilities! Anyway…here is the card:


Stamps: Up, Up, and Away
Cardstock: Island Indigo, Poppy Parade, Bashful Blue, Whisper White
Ink: Basic Black, Poppy Parade, Island Indigo, Bashful Blue, Lucky Limeade
Markers: Daffodil Delight, Pool Party
Accessories: Snow Burst Textured Impressions Embossing Folder, 1 ¾” Scalloped Circle Punch, Stampin’ Sponge, Post-It Notes, Stampin’ Dimensionals, Paper Snips, Paper Piercer, Mat Pack, Silver Brads

The card base is Island Indigo cardstock cut at 5 ½” x 8 ½”, and scored at 4 ¼”. The card front was run through the Big Shot in the Snow Burst Textured Impressions Embossing Folder. Next a piece of Whisper White cardstock was cut at 2 5/8” x 3 5/8”. The sticky edge of a Post-It Note was torn and the Post-It Note was placed onto the cardstock so that only a little of the bottom of the cardstock shows. This exposed area of cardstock was sponged with Lucky Limeade ink to create hills. The Post-It Note was moved and Lucky Limeade was sponged again. I repeated the steps once more to get three hills.

A 1 ¾” Scalloped Circle was punched from a Post-It Note and used as a mask to sponge bashful blue ink around the edges of the scallops to create the clouds. I started from the bottom and worked my way up sponging about half way around the scalloped circle each time. This makes it look like your sky is full of bright puffy little clouds.

The greeting was stamped in the lower left hand corner of the cardstock in Basic Black ink. Then the basket image was stamped in the cloud area with Basic Black ink. The image panel was adhered to a 2 7/8” x 3 7/8” piece of Bashful Blue cardstock. This was adhered to a 3” x 4” piece of Poppy Parade cardstock. The Paper Piercer and Mat Pack were used to pierce holes in three of the corners and silver brads were added. This panel was adhered to the card front with Stampin’ Dimensionals.


The two balloons were stamped onto a scrap piece of Whisper White cardstock. The striped balloon was stamped in Poppy Parade ink and then the white spaces were colored in with a Daffodil Delight marker. The diamond balloon was stamped in Island Indigo ink and the white spaces were colored in with a Pool Party marker. The balloons were cut out with Paper Snips and were adhered to the card front with Stampin’ Dimensionals.

That’s it for this birthday card! Thanks for stopping by!

Tuesday, November 1, 2011

Fall Tree

Here is the second card from the October Make and Take. I just couldn’t resist doing a card with a fall tree. Fall is my favorite season after all. Take a look at the card we made:


Stamps: Lovely as a Tree
Cardstock: More Mustard, So Saffron, Cajun Craze, Chocoalte Chip
DSP: Frostwood Lodge Designer Series Paper
Markers: Chocolate Chip, More Mustard, Cajun Craze, Old Olive, Cherry Cobbler
Accessories: Scallop Edge Border Punch, Paper Piercer, Mat Pack, Neutrals Brads (Pewter), Stampin’ Dimensionals, Perfect Polka Dots Textured Impressions Folder

The card base is More Mustard cardstock cut at 4 ¼” x 11”, and scored at 5 ½”. A piece of So Saffron cardstock was cut at 4” x 5 ¼” and was run through the Big Shot in the Perfect Polka Dots Textured Impressions Embossing Folder. This was adhered to the card front. A piece of Cajun Craze cardstock was cut at 2 ¼” x 4” and one lone side was punched with the Scallop Edge Border Punch. A piece of Frostwood Lodge DSP was cut at 1 5/8” x 4”. You could somewhat see the white edges of the DSP so I sponged the edges of the DSP with Early Espresso ink. The DSP was adhered to the Cajun Craze cardstock. This panel was adhered to the bottom of the card front. The Paper Piercer and Mat Pack were used to pierce two holes in the upper right and corner of the DSP and two pewter brads from the Neutral Brad Pack were added.

A piece of Very Vanilla cardstock was cut at 2” x 4”. The pine tree from Lovely as a Tree was colored in completely with the More Mustard marker. The trunk of the tree was colored with the Chocolate Chip marker. Then the colors Cajun Craze, Old Olive, and Cherry Cobbler were randomly tapped on the tree image. I breathed on the stamp to re-moisten the ink and stamped the image onto the cardstock. This method of coloring gives a very realistic looking fall tree. This panel was adhered to a 2 ¼” x 4 ¼” piece of More Mustard. The panel was then adhered to a 2 3/8” x 4 3/8” piece of Chocolate Chip cardstock before being adhered to the card front with Stampin’ Dimensionals.


That’s it! A pretty quick and simple card once you can get everyone convinced to tap the marker colors without paying attention to where you’re tapping. I kept hearing people oooh and ahhhh after they stamped the image. I hope you will give this technique a try sometime!

Thanks for stopping by!