Friday, October 8, 2010

Just Believe Birthday - SCCSC33

Here is another card created with a past Sketch Challenge from Stampin' Connection. I used this sketch to create a birthday card for my sister. Here is the sketch:

And here is the card I created with it:


Stamps: Just Believe, Occational Quotes
Cardstock: Pink Pirouette, Melon Mambo, Whisper White, Rose Red
DSP: Melon Mambo DSP (retired)
Ink: Pretty In Pink
Accessories: Scalloped Circle Punch, Needle Tool, Mat Pack, Basic Pearls Jewel Accents, Rich Razzleberry Ribbon, Stampin' Dimensionals, Mini Glue Dots, Stamp-A-Ma-Jig, Markers: Pear Pizzaz, Old Olive, Always Artichoke, Melon Mambo, Rose Red, Basic Black

The card base is 5 1/2" x 8 1/2" Pink Pirouette cardstock scored at 4 1/4". A piece of Melon Mambo DSP (retired) was cut at 1 3/8" x 3 7/8" and adhered to a piece of Melon Mambo cardstock cut at 1 1/2" x 4". This was done twice to get two small panels that were adhered to the card front in the upper left hand corner of the card.

A piece of Whisper White cardstock was cut at 2 7/8" x 3 3/8". The flower shilouette from Just Believe was colored in with the Pear Pizzaz, Old Olive, Always Artichoke, Melon Mambo, and Rose Red markers. The stamp was breathed on to re-moisten the ink and then stamped onto the Whisper White cardstock. The small leaves were stamped in Old Olive along the bottom of the cardstock just to fill it in with more leaves. This cardstock was then adhered to a 3" x 3 1/2" piece of Rose Red cardstock, and then adhered to the card front.

On a scrap piece of Whisper White cardstock the image from Just Believe was stamped in Pretty In Pink ink and punched out with the 1 3/4" Scalloped Circle Punch. I used the needle tool to add pierced holes all the way around the scalloped circle.

The Stamp-A-Ma-Jig was used with the "Birthday Wishes" from Occasional Quotes to stamp the greeting. I used a Basic Black marker to color in just "Birthday" and used the Stamp-A-Ma-Jig to stamp it. Cleaned the stamp completely, and then repeated these steps to stamp "Wishes" under "Birthday" so that the greeting fits within the center of the scalloped circle. A piece of Rich Razzleberry ribbon was tied into a bow and adhered to the top of the scalloped circle with a Mini Glue Dot. The scalloped circle was adhered to the card front with a Stampin' Dimensional. Some Basic Pearls Jewel Accents were added to the flower centers for a little bit of bling.

Thank you Alex for the wonderful sketch! If you are a Stampin' Up Demonstrator and would like to play along you can find the post here. If you are not a demonstrator and would still like to play you can leave the link to your wonderful creation in the comments section here. I would love to see your creations! Have fun stamping!

Thursday, October 7, 2010

Just Believe

How is everyone on this lovely Thursday morning? Today I have a card to show you that is a combination of two challenges. The first is a featured stamper challenge SCFC30 on Stampin Connection honoring Diane Gilbert. You can see her card and her blog by clicking here. The second challenge is the SCCOLOR33 challenge from Stampin Connection which uses Rich Razzleberry, Old Olive, Whisper White, and Basic Black. Take a look:

Stamps: Just Believe
Cardstock: Rich Razzleberry, Old Olive, Whisper White, Basic Black
DSP: Rich Razzleberry DSP (retired)
Ink: Basic Black, Rich Razzleberry
Accessories: 5/8" Basic Black Satin ribbon, Beautiful Wings Embosslit die, Dazzling Diamonds, Tombow Muli-Purpose Adhesive, Crystal Effects, Mini Glue Dots, 1 3/4" Scalloped Circle punch, Needle Tool, Mat Pack, Stampin' Dimensionals, Markers: Rich Razzleberry, Old Olive

The card base is 5 1/2" x 8 1/2" Rich Razzleberry cardstock scored at 4 1/4". A piece of Rich Razzleberry DSP (retired) was cut at 4" x 5 1/4" and adhered to the card front. A piece of Whisper White cardstock was cut at 2 1/4" x 4 1/4". I inked up the flower silhouette from Just Believe with my Rich Razzleberry and Old Olive markers. I breathed on the stamp to re-moisten the ink and then stamped it onto the Whisper White. This cardstock was adhered to a 2 1/2" x 4 1/2" piece of Old Olive cardstock. A piece of 5/8" Basic Black Satin ribbon was tied into a knot around the bottom of the panel and the panel was adhered to the card front.

On a scrap piece of Whisper White cardstock I stamped the sentiment from Just Believe in Basic Black ink. This was then punched out with the 1 3/4" Scalloped Circle punch. The Needle Tool and Mat Pack were used to add little punched holes inside the scallops around the scalloped circle. The edges were sponged with Rich Razzleberry ink. Another 1 3/4" scalloped circle was punched from a scrap of Basic Black cardstock and adhered behind the stamped Whisper White scalloped circle. This was adhered to the card front with a couple Stampin' Dimensionals.

A scrap of Rich Razzleberry was run through the Big Shot in the Beautiful Wings Embosslit Die. I added some Tombow Multi-Purpose Adhesive just around the edges of the two butterflies I used and then added Dazzling Diamonds glitter onto the adhesive. After this dried I covered the entire butterfly with Crystal Effects. This gives the butterfly a shiny glass-like look while holding all of the glitter in place. Here is a closeup photo of the butterflies.


That is all I have for today. Come back tomorrow to see another card using the set Just Believe. Except this one is combined with an old sketch challenge to be a birthday card for my sister! Have fun stamping!

Tuesday, October 5, 2010

Thank You Owl - SCCSC34

I have been FINALLY catching up on a few challenges that I've missed. So on this wonderful tuesday I have one to show you. This is using the SCCSC34 sketch on Stampin' Connection. Here is the sketch:


And here is the card I created with it:


Stamps: Cute By The Inch
Cardstock: Crumb Cake, Daffodil Delight, Early Espresso, Peach Parfait, Pear Pizzaz, scraps for owl
DSP: Autumn Spice
Ink: Early Espresso, Peach Parfait, Pear Pizzaz
Accessories: Paper Snips, Perfect Polka Dots Textured Imspressions Die, Two-Step Owl Punch, Two-Way Glue Pen, Stampin' Dimensionals

The card base is Crumb Cake cardstock cut at 5 1/2" x 8 1/2" and scored at 4 1/4". A piece of Daffodil Delight cardstock was cut at 4" x 5 1/4". A piece of Pear Pizzaz cardstock was cut at 2" x 4" and adhered to the right side of the Daffodil Delight cardstock. A strip of Autumn Spice DSP was cut at 1/2" x 4" and adhered on the left side of the Pear Pizzaz cardstock. A strip of Peach Parfait cardstock was cut at 1/4" x 4" and adhered onto the Daffodil Delight cardstock a little to the left of the Pear Pizzaz cardstock. A strip of Early Espresso cardstock was cut at 1/8" x 4" and adhered onto the Daffodil Delight cardstock just to the left of the Peach Parfait cardstock. I used a Two-Way Glue Pen to adhere down all of the small cardstock strips.

The remainder of the Daffodil Delight cardstock without layers was placed into the Perfect Polka Dots Textured Impressions Die and run through the big shot to add texture. This panel was then adhered to the card front.

On a scrap of Whisper White cardstock I stamped the images from Cute By The Inch in Peach Parfait, Early Espresso, and Pear Pizzaz ink and trimmed around them with Paper Snips. These squares were then adhered to a scrap of Daffodil Delight cardstock and were again trimmed around with the Paper Snips to create a mat. The square were then adhered to the Pear Pizzaz panel on the card front.

An owl was created by using the Two-Step Owl Punch with scraps of Early Espresso, Crumb Cake, Naturals White, Basic Black, Cherry Cobbler, and Greenhouse Gala DSP. The pieces were adhered together with a Two-Way Glue Pen and the owl was added to the card front with a Stampin' Dimensional.

This was a quick card to make and a really fun sketch to play with. Thank you Susie Nelson for the great sketch! If you are a Stampin' Up Demonstrator and wouldl like to play this sketch challenge you can find the post here. If you are not a demonstrator and would still like to play along you can leave a link to your creation in the comments section. I would love to see what you make with the sketch! Have fun stamping!

Monday, October 4, 2010

Pumpkin Placecard/Photo Holder - Tutorial

Today's tutorial is on how to make a cute little Pumpkin Placecard/Photo Holder.

For this project you will need: Peach Parfait cardstock, Old Olive cardstock scraps, 2 3/4" Scalloped Circle Punch, Two-Step Bird Punch, Craft and Rubber scissors, Paper Snips, Sticky Strips, Pumpkin Pie ink, Stampin Sponge, paper clip, and a penny.

Punch six 2 3/4" scalloped circles with teh 2 3/4" Scalloped Circle punch and score the scalloped circle in the middle. Make sure that your score is in-between the scallops that way your scallops on the bottom will act as "feet".


Sponge the edges of the scalloped circles on one side with Pumpkin Pie ink and a Stampin' Sponge.


Fold your scalloped circles in half on your score line. Make sure that the sponged side is on the inside of the fold.

Add and adhesive of your choice to the side of the first scallop. Here I am using a Stampin' Up Glue Stick (the wrapper kept sliding off when I pulled the cap off so I just got rid of it).


Place one half of a second scalloped circle onto the adhesive of the first scalloped circle. Make sure to line up your scallops before pressing down and adhering it completely. Repeat this step to adhere three scalloped circles together to make half of the pumpkin. Repeat with the remaining scalloped circles to make the other pumpkin half. See photo below:


Fold up your pumpkin half and use paper snips to trim off the bottom scallop on both halves. This will create a larger base for the pumpkin and prevent it from falling over if you are using it to hold a picture.

Use the Two-Step Bird Punch to punch out two branches from Old Olive cardstock scraps.


Add three strips of sticky strip on the bottom, middle, and top of the inside of both pumpkin halves.


Remove the sticky strip liner from one pumpkin half and adhere a paper clip so that the bottom of the paper clip is in the middle of the pumpkin. Adhere a penny on the bottom. The penny adds weight to the bottom of the pumpkin to prevent it from tipping over when holding a photo.


Place your branch on the first half. Remove the sticky strip liner from the other half and place your branch. Adhere the two halves together and be careful to line up the scallops before pressing the halves together. The sticky strip is super sticky and super strong. Once it is stuck, it is there forever!


Now you're finished and you can add your place card or photo! Wouldn't this be cute to have as place card holders for Thanksgiving if you have a large group? I will use mine to hold a photo on my desk at work. I hope you've enjoyed this tutorial. Please let me know in the comments section if there are any specific tutorials you would like me to feature and I will make sure it gets done! Thanks for stopping by! 

Autumn Spice - SCCSC35

Happy Monday everyone! I know, it's wierd to be cheerful early on a Monday morning, but only one more monday and then I will be on vacation! Yay! I will make sure to schedule some posts so you will still get to see some crafty goodness while I'm gone. For today's post I created for the Stampin' Connection Sketch Challenge. I was recently added to the sketch challenge team on Stampin Connection and will be regualrly featuring the weekly sketch challege on Mondays. That means that the tutorials will be moving to Fridays after this week. Here is the sketch:


An here is my version:

Stamps: Day of Gratitude
Cardstock: More Mustard, Very Vanilla, Old Olive
DSP: Autumn Spice
Ink: Peach Parfait, Old Olive, Cherry Cobbler, Early Espresso
Accessories: Elegant Lines Textured Impressions Die, Sponge Dauber, Decorative Label Punch, Basic Pearls Jewel Accents, Stampin Dimensionals, 5/8" Old Olive Grograin ribbon, 1/8" Early Espresso Taffeta ribbon, Curly Label Punch, Paper Snips

The card base is More Mustard cardstock cut at 5 1/2" x 8 1/2" and scored at 4 1/4". A piece of Autumn Spice DSP was cut at 4" x 5 1/4" and run through the Big Shot with the Elegant Lines Textured Impressions Die. I used a sponge dauber to highlight the raised embossed lines with Early Espresso ink. The greeting "thank you" from Day of Gratitude was stamped in Early Espresso ink on a scrap of Old Olive cardstock and punched out with the Curly Label Punch. This was adhered to the card front and then trimmed with Paper Snips. A piece of 5/8" Old Olive Grosgrain ribbon was wrapped around the Autumn Spice panel and adhered to the back. This was then adhered to the card front.

On a scrap of Very Vanilla cardstock I stamped the three leaves from Day of Gratitude in Peach Parfait, Old Olive, and Cherry Cobbler ink. Each leaf was punched out with the Decorative Label Punch. The edges of each decorative label were sponged with early espresso ink. Some small Basic Pearls Jewel Accents were added to the top and bottom of each decorative label and to each side of the trimmed curly label. Stampin' Dimensionals were added to the back of each decorative label and they were adhered to the card front. Some small pieces of 1/8" Early Espresso Taffeta ribbon were tied onto either side of the Old Olive ribbon. That's it!

Thank you Liz Goldhawk for this fun sketch to play with!  If you're a Stampin' Up Demonstrator and would like to play along with this sketch challenge go here to post a link to your wonderful creations! I would LOVE to see them. If you aren't a demonstrator and would still like to play along  you can post a link to your creation in the comments section of this post! Make sure to come back later today to see this week's tutorial on how to make this adorable little pumpkin placecard/photo holder.

Friday, October 1, 2010

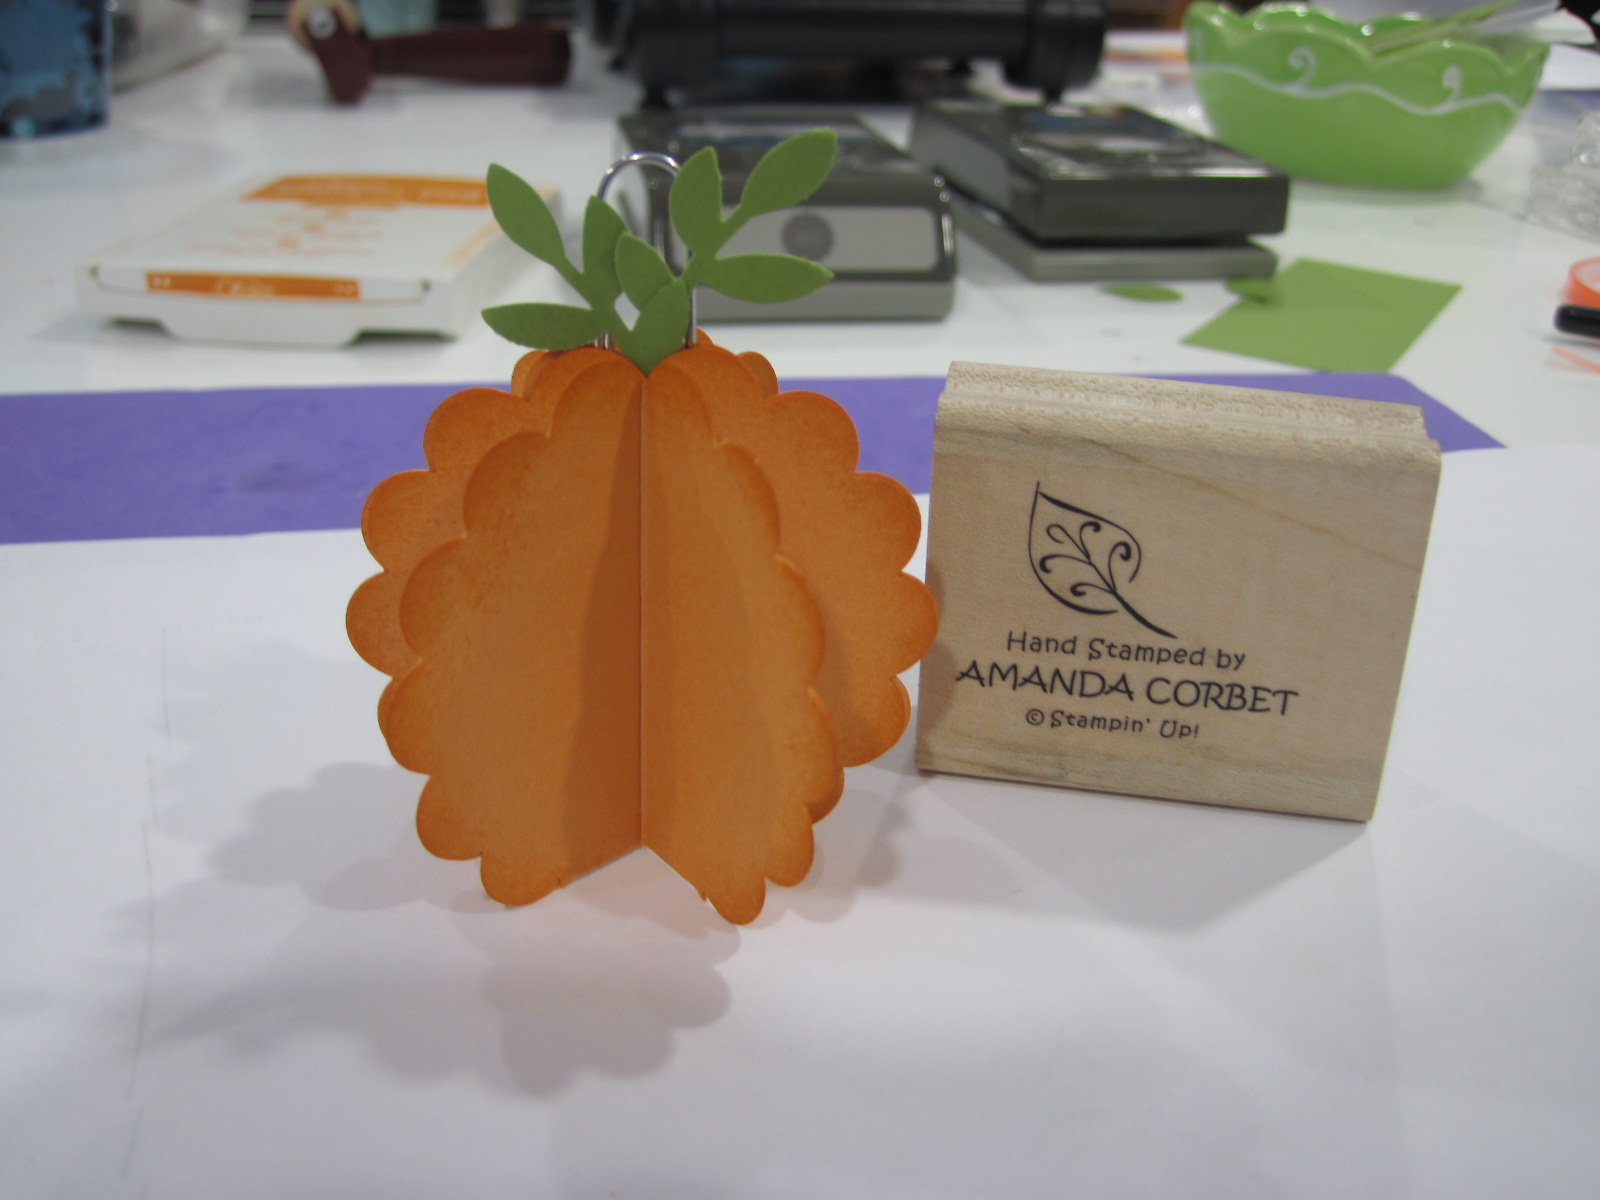
Pumpkin Card Holder - September Make and Take 5

This is the three dimensional project that my guests made at the September Make and Take. Everyone absolutely loved this little place card holder. It's just sooo cute!


Cardstock: Peach Parfait, Old Olive
Ink: Pumpkin Pie
Accessories: 2 3/4" Scalloped Circle Punch, Two-Step Bird Punch, Sticky Strip, Paper Snips, Paper Clip

I will keep the post today short and sweet. I will have a tutorial on how to create this adorable little pumpkin placecard holder on Monday. Come back later today to see the Sketch Challenge and Color Challenge cards from last week that I missed! Have fun stamping!

Update: You can find the tutorial for this project here.