Saturday, February 22, 2014

Cherish

I took some time this week and finally did something with my new Dylusions Creative Journal that I've had for a couple months. That blank page is just so dang scary isn't it? Especially when said blank page is the first one in a new journal. Even more so when it's your first actual mixed media journal... So I took my Shades of Spring Frosted Designs kit from February and used some of the goodies from the kit to make this lovely journal page. 


  • Paper: Basic Grey Fresh Cut Gardenia Row
  • Ink: Distress Squeezed Lemonade, Distress Picked Raspberry
  • Paint: Deep Midnight Blue, Titanium White, Decoupage, Distress Paint Dauber in Juniper
  • Accessories: Wood Veneer, Signo White Gel Pen, Sharpie, Tombow Multipurpose Liquid Adhesive

I cut the patterned paper down to fit my journal page and glued it on with some Decopage from DecoArt. Then I took some Titanium White paint and dry brushed it around all four sides. I added some Deep Midnight Blue dry brushing on the sides and allowed that to dry. 

Next I used the Distress Paint Dauber in Juniper with the Faded Dots stencil to add some splotches of dots here and there. 


Then I took a good ole Sharpie fine point marker and doodled on some vines with leaves.


I took the wood "cherish" and heart and tapped the Squeezed Lemonade Distress ink pad directly onto the wood to add a bright pop of color. For the heart I touched just the edges into the Picked Raspberry Distress ink pad and since it is such a small cute heart I managed to make the tips of the fingers holding said heart a lovely shade of pink. As the heart dried the raspberry ink slowly bled into the lemonade to get the pretty heart you see above.

I used some Tombow Multipurpose Liquid Adhesive and a good heavy book to glue the wood pieces down onto the page. The book was just to hold the wood pieces pressed into the paper until the glue set. I cleaned up my craft room a bit while the glue set. Although my craft room could use a lot more than just five minutes of cleaning... but that is for another day.


The journaling was done with a White Signo Gel Pen and under "cherish" it says "every single moment you get with those you love. every laugh, every smile, every hug. you never know which moment will be your last."


This page also works with the current Kit Challenge at Frosted Designs. The challenge was to use three of the following: White Gel Pen, at least one distress ink, at least one wood veneer, the color pink, or at least one sticker. Four out of five isn't bad at all huh? Either way I really love this page and it allowed me to express what I was feeling in that moment. Not to mention I got to play around with some paint! And get my fingers inky!


Friday, February 21, 2014

Another Sorbet Birthday

You might notice that this card is almost exactly like another card that I posted earlier this week. As I was making the version for the Make and Take I kept thinking that this card would be so much cuter (cuter is a word right? Well if it's not it is now!) in Pool Party. 

My favorite color is blue and has been leaning more towards shades of turquoise lately so it is really easy for me to reach for shades of blue when creating. It's my comfort zone, my warm snugly blanket in a way. Well for the Make and Take classes I really try hard to have samples with a wide variety of colors. Otherwise they would all have blue in them! So while I made the Make and Take card I also made this stepped up version in the color I was itching to use. 


  • Smoky Slate card stock 4-1/4" x 11", scored at 5-1/2"
  • Whisper White card stock 2-1/2" x 4-1/4"
  • Sweet Sorbet DSP 2-1/4" x 4-1/4"
  • Pool party card stock 2-3/4" x 3-1/4"
  • Whisper White card stock 2" x 3"
  • Stamps: Morning Meadow
  • Ink: Pool Party, Smoky Slate
  • Accessories: Deco Labels Framelits, Ovals Framelits, Stampin' Dimensionals, Dazzling Details, Rhinestone Basic Jewels, Paper Piercing Tool, Stampin' Pierce Mat, Silver Ribbon, Glue Dots
This card basically goes together the same as the Crisp Cantaloupe and Elegant Eggplant version, but if you didn't see that post or just feel like reading the instructions again... here they are! 

I started off by folding the Smoky Slate card stock on the score line. Them I stamped the flower image several times onto the top of the card front in Smoky Slate ink. To get the varied colors in the stamped images stamp it twice before adding more ink to the stamp. That gives you one darker image and one lighter image all with the same ink pad. 

Next use some good ole Glue Stick to glue the fabulous Sweet Sorbet DSP onto the large piece of Whisper White card stock, then onto the card front it goes with some more Glue Stick. Take the Silver Ribbon and cut a piece just long enough to wrap around the card. Use Glue Dots to stick the ribbon ends down in the center of the card. You won't have to worry about having neat cut ribbon ends or them meeting up perfectly because it will be covered by the label later.  


Take the small piece of Whisper White card stock and stamp the label image in Smoky Slate ink. Then stamp the greeting inside the label in Pool Party ink. Use the 2nd from smallest Ovals Framelit to cut out the stamped image. Use the 2nd from smallest Deco Labels Framelit to cut a label from the Pool Party card stock. Now Stampin' Up! really should come out with a piercing template that matches the Deco Labels! I used a combination of my other piercing templates to get close and just free handed the rest. Sorry, I don't have any more detailed instructions than that. 

Use some Stampin' Dimensionals to glue the stamped label inside the Pool Party label. Add some sparkle to the greeting with a small Rhinestone Basic Jewel on each side. Then stick the label down onto the center of the card front with a few Stampin' Dimensionals.


For some more added sparkle add a dot of Dazzling Details into the center of the flowers. You're done! A cute and lovely Pool Party birthday card ready and waiting to be sent to someone special! Someone special who loves blue... or turquoise... or Pool Party! 


Thursday, February 20, 2014

Leadership Vivid Vases Case

I have another fun card from the January Make and Take to share with you! This one was inspired by one of the Make and Takes from Stampin' Up! Leadership Conference. I did not go to Leadership, but some of the other demonstrator bloggers that I follow were posting pictures of their make and takes like this one from Julie. So I did what I could to replicate it for my Make and Take ladies.

I was hoarding saving my Kaleidoscope DSP for another project so I substituted the big bold diagonal stripes for some dainty chevrons. I think I like the chevrons better though...


  • Whisper White card stock 5-1/2" x 8-1/2", scored at 4-1/4"
  • Basic Black DSP 4" x 5-1/4"
  • Whisper White card stock 3-1/4" x 3-1/4"
  • Coastal Cabana card stock 1-1/4" x 3-1/4"
  • Crushed Curry card stock 1/2" x 4"
  • 8" Pool Party Baker's Twine
  • Stamps: Vivid Vases, Everything Eleanor
  • Ink: Black Stazon, Strawberry Slush
  • Markers: Pool Party, So Saffron, Pistachio Pudding, Crisp Cantaloupe, Strawberry Slush
  • Accessories: Vintage Faceted Buttons, Pool Party Baker's Twine, Glue Dots, Scallop Edge Border Punch
I started off by folding the Whisper White card stock on the score line then glued the Basic Black chevron DSP onto the card front. Next I stamped the Vivid Vases image onto the smaller piece of Whisper White card stock in Black Stazon ink and colored in the images with the markers.


After you've got all your lovely flowers colored in you will want to use the Scallop Edge Border Punch on one of the long edges of the Coastal Cabana card stock. Then use Glue Stick to glue the scalloped Coastal Cabana down onto the bottom of the stamped Whisper White card stock. Then glue this down onto the card front. Use some more good ole Glue Stick to glue down the piece of Crushed Curry card stock.


Take the Pool Party Baker's Twine and thread it through a medium sized Vintage Faceted Designer Button and tie it into a little bitty bow. Then just glue the button onto the card with a Glue Dot. This just adds a little bit of fun to the card front.


For an unexpected pop I stamped the swirl image from Everything Eleanor on the inside of the card in Strawberry Slush ink. So cute, so fun! 


Watercolor Flowers

Here is another card from the January Make and Take! It's also one of my favorites from January! So much texture and pattern! 


  • Daffodil Delight card stock 5-1/2" x 8-1/2", scored at 4-1/4"
  • Watercolor Wonder DSP 2" x 5-1/4"
  • Champagne Glimmer Paper 5/8" x 5-1/4"
  • Stamps: Perfect Pennants, Flower Shoppe, Hardwood
  • Ink: Baked Brown Sugar, Daffodil Delight, Crisp Cantaloupe
  • Accessories: 1-3/4" Circle Punch, Pansy Punch, Scallop Edge Border Punch, Stampin' Dimensionals, Large Pearl Basic Jewel, 2-Way Glue Pen, Heat Tool, Aqua Painter
I started off on this bright flowery card by folding the Daffodil Delight card stock on the score line and stamping the card front with the fabulous new Hardwood background stamp in Baked Brown Sugar ink. Then I glued the DSP down onto the bottom of the card front with some Glue Stick. I used the Scallop Edge Border Punch on one long edge of the Champagne Glimmer Paper and adhered that at the top edge of the DSP with 2-Way Glue Pen

Now for the flower. First we are going to do a little bit of water coloring. Grab a scrap of Whisper White card stock. Squeeze the center of your closed Daffodil Delight ink pad, then open it half way. See the ink that is on the lid? We are going to use an Aqua Painter to pick up some of that ink and color it onto the scrap of Whisper White card stock. It doesn't need to be perfect and it just needs to be about big enough for your flower image. Now dry the ink with the Heat Tool. You want it completely dry before you stamp your flower. 


Take the flower image from Flower Shoppe and stamp it on top of your yellow splotch in Crisp Cantaloupe ink. 


Now punch out the flower image with the Pansy Punch. To add shape to the petals of the flower curl them around your finger, a pencil, or use a bone folder to give them just a little bit of a curl. Then add a Large Pearl into the center of the flower for some fun bling!


Next take the greeting from Perfect Pennants and stamp it onto a scrap of Whisper White card stock in Baked Brown Sugar ink. Punch out the greeting with the 1-3/4" Circle punch and glue it onto the left side of the card front with a couple Stampin' Dimensionals. Stick the flower down next to the greeting circle with another Stampin' Dimensional.

The curled flower and Stampin' Dimensionals really pop things up and give this card some nice dimension.


For the inside simply stamp another flower image from Flower Shoppe all over the inside of the card in Daffodil Delight ink. Then take the scrap piece of Champagne Glimmer Paper from when you punched your scallop edge and glue it inside the card at the top. No waste here! 


That's it! I really do love all the pattern and texture on this card. And I really like the fact that I was able to use that scrap of Glimmer Paper instead of just throwing it away!


Wednesday, February 19, 2014

Sweet Sorbet Birthday

Here is another one of the cards from the January Make and Take. This is pretty simple and still really pretty! 


  • Smoky Slate card stock 4-1/4" x 11", scored at 5-1/2"
  • Whisper White card stock 2-1/2" x 4-1/4"
  • Sweet Sorbet DSP 2-1/4" x 4-1/4"
  • Elegant Eggplant card stock 2-3/4" x 3-1/4"
  • Whisper White card stock 2" x 3"
  • Stamps: Morning Meadow
  • Ink: Elegant Eggplant, Smoky Slate
  • Accessories: Deco Labels Framelits, Ovals Framelits, Stampin' Dimensionals, Dazzling Details, Rhinestone Basic Jewels


I started off by folding the Smoky Slate card stock on the score line. Them I stamped the flower image several times onto the top of the card front in Smoky Slate ink. To get the varied colors in the stamped images stamp it twice before adding more ink to the stamp. That gives you one darker image and one lighter image all with the same ink pad. 

Next use some good ole Glue Stick to glue the fabulous Sweet Sorbet DSP onto the large piece of Whisper White card stock, then onto the card front. 


Take the small piece of Whisper White card stock and stamp the label image in Smoky Slate ink. Then stamp the greeting inside the label in Elegant Eggplant ink. Use the 2nd from smallest Ovals Framelit to cut out the stamped image. Use the 2nd from smallest Deco Labels Framelit to cut a label from the Elegant Eggplant card stock.

Use some more Glue Stick to glue the stamped label inside the Elegant Eggplant label. Add some sparkle to the greeting with a small Rhinestone Basic Jewel on each side. Then stick the label down onto the center of the card front with a few Stampin' Dimensionals.


For some more added sparkle add a dot of Dazzling Details into the center of the flowers. You're done! A cute and lovely birthday card ready and waiting to be sent to someone special! 


You Make Me Happy!

You do make me happy my dear readers, but in this case it's also the fabulous greeting from the new Perfect Pennants stamp set in the Occasions catalog. What a great way to let someone know they are special to you! This card is one of the projects that my January Make and Take guests worked on. 


  • Whisper White CS 4-1/4" x 11", scored at 5-1/2"
  • Coastal Cabana DSP 4" x 5-1/4"
  • Gold Fancy Foil Designer Vellum (hearts) 3-1/2" x 4-1/2"
  • Crisp Cantaloupe CS 1-3/4" x 3"
  • 13" Crisp Cantaloupe Ruffle Stretch Trim
  • Stamps: Perfect Pennants
  • Ink: Versamark, Coastal Cabana, Crisp Cantaloupe
  • Accessories: Paper Snips, 2-Way Glue Pen, Banner Framelits, Gold embossing powder, Heat Tool, Embossing Buddy, Stampin' Dimensionals
To make this lovely start out by gluing the Coastal Cabana DSP onto the card front. Now take the 5th from smallest Banners Framelit and use it to cut your pretty gold vellum with the hearts in your Big Shot. Use your Embossing Buddy on the piece of Crisp Cantaloupe card stock then stamp the greeting from Perfect Pennants onto the card stock in Versamark ink. Pour Gold embossing powder over the stamped greeting, tap off the excess, and heat it with your heat tool. Cut out the pretty and shiny greeting banner with the 2nd from smallest Banners Framelit in your Big Shot. 


Glue the greeting banner onto the center of the vellum banner with a couple Stampin' Dimensionals. Add some Glue Stick onto the backside of the vellum banner just where the Crisp Cantaloupe banner is. Also add a couple dots of 2-Way Glue Pen behind each of the hearts on the banner then stick this down onto the center of the card front. 

Wrap the Crisp Cantaloupe Ruffle Stretch Trim around the card front, over the top of the vellum banner and tie it into a knot. Then just trim the ribbon ends with some Paper Snips and you're done! 


Tuesday, February 18, 2014

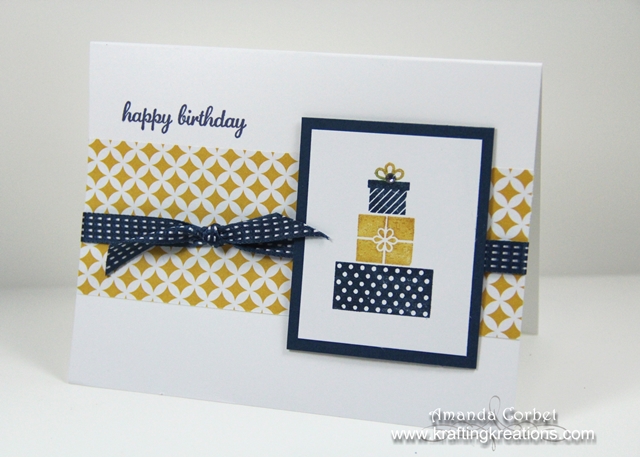
Happy Birthday Presents

Here is the final card from the December Make and Take! I really wanted to show how Christmas stamp sets could really be used for occasions other than just Christmas. So that is how this fun birthday card came from the Wishing You stamp set from the Holiday Catalog. 


  • Whisper White card stock 5-1/2" x 8-1/2", scored at 4-1/4". 
  • Eastern Elegance DSP 2" x 5-1/2"
  • Midnight Muse card stock 2-1/4" x 2-3/4"
  • Whisper White card stock 2" x 2-1/2"
  • 18" Midnight Muse Stitched Satin Ribbon
  • Stamps: Express Yourself, Wishing You
  • Markers: Midnight Muse, Summer Starfruit
  • Accessories: Midnight Muse Stitched Satin Ribbon, Rhinestone Basic Jewels, Stampin' Dimensionals

Start off by folding the Whisper White card stock on the score line. Use some Glue Stick to glue down the DSP into the center of the card front. Then ink up the "happy birthday" stamp from Express Yourself with a Midnight Muse marker. Breathe on the stamp to re-moisten the ink and stamp the image just above the left side of the DSP. Wrap the ribbon around the card front and tie it into a knot.


Now take the present image from Wishing You and color it in with Midnight Muse and Summer Starfruit markers. Breathe on the stamp to re-moisten the ink and stamp the image onto the small piece of Whisper White card stock. Glue this onto the Midnight Muse card stock with some Glue Stick, then stick this layer onto the card front with a few Stampin' Dimensionals.


Finally, just to add a little bit of sparkle because I love sparkle, add a small Rhinestone Basic Jewel into the center of the bow on the stack of presents. You're Done! Now you have another way to use this fabulous Christmas stamp set! 


Christmas Star

Here is another quick and pretty card from the December Make and Take. These stamps were some of the ones that you could buy individually. I just love the neutral colors of this one. It's just so simple and elegant. 


  • Early Espresso card stock 4-1/4" x 11", scored at 5-1/2"
  • Crumb Cake card stock 4" x 5-1/4"
  • Very Vanilla card stock 3-7/8" x 5-1/8"
  • Very Vanilla card stock 3-7/8" x 5-1/8" (inside)
  • 18" Crumb Cake Taffeta Ribbon
  • Stamps: Christmas Star, Magical Season
  • Ink: Soft Suede, Versamark
  • Accessories: Gold embossing powder, Embossing Buddy, Heat Tool, Large Pearl Basic Jewel, Crumb Cake Taffeta Ribbon
Start off by folding the Early Espresso card stock on the score line. Next stamp the lovely Christmas Star image onto the bottom of both of the Very Vanilla card stock pieces in Soft Suede ink. Glue one of these down on the inside of the card so you have a space to write a message you can actually see. 


Rub your Embossing Buddy all over the bottom of the other Very Vanilla card stock and stamp the greeting from Magical Season onto the card stock in Versamark ink. Cover the stamped image with Gold embossing powder, tap off the excess, and heat it with the Heat Tool. Glue this layer onto the Crumb Cake card stock and then onto the card front.


Finally add a large pearl into the center of the star for a little bling and wrap the ribbon around the top of the card front and tie it into a bow. Super duper easy yet super pretty! 


Monday, February 17, 2014

Skating Merry Christmas Card

Are you ready for another adorable, yet very late, Christmas card idea? I totally LOVE the big beautiful polka dots in this DSP! 


  • Sahara Sand Card Stock 5-1/2" x 8-1/2", scored at 4-1/4"
  • Whisper White Card Stock 3-1/2" x 4-3/4"
  • Polka dot Season of Style DSP 3-1/4" x 4-1/2"
  • Season of Style DSP 1-1/4" x 4"
  • 15" Real Red Taffeta Ribbon
  • Stamps: For The Birtds
  • Ink: Stazon
  • Markers: Cherry Cobbler, Pear Pizzaz, Soft Sky
  • Accessories: XL Oval Punch, Dazzling Details, Stampin' Dimensionals
This one goes together pretty quickly once you have all the pieces cut. Glue the polka dot Season  of Style DSP onto the Whisper White card stock. Glue the red Season of Style DSP onto the bottom of this layer. Then wrap the Real Red Taffeta ribbon around the card stock and tie it into a knot and stick this layer onto the card front with Stampin' Dimensionals. 


For the adorable little birdie stamp the image from For the Birds onto a scrap of Whisper White card stock in Black Stazon ink. Color in the bird with the markers and punch out the image with the XL Oval Punch. Stick this onto the card front with a couple Stampin' Dimensionals and scribble on some Dazzling Details around the bird to make the "ice" sparkle.


So cute! I cased this card from somewhere, but I have absolutely no idea where. If you happen to know the original creator let me know so I can give them credit. 


Candy Stripe Snowflakes

I have another cute card from the November Make and Take to share with you today. Hopefully you still have some of this paper and the stamp set if you would like to re-create this fun yet simple card. 


  • Crumb Cake card stock 5-1/2" x 8-1/2", scored at 4-1/4"
  • Whisper White card stock 3-1/4" x 5-1/2"
  • Season of Style DSP 1-1/2" x 5-1/2"
  • Cherry Cobbler card stock 1/2" x 5-1/2"
  • 20" Silver 1/8" Ribbon
  • Stamps: Endless Wishes
  • Ink: Soft Suede, Gumball Green, Cherry Cobbler 
  • Accessories: Scallop Trim Border Punch, Rhinestones

For this sweet and simple Christmas card start out by folding the Crumb Cake card stock on the score line. Then stamp the snowflake image from Endless Wishes all over the top and bottom of the card front in Soft Suede ink. Now take the Whisper White card stock and stamp the "merry" in the upper left hand corner in Gumball Green ink. Stamp the "christmas" just below the merry in Cherry Cobbler ink.

Use the Scallop Trim border punch along the bottom edge of the Whisper White card stock then glue this piece onto the card front. Glue the DSP onto the Whisper White card stock just above the scalloped edge. Then glue the strip of Cherry Cobbler card stock over the edge of the DSP.


Wrap the Silver 1/8" Ribbon around the card front and tie it into a knot. Then, just to add a little more sparkle and shine, add a Rhinestone onto each end of the "merry". 


Ta daa! Fast and easy Christmas card done! 


Sunday, February 16, 2014

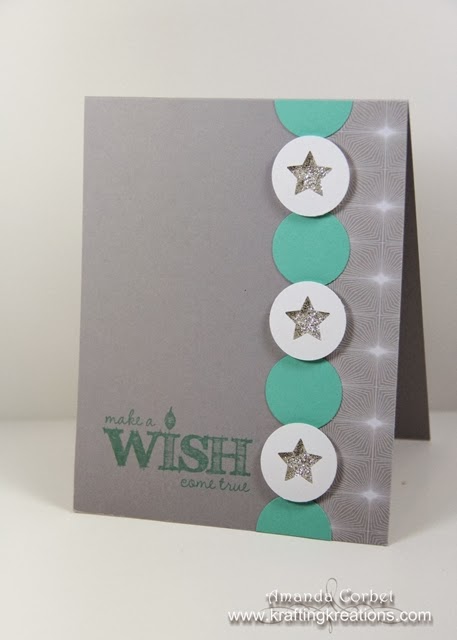
Make a Wish Come True!

I have another fun card from the November Make and Take to share with you! This one is a sparkly fun birthday card using some Winter Frost DSP. This lovely was cased from Laurie at Soap Box Creations


  • Stamps: Make a Wish
  • Card Stock: Smoky Slate, Coastal Cabana, Whisper White
  • DSP: Winter Frost
  • Ink: Coastal Cabana
  • Accessories: 1" Circle Punch, retired star punch, Silver Glimmer Paper, 3/4" Circle Punch, Stampin' Dimensionals, 2-Way Glue Pen, Paper Snips

For this fun card I started off by cutting a piece of Smoky Slate card stock 4-1/4" x 11" and scored it at 5-1/2". Next I cut a piece of Winter Frost DSP 1" x 5-1/2" and adhered it onto the right side of the card front. I stamped the greeting from Make a Wish in the lower left corner of the card front in Coastal Cabana ink. 


Now for the fun part! I used the technically retired little Star punch from the 2012 Holiday Catalog to punch a three stars in a scrap of Whisper White card stock with a couple inches between each star. Then I punched out the star shape with a 1" Circle punch. I used the 1" Circle punch three more times on some Coastal Cabana card stock then punched three circles from Silver Glimmer Paper with the 3/4" Circle punch. 


I cut one Coastal Cabana circle in half with Paper Snips then adhered each half onto the card front centered over the edge of the DSP. Then I adhered the remaining two Coastal Cabana circles evenly spaced between the top and the bottom of the card front. I adhered the Silver Glimmer Paper circles between the Coastal Cabana Circles with 2-Way Glue Pen. Now for the circles with the star cut outs I used a half a dimensional on each side and adhered these over the glimmer paper circles.

Have I succeeded in totally confusing  you now? Just checking...


On the inside I stamped the Happy Birthday from Chalk Talk in Coastal Cabana ink and added two punched Glimmer Paper stars.

This just goes to show you that just because the paper is meant for winter and Christmas doesn't mean it's the only way it can be used!