Friday, May 22, 2015

Sunroom Design Plans

Are you ready to see my design plan for our in process sunroom? Where I left off the walls and ceiling had been textured and painted and that's where I left you hanging in anticipation. Exciting stuff right? I just know you were on the edge of your seat waiting to see what we did next.

First off I want to let you know that I am by no means a professional designer. I'm pretty sure I will make choices that others would not. I've never truly "decorated" a room before quasi finishing my craft studio this winter. It's taken years for me to discover what I truly loved from a design perspective and what fits my husband's and my personality. So what we end up with is a style that is a mix between modern, traditional, and rustic. In short lets just say that we can't make up our minds...

This room is going to function primarily as our living room, but will also have a small table space and a computer desk for me. I like having my computer upstairs in the main living area rather than down in my craft room. It makes it easier to listen to homework lectures while I cook dinner or work on blog posts in spare bits of time.

Here is a list of our needs for this space:

  • Sofa (of course)
  • Entertainment center for TV, etc. 
  • Ottoman for storage and to put your feet up 
  • End tables 
  • Bistro table
  • Recliner for the hubs
  • Accent chairs for guests
  • Ceiling fans to circulate air when the windows are open
  • Plenty of hidden storage
  • DVD storage
  • Curtains & sheers

I've compiled everything onto one Pinterest board. Pinterest makes it so easy to have a design board with links to everything you need. Let me just say real quick that this is absolutely not a sponsored post in any way. I just love the products I chose for this space and I'm sharing my design journey with you. 

I purchased these curtains from Walmart a couple years ago not long after we initially started working on the space. When you are buying curtain panels to cover nine windows it's truly an investment even for inexpensive curtains. So I went with something that has a natural linen look in neutral colors. I figured the curtains could last through many paint color changes and still work with the design of the room.

As many a design blog suggests I started off by finding an inspiration fabric to act as my muse for the room before choosing any paint colors. I found this lovely fabric here. It's an outdoor fabric, but I absolutely loved the vibrant colors and the watercolor look of the pattern. It's from this that I pulled the color for the walls and what I am designing the room around. Well that and the curtains I already had...

Richloom Solarium Outdoor Muree Sunblue

For the flooring we wanted to keep it on the cheap side. After pricing engineered hardwood and laminate wood flooring we found it was just going to cost too much money to finish this huge room in the time frame that we want to. After 3+ years under construction I'm not willing to wait any longer than necessary.

So we patched the subfloor where we had to cut some pieces out to run wiring and I'm going to paint and stencil the floor. Call me crazy... believe me, mu husband has, but it will look nice and will at least last until we are ready to buy a house out in the country and we can deal with the flooring before putting the house up for sale. Or maybe it will look awesome enough to keep as is. But I'm going to take a chance and get it done. It will take a lot of hard work, but it will also save us some $. This is my inspiration.
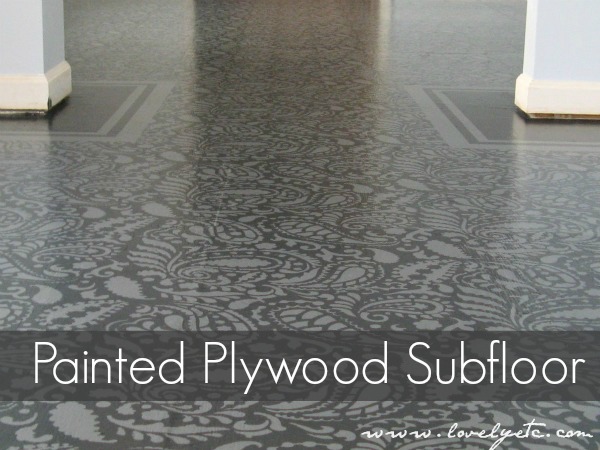
painted stenciled floor

For the sofa I purchased this lovely from Wayfair and it arrived last week. It is so beautiful and looks exactly like the picture on the website. I won't be using the throw pillows that came with it though. I want something a little more bright and fun. That's where the inspiration fabric comes in, as throw pillows. For the side chairs I plan on ordering two of these.


For my desk I wanted something that wouldn't block the glorious windows. So I'm sticking with something simple. I've purchased the bases of this desk from Ikea and we will be DIYing the desk top with some wood. This beauty is my desk chair. I plan to have some floating shelves on the wall to the right of the desk for some decorative display.


I picked up the turquoise bistro set from our local Dillon's of all places. This isn't the exact same one but it works to get an idea of everything together.


Some things we will be DIY-ing are the entertainment center, ottoman, and end tables. The ottoman won't have the same fabric as this one, but I like the shape, size and the decorative legs on the bottom.


We will be using two of these ceiling fans in our large 12 ft. x 24 ft. space. 


This last weekend we got the trim up around the windows. The trim around the door and baseboards will be done after the flooring is finished up. So my challenge this week, to clean and prep the floors for paint and stenciling! Wish me luck!


Wednesday, May 13, 2015

Thoughts of Butterflies

I made this card quite some time ago when stamping with some friends and I just never got around to posting it. So now I'm finally sharing it with you. Some of the products have since retired, but I bet you could re-do the same card with current supplies and it would be just a beautiful if not more!


  • Crumb Cake card stock 5-1/2" x 8-1/2", scored at 4-1/4"
  • Pool Party card stock 3-1/4" x 4-1/2"
  • Very Vanilla card stock 3" x 4-1/4"
  • Crumb Cake ribbon 10"
  • Stamps: Loving Thoughts, Papillion Potourri, Flowering Flourishes, En Francais
  • Ink: Soft Suede, Pool Party, Midnight Muse, Stazon
  • Accessories: Stampin' Sponge, Crumb Cake Taffeta Ribbon, Glue Dots, Dazzling Details, Sponge Dauber, Delicate Butterfly Punch


Fold the Crumb Cake card stock on the score line. Stamp the En Francais background image onto the card front in Soft Suede ink. Sponge Soft Suede ink around the edges of the card front.

Next take the piece of Very Vanilla card stock and stamp the flourish image from Flowering Flourishes onto the card stock in Pool Party ink. Stamp the greeting from Loving Thoughts onto the bottom of the card stock in Midnight Muse ink then sponge Soft Suede ink around all four sides.

Glue the stamped Very Vanilla card stock onto the Pool Party card stock. Wrap the Crumb Cake ribbon around the panel just above the greeting and tie it into a knot. Stick this layer onto the card front with a few Stampin' Dimensionals.


Now for the butterflies! Take a scrap of Very Vanilla card stock and stamp the butterfly image from Papillion Potpourri three times in Stazon ink. Take a sponge dauber and sponge Pool Party ink in just the center of the butterfly. Then sponge Midnight Muse in the center of the butterfly making sure you don't cover all of the Pool Party ink.


Punch out each of the butterflies with the delicate butterfly punch and glue them onto the card front all in a row with Glue Dots.


To add a little shimmer to the butterflies scribble some Dazzling Details onto the wings of the butterflies an allow it to dry.

For the envelope I just stamped the image from Flowering Flourishes a couple times in the lower left hand corner in Pool Party ink and sponged Soft Suede around the edges.

Ta da! Done!


Friday, May 8, 2015

Bright Blossom

This is another card that I made a long time ago that I never go around to posting. I think it's been sitting in my drafts folder for a couple of years. But it's still cute so I'm going to share it with you anyway...


  • Lucky Limeade card stock 5-1/2" x 8-1/2", scored at 4-1/4"
  • Tempting Turquoise DSP 1-1/2" x 4"
  • Whisper White 1/2" x 4"
  • Stamps: Curly Cute
  • Ink: Lucky Limeade, Melon Mambo
  • Accessories: Chevron embossing folder, Dotted Scallop Ribbon Punch, Stampin' Sponge, Vintage Faceted Buttons, 1/2" Circle Punch, Stampin' Dimensionals, 2-Way Glue Pen, Glue Dots, Multipurpose Liquid Glue

To make this one fold the Lucky Limeade card stock on the score line. Run the card front through the Big Shot in the Chevron embossing folder. Next use the Dotted Scallop Ribbon Punch on a scrap of So Saffron card stock. Then adhere that punched ribbon behind the edge of the Tempting Turquoise DSP with 2-Way Glue Pen. Stick this layer onto the card front with a few Stampin' Dimensionals. 

For the greeting stamp the image from Curly Cute onto the strip of Whisper White card stock in Lucky Limeade ink. Use Paper Snips to trim one end of the card stock into a banner shape then run the card stock over your fingers to make it kinda wavy. Use a Stampin' Dimensional in the peaks of each wave to stick the greeting onto the card front. 


For the flower use the Blossom Punch three times on Pink Pirouette card stock. Use a Stampin' Sponge with Melon Mambo ink to sponge the edges of all three flower blossoms. Use Multipurpose Liquid Glue to glue two of the flowers together. 

For the last flower take Paper Snips and trim between two of the petals towards the center of the flower. Apply a little liquid glue onto one of the petals and adhere it behind the petal on the other side of the slit. This forces the flower into kind of a cone shape and lifts it up off the card. Use Paper Snips to trim off the point of the cone and use more liquid glue to glue the cone flower inside the other layered flowers. 

Now use the 1/2" Circle punch on a scrap of So Saffron card stock and press it into the glue inside the cone flower. Then just use a glue dot to stick a Vintage Faceted Button into the center of the flower. 


Now you have a bright and fun card ready to give!


Monday, April 6, 2015

Smile

What do you get when you combine some awesome scraps with a card base and a stamp? A really awesome card! 


I had this scrap of DSP from a previous project laying around on my table. At the time I was trying to use the ink pad directly onto the paper to get a nice smooth blend of color from lightest to darkest. Well the paper kept slipping or I dropped the ink pad and it tool three tries to get what I was looking for. I was frustrated and tossed the "bad" ones aside.

Well a couple weeks later after I got over my frustration I found these again on my work table when I realized how cool they looked. It's amazing what a few days without looking at something can do huh?

The chevron piece is actually a scrap of Silver Glimmer Paper. I was trying to get as many chevrons as possible out of this one strip and the remaining scrap that I would normally toss looked really neat so I combined those two pieces that were headed for the trash with a few more pieces and a greeting to make this fun card.


The greeting from Happy Day was stamped onto the DSP in Stazon ink. I used 2-Way Glue Pen to glue the chevron piece onto the left side of the DSP. That layer was glued onto a slightly larger piece of Night of navy card stock. Then that panel was added onto the Smoky Slate card front with a few Stampin' Dimensionals.


Finally I threaded some Whisper White Baker's Twine through the button and tied it into a bow. That was stuck onto the card with a Stampin' Dimensional. I also added a large Rhinestone onto the i in the greeting and added a spritz of Vanilla Shimmer Smooch Sprtiz to the card to give it some more sparkle.

Have you made anything lately from something that would have otherwise been thrown in the trash?


Monday, March 23, 2015

Craft Storage Ideas Planner Blog Hop


Hi there, readers! Thanks for Hopping along on the Craft Storage Ideas Planner Blog Hop! You should have come from Kimberly’s blog.

We are so excited to share some great ideas for keeping your planner both organized and fun along the way. But first, I want to share some FANTASTIC PRIZES we will be sharing with lucky commenters along the route!

Thursday, February 26, 2015

Craft Studio Tour

It's been quite some time since I've shared my studio and there have been a whole bunch of updates. In case you're curious to see what I started with and what it looked like last time I shared my studio just follow the links. Here is what it looks like now! (Click on any of the photos to make them larger).