Tuesday, June 12, 2012

Craft Project Central!

Cupcake Box, Card Set, and Gift Card: 

This cute cupcake box is the perfect way to bring someone a cupcake on their special day!  It makes a great gift with the set of matching cards and 3" x 3" gift card!  This project is also a fun class, club, or camp project!


This adorable project was created by Heidi! If you have a chance please stop by Craft Project Central and leave Heidi a comment on her project!

If you would like to subscribe to the June edition of Craft Project Central and get 10 fabulous tutorials for just $10.00 then click HERE!

Thanks for stopping by!


Monday, June 11, 2012

New Toys and Carry On

I had been saving up for the new catalog release for a few months. There are always lots of new goodies that I want from the new catalog. Here is part of my first order! I had already put a lot of it away before thinking to take a picture, but here are all the fabulous new stamp sets that I got! 


Including the much desired and currently unavailable hostess set Carry On. Stampin' Up is currently not processing orders with this hostess set due to unexpected legal issues. Apparently there is an ongoing legal dispute about the trademark rights to the Keep Calm and Carry On saying. As soon as Stampin' Up posts news about the future of this set I will let you know. But since my order was entered on June 1st I was one of the lucky few that actually was able to get this set! Yay! 


So of course I had to create a card with it! I used the sketch SCCSC123 for this card. 


  • Stamps: Carry On
  • Card Stock: Midnight Muse, Whisper White
  • DSP: Gumball Green
  • Ink: Midnight Muse, Gumball Green
  • Accessories: Whisper White Stitched Grosgrain Ribbon, Stampin' Dimensionals

Here is the sketch that was created by yours truly: 


I kept this card pretty clean and simple. So to start off I cut a piece of Midnight Muse card stock 5-1/2" x 8-1/2" and scored it at 4-1/4". Then I cut a piece of Whisper White card stock 4-1/4" x 4-1/4" and adhered it onto the card front. Next I cut a piece of Gumball Green DSP 3-3/4" x 4-1/4" and adhered it onto the Whisper White card stock. Since my main image panel was also my sentiment I skipped adding a sentiment on the bottom of the card. 

I know, I know. I'm bad. My sketch and I can't even follow it! But you gotta go where inspiration lead you right? 

Next I cut a piece of Whisper White card stock 2" x 3-1/2". I stamped the Keep Calm and Stamp On in Midnight Muse ink and the little card in Gumball Green ink. This was adhered onto a 2-1/4" x 3-3/4" piece of Midnight Muse card stock. I wrapped a piece of Whisper White Stitched Grosgrain ribbon around the panel and tied it into a bow. The panel was adhered onto the card front with Stampin' Dimensionals. 


I've got all sorts of new goodies to show you! So come back each day to see what new toys I've used! If you would like to start shopping the new catalog online and get your own new toys to play with then click HERE

Thanks for stopping by!


Sunday, June 10, 2012

Craft Project Central!

4th of July Decor:

This year add some handmade pieces of Americana to your home for the 4th of July!  It’s easy to add a festive feel to your home with a little bit of Red, White and Blue paper and a few accessories.  In this tutorial, you’ll learn how to make the Candy Wrapper Wreath, Pinwheel Clips, and the Pledge of Allegiance Subway Art!  They are so easy to make you’ll have time to make extras as gifts!  And if you don’t celebrate the 4th of July, change up the colors and theme and make these great items for a different occasion!


This beautiful patriotic project was designed by Carrie! If you have a chance please head on over to Craft Project Central and leaven Carrie a comment on her project! 

If you would like to subscribe to the June edition of Craft Project Central and get 10 fantastic tutorials for just $10.00 then click HERE

Thanks for stopping by! 


Saturday, June 9, 2012

Butterfly Congratulations!

Good morning everyone! I hope you're having a fabulous weekend! Today I will have plenty of time to spend in my craft room playing with all my new catalog goodies! I'll have lots of great things to show you this week! Here is a card that I created for the Stampin Connection SCCSC121 sketch challenge. 


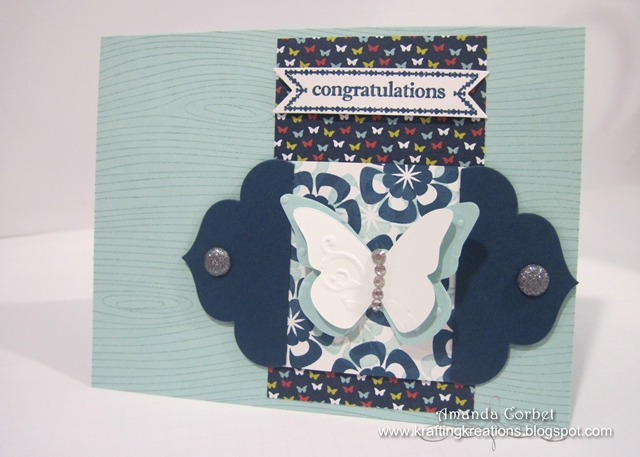
  • Stamps: Betsy's Blossoms, Itty Bitty Banners, Woodgrain
  • Card Stock: Pool Party, Midnight Muse, Whisper White
  • DSP: Patio Party
  • Ink: Pool Party, Midnight Muse
  • Accessories: Beautiful Butterflies die, Beautiful Wings sizzlit, Apothecarty Accents framelit, Bitty Banners framelit, Glimmer Brads, Mini Glue Dots, Rhinestones, Stampin' Dimensionals. 
Here is the sketch that was created by Liz Goldhawk:


I started off with a piece of Pool Party card stock cut at 5-1/2" x 8-1/2" and scored at 4-1/4". I stamped the Woodgrain background image onto the card front in Pool Party ink. This adds a subtle background pattern. I've been loving the woodgrain look lately...don't know why.

Next I cut a piece of Patio Party DSP 2-1/4" x 4" and adhered it onto the card front. Then I cut a piece of Whisper White card stock 2-1/4" x 2-1/4". I stamped the blossom from Betsy's Blossoms in Midnight Muse ink and Pool Party ink. Can you see how solid and dark those Midnight Muse flowers are? I LOVE the new ink pads! My Pool Party ink pad is still the old felt style and you can tell. I stamped the Midnight Muse flowers first, then the Pool Party flowers not really paying attention to the order. I think it's interesting how you can clearly see the Pool Party flowers on top of the darker Midnight Muse ones.


Next I cut a piece of Midnight Muse card stock 3-1/4" x 5-1/4" and ran it through the Big Shot on the Apothecary Accents framelit. I uses Paper Snips to cut the die cut shape to get just the ends of the label. I adhered the labels on top of the sides of the stamped Whisper White card stock. Then I used the Paper Piercer and Mat Pack to pierce a hole in each end of the label and added a Glimmer Brad. I ordered the new Paper Piercing Tool and Stampin' Pierce Mat, but they hadn't arrived when I made this card.

I adhered this label panel onto the card front with Stampin' Dimensionals. I had these two butterflies already sitting in a box of scraps so I pulled them out, adhered them together with a Mini Glue Dot and adhered it onto the stamped panel with a Mini Glue Dot. I added some Rhinestones to create the butterfly's body and add some more sparkle. What can I say...I love sparkle and bling!

Now for the greeting. I stamped the banner from Itty Bitty Banners in Midnight Muse ink and then used the Bitty Banners framelits to cut out the stamped image. I adhered the banner onto the card front with a couple Stampin' Dimensionals.

I just love how this turned out. I'm loving all the wonderful new framelits in the new catty. They were at the top of my list for my first order and you will see some creations using them later this week!

Thanks for stopping by!


Friday, June 8, 2012

Blog Candy Winner!!!!!

I'm so sorry this post is late. I had intended on getting it up this afternoon, but it has been a busy day. With work in the morning, picking up an awesome desk/hutch at a garage sale and getting it home, and signing closing documents for refinancing our house. Yay!


So the winner of the free subscription to the June edition of Craft Project Central is.....

Comment #11: Judy Garza
"The cover is very enticing! I want to OPEN it and look through it! Bet it is fabulous on the inside too. Thanks for sharing. 
Judy"

I have sent you an e-mail Judy! 

Thank you everyone who entered! Check back next month to see what my Craft Project Central project is and have a chance to with a free July subscription! 

Thanks for stopping by!

For the Birds - Friday Mashup 62!

Good morning everyone! Today I have another Friday Mashup challenge to share with you! This week is all for the birds! The challenge was to make a card using the sketch below, make a project featuring birds, or mash it up and create a card with the sketch featuring birds! 


So here is my mashed up card! 


  • Stamps: Papaya Collage, Friendly Phrases, Language of Friendship
  • Card Stock: Summer Starfruit, Basic Gray, Whisper White, Gumball Green
  • DSP: Titterpated
  • Ink: Summer Starfruit, Gumball Green, Basic Black, Basic Gray
  • Accessories: Bird Punch, Stampin' Dimensionals, Silver Glimmer Paper, Stampin' Sponge, Rhinestones
Summer Starfruit is such an interesting color. When I first saw it I thought I would have to force myself to use it, but now I find I'm drawn to it when reaching for colors to start a new card. So for this card I started with a 5-1/2" x 8-1/2" piece of Summer Starfruit card stock that was scored at 4-1/4. Next I cut a piece of Twitterpated DSP 1-1/4" x 5-1/2" and adhered it in the center of the card front.

For the vertical strips I used Gumball Green cut at 3/4" x 4-1/4" and adhered them onto the card front. Just to add a little bit of sparkle I cut two pieces of Silver Glimmer Paper 1/4" x 4-1/4" and adhered them on top of the Gumball Green strips.

For the main image panel I started off with a piece of Whisper White card stock cut at 2-1/4" x 3-1/4". I stamped the leaves from Papaya Collage in Summer Starfruit and Gumball Green. I'm still getting used to these new ink pads, but so far I love them! I wanted to stick with something simple for the greeting so I pulled out Friendly Phrases and stamped the greeting onto the Whisper White card stock in Basic Black ink. Then I adhered this panel onto a 2-3/8" x 3-3/8" piece of Basic Gray card stock and then I adhered this onto the card front with Stampin' Dimensionals.


I couldn't resist adding just another little bit of sparkle so I added a small Rhinestone onto the greeting.

Now for the bird...I stamped the bird image from Language of Friendship in Basic Black ink onto Basic Gray card stock. Then I punched out the bird with the Bird Punch and sponged around the edges with Basic Gray ink. I adhered the wing onto the bird with a Stampin' Dimensional. I punched a branch from Gumball Green card stock with the Bird Punch and adhered it behind the bird. I adhered the bird to the card front with a Stampin' Dimensional just to make it pop!


If you have a chance head on over to the Friday Mashup! and play along! Head on over there to see what else the design team has created!

Thanks for stopping by!