Friday, September 27, 2013

Gorgeous Grunge is...

Gorgeous! Today I have a really bright and fun card that uses the Gorgeous Grunge stamp set. The idea for this card popped into my head one day while I was at work so I quickly jotted my idea down on paper with a quick sketch so I didn't forget it. Later that evening I just HAD to put it together! 
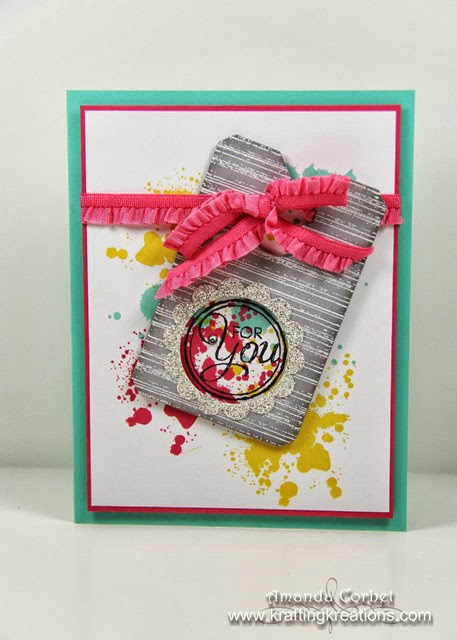


  • Stamps: Gorgeous Grunge, Chalk Talk
  • Card Stock: Coastal Cabana, Strawberry Slush, Whisper White, Smoky Slate
  • Ink: Smoky Slate, Daffodil Delight, Strawberry Slush, Coastal Cabana, Jet Black Stazon, Versamark
  • Accessories: Chalk Talk Framelits, 1-3/8" Circle Punch, 1-3/4" Scalloped Circle Punch, White embossing powder, Rhinestones Basic Jewels, Strawberry Slush Ruffle Stretch Trim, Stampin' Dimensionals, 2-Way Glue Pen


To make this card start off by cutting a piece of Coastal Cabana card stock 5-1/2" x 8-1/2" and score it at 4-1/4". Next  cut a piece of Whisper White card stock 3-3/4" x 5". Stamp the splatter images from Gorgeous Grunge all over the card stock in Daffodil Delight, Strawberry Slush, and Coastal Cabana ink. 


Next stamp the "for you" from Chalk Talk onto the colorful splatters in Jet Black Stazon ink then adhere this layer onto a 3-7/8" x 5-1/8" piece of Strawberry Slush card stock. 


To get the fun lines on the label cut a scrap piece of Smoky Slate card stock with the Chalk Talk framelit in the Big Shot. Then stamp the lines image from Gorgeous Grunge several times onto the card stock in Versamark ink, cover the stamped lines with White embossing powder, tap off the excess, and heat it with you heat tool. Take the 1-3/8" Circle punch and punch a circle out of the tag. Sponge around the edges of the tag with Smoky Slate ink to really bring out those lines. 


Now take a piece of Silver Glimmer paper and use the 1-3/8" Circle punch to punch a hole. Now line up the circle in the center of your 1-3/4" Scalloped Circle punch and punch out a glimmery scalloped frame. 


Use 2-Way Glue Pen to adhere your frame around the circle in the tag. 


Wrap a piece of Strawberry Slush Ruffle Stretch Trim around the stamped Whisper White panel and tie it into a bow. Adhere the tag onto the card front at an angle with Stampin' Dimensionals. Make sure that the bow of your ribbon is inside the slit at the top of your tag. Add a single medium Rhinestone basic jewel onto the greeting for a little more sparkle (because there just wasn't enough already). 


Now adhere this layer onto your Coastal Cabana card front with Stampin' Dimensionals and you're done! 


This is such a cheerful and bright card! I just absolutely love it! It will have to go to someone very special, or it may just stay in my personal collection forever because I don't think I'll be able to part with it! I just LOVE the Gorgeous Grunge stamp set! It has so many possibilities and works for any occasion!


Thank You Pear

It’s Friday Mashup time again! This week it’s all about colors and some fruit! I pulled out a retired stamp set for this one. Take a look!


  • Stamps: Faith in Nature, Woodgrain, Express Yourself
  • Card Stock: Pool Party Core’dinations, Cherry Cobbler, Early Espresso, So Saffron, Very Vanilla
  • Ink: Early Espresso, Versamark, Jet Black Stazon
  • Markers: So Saffron, More Mustard, Pear Pizzaz, Old Olive
  • Accessories: Burlap Ribbon, Early Espresso Baker’s Twine, Deco Labels Framelits, Ovals Framelits, Argyle Embossing Folder, Stampin’ Dimensionals, Glue Dots, Curly Label Punch, Gold Embossing Powder, Embossing Buddy, Heat Tool, Sanding Block


Photo Source

Here's your Mashup Challenge:
  1. Create a project with using the colors "Cherry Cobbler, So Saffron & Early Espresso."
  2. Create a project using a "Fruit Image."
  3. Or Mash it Up and create a project using the above "Color Combo & a Fruit Image. "

For this fun card start off with a piece of Cherry Cobbler card stock cut 5-1/2” x 8-1/2” and scored at 4-1/4”. Stamp the Woodgrain background image onto the card stock in Early Espresso ink. Next cut a piece of Pool Party Core’dinations card stock 2-1/2” x 5-1/2” and run it through the Big Shot in the Argyle embossing folder. Use the Sanding Block to reveal the lighter core of the card stock and bring out the texture pattern. Adhere this onto a 2-5/8” x 5-1/2” piece of Early Espresso card stock.

Cut a piece of Burlap ribbon about 4” long and use Glue Dots to adhere each end of the ribbon onto the backside of the panel. Cut a piece of Early Espresso Baker’s Twine about 24” long, wrap it around the panel several times and tie the ends into a bow. Stamp the greeting from Express Yourself onto a scrap of Very Vanilla card stock in Early Espresso ink. Punch out the greeting with the Curly Label punch making sure the greeting is right at the bottom of the punch. Adhere this underneath the Burlap ribbon so just part of the label shows. Adhere this main panel onto the card front with Stampin’ Dimensionals.


Next stamp the pear image from Faith in Nature onto a scrap of So Saffron card stock in Jet Black Stazon ink. Use your markers to color in the image. Cut out the pear in the Big Shot with the 3rd from smallest Oval framelit. Next use the second from smallest Deco Labels Framelit on a scrap of Early Espresso card stock. Use a Stampin’ Sponge to sponge a little bit of Versamark ink around the edges of the card stock. Pour Gold embossing powder over the wet ink and tap off the excess powder. I was intentionally going for a messy look here. Now heat the embossing powder with a Heat Tool until it’s all shiny and wonderful. Adhere the oval onto the gold edged label with a Stampin’ Dimensional. Then adhere the label onto the card front with more Stampin’ Dimensionals.


I totally went dimensional crazy on this card so I won’t be sending this one through the mail, but it is so pretty and was so much fun to make! I just love that messy heat embossing around the Early Espresso label!


Head on over to the Friday Mashup to see what the rest of the design team has created and to play along with the challenge!


Wednesday, September 25, 2013

Craft Project Central!

Accordion Memory Keeper Gift Set: 

This project is a perfect gift for a friend or loved one. It consist of an Accordion Memory Keeper, where you can personalize with messages and/or add photos, four thank you note cards, and a one - of - a - kind flower pen. 


This absolutely beautiful gift set was designed by Gayle! If you have a chance please head on over to Gayle's blog and leave her a comment on her project! 

If you would like to subscribe to the September edition of Craft Project Central and get 10 wonderful tutorials for only $10 then click HERE!

More September projects that you may have missed: 


Sunday, September 22, 2013

Craft Project Central!

Harvest Party Decor: 

Decorating my house with Fall Décor is one of my favorite things to do!  I love all of the rich, warm colors.  This month I’ve created some simple, new ways to jazz up my home, and yours, for a Harvest Party.  A festive banner can hang from your mantel or window; refresh your cake stands with some die cut leaves; create gratitude and treat jars, and give those pumpkins a facelift with glitter. You’ll be ready in no time to celebrate the Harvest Season.


This beautiful decor set was designed by Jen! If you have a chance please stop by Jen's blog and leave her a comment on her project! 

If you would like to subscribe to the September edition of Craft Project Central and get 10 wonderful tutorials for only $10 then click HERE!

More September projects that you may have missed: 


Friday, September 20, 2013

Fall Pumpkins

It’s Friday again! This week we are going with a fun fall theme! I have been cleaning and reorganizing my craft room quite a bit lately. I’m not exactly sure that the process of cleaning and reorganizing ever ends, but I have pulled out several retired clear mount stamp sets that I could stand to part with. I gotta make more room on my shelf for new goodies you know. Anyway I came across this Cottage Window stamp set that I never used. As in brand new! It was never inked and didn’t even have the sticker on the back. So terrible I know! So I pulled it out to use on this card and it is just so cute! Now it has to go back on my stamp shelf.


  • Stamps: Gorgeous Grunge, Express Yourself, Woodgrain, Cottage Window
  • Card Stock: Very Vanilla, Baked Brown Sugar, Crumb Cake, Early Espresso, Soft Sky
  • Ink: Soft Sky, Early Espresso, Whisper White Craft, Jet Black Stazon
  • Markers: Pumpkin Pie, Crushed Curry, Early Espresso, Blender Pen
  • Accessories: Dotted Scallop Ribbon Punch, Stripes embossing folder, Burlap ribbon, Paper Snips, craft knife, Stampin’ Dimensionals


Here's your Mashup Challenge:
  1. Create a project with a "Fall/Harvest Food Theme (Preserves, Apples, Pumpkins etc.)."
  2. Create a project using "Paper Piecing."
  3. Or Mash it Up and create a "Fall Food themed project with some Paper Piecing "

For this fun fall card I started off by cutting a piece of Soft Sky card stock 5-1/2” x 8-1/2” and scored it at 4-1/4”. I stamped all over the card front with the small spots image from Gorgeous Grunge in Soft Sky ink to add some interest to the background.

Next I  cut a piece of Crumb Cake card stock 3” x 4-1/4” and stamped it with the Woodgrain background stamp in Early Espresso ink. I ran this piece through the Big Shot in the Stripes folder so that the stripes are going the same direction as the wood grain. Next I took my Whisper White craft pad and ran it across the card stock then used a paper towel to lightly wipe some of the thicker areas of ink off. This made the wood grain look like an old weathered wall. I adhered this onto a 3-1/8” x 4-1/4” piece of Very Vanilla card stock.  

Then I used the Dotted Scallop Ribbon Punch twice on a scrap of Early Espresso card stock. I cut the Early Espresso border down to 4-1/4” and adhered half of each ribbon behind each side of the panel with 2-Way Glue Pen.  I cut a piece of the fabulous new Burlap Ribbon about 6” long. I used Paper Snips to cut one end into a dove-tail shape then pulled out the horizontal threads to make the end more frayed. I used a few Glue Dots to adhere the other end of the ribbon onto the backside of the card stock panel and added one Glue Dot close to the dove-tail end and adhered that down onto the card stock to keep it from moving around.


Now for that adorable cottage window! I stamped the cottage window frame once on Very Vanilla card stock and once on Baked Brown Sugar card stock in Jet Black Stazon ink. I used paper Snips to cut around the Baked Brown Sugar window and used a craft knife to carefully cut out the pane openings in the window. Next I stamped the branch and spider inside the Very Vanilla window with Jet Black Stazon ink and stamped the Pumpkins onto the card stock in Cajun Craze ink. Then I used my Crushed Curry and Pumpkin Pie markers to color in the leaves, Pumpkin Pie and Early Espresso for the Pumpkins, and some Crumb Cake to make the ledge that the pumpkins are sitting on.


I wanted to give a hint of color to the sky area so I squeezed the center of my closed Soft Sky ink pad then used a Blender Pen to pick up just a teeny tiny bit of color and started adding it to the top portions of the window. I cut out the inside of the window shape with Paper Snips and adhered it on top of the Baked Brown Sugar window frame. This was adhered onto the card front with a couple Stampin’ Dimensionals.


Finally the wood grain layer was adhered onto the card front with a few Stampin’ Dimensionals and I added the greeting from Express Yourself into the bottom right corner of the card in Early Espresso ink.

I just had so much fun making this card! I love to color and got to play with some new and old goodies! 


Thursday, September 19, 2013

New Project Galleries!

I have spent A LOT of time on an addition to my little blog here. Some of you may have already taken a peek at it while I was working on it. It's my new Project Galleries!

Yep! I've added a Project Galleries page that has links to different categories of projects. By clicking on one of these category titles you can see all of the projects that I've ever posted that relate to that category. Not only that, but if you click on any picture it will take you to the original post! Awesomeness right? 


There are a few very old posts (like from the first few months after I started this little blog) That the pictures aren't working right in the gallery. I will work on getting these fixed, but you can still view hundreds of other wonderful projects! 

I hope you like it!


Tuesday, September 17, 2013

Almost an Artisan Entry

When I was creating my projects for my Artisan Contest entry I made about 8 different cards. I had so many ideas that I wanted to try. It was just days before I had to ship everything out that I chose the 5 cards to send. Well, this is one of the cards that I decided to hold onto. It just wasn't as nice as the others I had made. So I thought that I would share it with you now!


  • Stamps: Woodgrain, Sweet Essentials
  • DSP: Wisteria Wonder, Silver Glimmer Paper
  • Card Stock: Very Vanilla, Perfect Plum, Elegant Eggplant
  • Ink: Illuminate Versamark, Elegant Eggplant
  • Accessories: Rhinestones, Labels Framelits, Festive Piercing Pack, Paper-Piercing Tool, Stampin’ Pierce Mat, Paper Snips, Stampin’ Dimensionals, 3/16” Corner Punch


I started off by cutting a piece of Very Vanilla card stock 5-1/2” x 8-1/2” and score it at 4-1/4”. I used the 3/16” Corner punch on all of the outside corners of the card stock (not on the fold). Next I cut a piece of Perfect Plum card stock 4-1/2 x 5-1/2 and ran it through the Big Shot with the largest Labels Framelit. I stamped the Woodgrain background image onto the Perfect Plum label in Illuminate Versamark ink. You can see the shimmery woodgrain a lot better in real life.


I adhered the label onto the left side of the card front and used Paper Snips to trim off the portion of the label that extended past the fold of the card. Next I used my Paper-Piercing Tool, Stampin’ Pierce Mat, and Festive Piercing Pack to pierce holes around both the inside and the outside of the label. The piercing around the label really adds a fun little detail to the card.

Next I cut a piece of Wisteria Wonder DSP 1” x 3-3/4”. I stamped the greeting from Sweet Essentials onto the right side of the DSP in Elegant Eggplant ink then used Paper Snips to cut the greeting end into a dove-tail shape. I put Anywhere Glue Stick on the straight end of the banner, and a Stampin’ Dimensional on the dove-tail end of the banner then adhered the banner onto the card front.


Next I cut a piece of Elegant Eggplant card stock 1” x 5-1/2” and a piece of Silver Glimmer Paper 3/8” x 5-1/2”. I adhered the Glimmer Paper onto the Elegant Eggplant strip, then adhered that layer onto the card front. Since there just wasn’t enough glimmer yet, I added three Rhinestones onto the left end of the banner.

That completes this fun, yet simple card! 


Monday, September 16, 2013

Craft Project Central!

Halloween Party Ensemble: 

Get ready for a spooky Halloween party with this fun set! Complete with invitation, food labels for your treats table, party favor bag, luminary, and a decorated jar full of treats. You will be all set to surprise and scare your guests! Also, you’ll learn fun new ways to use the Card Base Pop’n Cuts die to make these projects!


This Halloween set was designed by me! 

If you would like to subscribe to the September edition of Craft Project Central and get 10 wonderful tutorials for only $10 then click HERE!

More September projects that you may have missed: 


Friday, September 13, 2013

So Sorry

It’s Friday again! That means its Friday Mashup time! This week Heidi has challenged us to create a sympathy card. After taking some time to think about what I wanted to do I pulled out my favorite new stamp set from the catalog Too Kind and the greeting set So Sorry.


  • Stamps: Too Kind, So Sorry, Gorgeous Grunge
  • DSP: Modern Medley
  • Card Stock: Crumb Cake, Soft Sky, Very Vanilla
  • Ink: Soft Sky, Marina Mist, Wild Wasabi, Basic Gray, Crumb Cake
  • Accessories: Silver Glimmer Paper, 1/8” Marina Mist ribbon, Rhinestones, Stampin’ Dimensionals


Here's your Mashup Challenge:
  1. Create a "Thinking of you or condolence card."
  2. Create a card/cards and "Donate it to a Charity or Organization of your choice."
  3. Or Mash it Up and create a "Thinking of you/Condolence Card and donate it to H.A.N.D.S via Heidi."

If you would like to make this sympathy card start off by cutting a piece of Crumb Cake card stock 5-1/2” x 8-1/2” and score it at 4-1/4”. Next cut a piece of Modern Medley DSP 4” x 2-5/8” and adhere it onto the left side of the card front. Cut a piece of Silver Glimmer Paper 1/4” x 4-1/4” and adhere it onto the card base right next to the DSP. Now take the small spots image from Gorgeous Grunge and stamp it a couple times on the right side of the card front in Crumb Cake ink.


For the image panel start off by cutting a piece of Very Vanilla card stock 2-3/4” x 3-3/4”. I wanted to keep the colors on this card soft so stamp the stems of the flowers onto the Very Vanilla card stock in Wild Wasabi ink. Next stamp the larger flower images onto the card stock in Soft Sky ink then stamp the more detailed images in Marina Mist ink.


For the greeting stamp the So Sorry in Basic Gray ink in the bottom right hand corner of the Very Vanilla card stock. Now stamp the smaller for your loss just above the Sorry in Marina Mist ink. Add a medium Rhinestone onto the S of the Sorry the wrap a piece of 1/8” Marina Mist ribbon around the panel and tie it into a bow. Adhere this panel onto the card front with a few Stampin’ Dimensionals and you’re done!  

If you have a chance head on over to the Friday Mashup to see what the rest of the design team created! 


Thursday, September 12, 2013

Craft Project Central!

Give Thanks Wreath: 

This wreath is fun to make, uses re-cycled materials and can be customized to any color scheme!  Highlighting the wonderful Sweater Weather Designer Series Paper, it is a mix of naturals, subtle and bright colors, perfect for the autumn season.


This beautiful fall project was created by Lauri! If you have a chance please head on over to Lauri's blog and leave her a comment on her project! 

If you would like to subscribe to the September edition of Craft Project Central and get 10 wonderful tutorials for only $10 then click HERE!

More September projects that you may have missed: 


Wednesday, September 11, 2013

Jewelry Photo Dump

I’ve made several pieces of jewelry for various reasons that I haven’t gotten around to posting. I’m trying to go through my pictures for blogging and get them cleaned up so I’m going to dump a bunch of these on you at once. Warning! Picture heavy post!

A birthday present for me from me:
I made myself this pair of earrings for my birthday last year. As a crafter I find I make more things as gifts than I actually keep for myself. So I made these just for me!  These are not 100% originally designed. I followed a tutorial I got off Etsy HERE.


Kelly’s Necklace:
I made this necklace and a matching pair of earrings for my Sister Kelly for her birthday last year. She said she wanted jewelry and something red. So this is what I came up with.


A necklace and earring set for Val:
Val is a very good friend and the mother of my Sister’s exchange student from a few years ago. She send me and my hubby some delicious treats from Germany for Christmas so in return I made her and her daughter Sira a jewelry set. So this is Vals.


This one was for Sira:
I had fun making these even though they did take a while to make.


Swirl earrings for Carline’s prom:
Caroline is the exchange student that my sister hosted last year. I made these for her to wear with her prom dress. So sparkly!


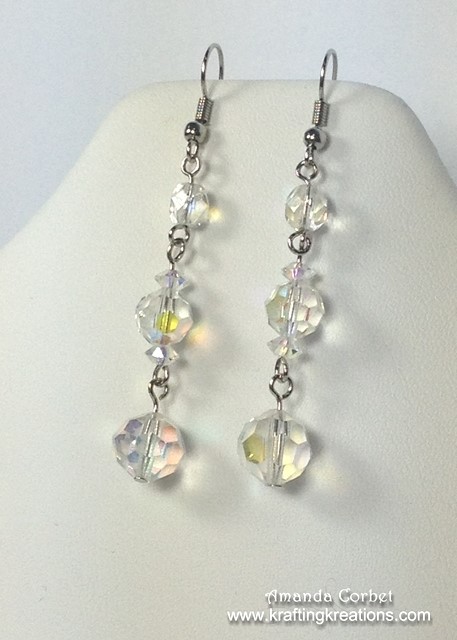
These simple earrings I had made as an alternative for Carline in case she wanted something simpler than the swirls. She did like the swirls better so I just kept these lovelies for myself.


These sparkly cracked glass earrings I made quite a while ago that are sitting in my Etsy shop looking for a good home.