Monday, July 18, 2011

Floral Get Well Wishes

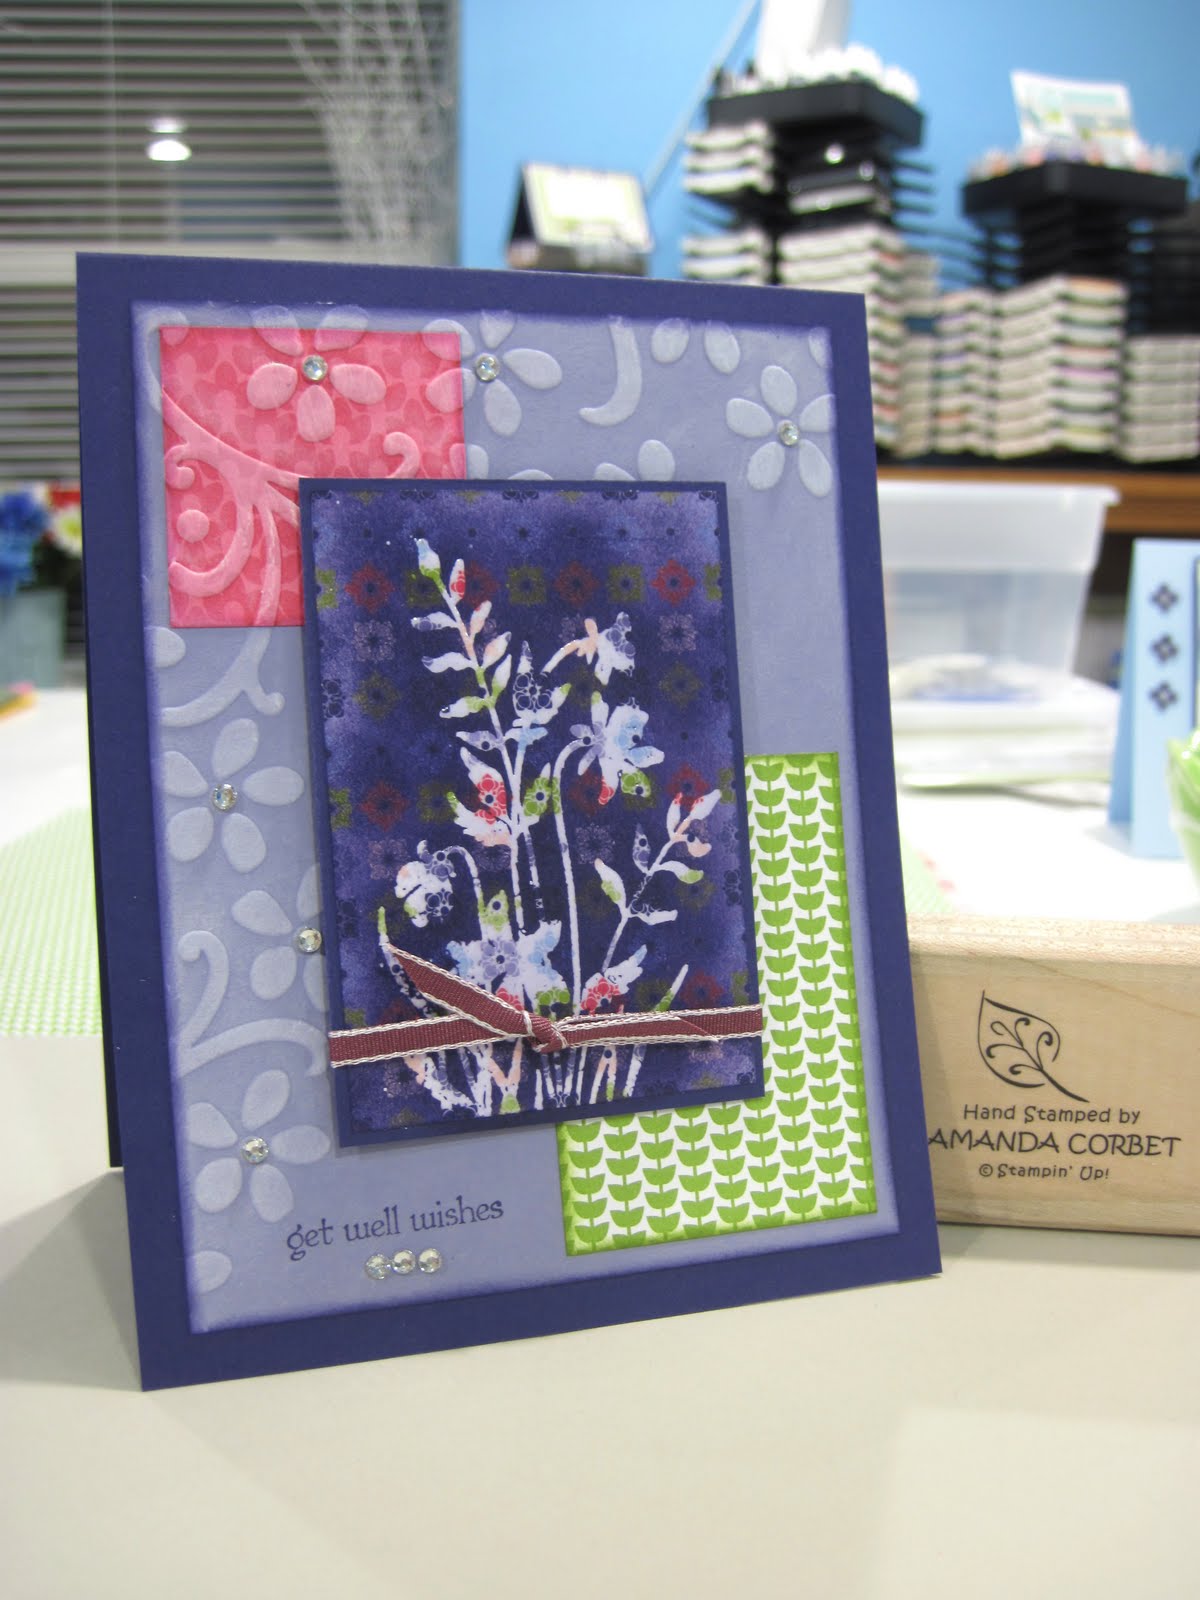
Good morning everyone! I hope you all are having a wonderful Monday! Today I am going to share with you the card I created for the SCCSC75 Sketch Challenge on Stampin' Connection. Here is the card:


Stamps: Just Believe, Teeny Tiny Wishes
Cardstock: Concord Crush, Wisteria Wonder
DSP: Cheerful Treat (Hostess)
Ink: Lucky Limeade, Melon Mambo, Concord Crush, Versamark, Whisper White Craft
Accessories: Clear Embossing Powder, Heat Gun, Stampin' Sponge, Elegant Bouquet Textured Impressions Embossing Folder, 1/8" Rich Razzleberry Taffeta Ribbon, Basic Rhinestones Jewel Accents, Stampin' Dimensionals.

The card was based on this sketch: 


The card base is Concord Crush cardstock cut at 5 1/2" x 8 1/2" and scored at 4 1/4". The next layer is Wisteria Wonder cardstock that was cut at 3 3/4" x 5". A piece of pink Cheerful Treat (Hostess) DSP was cut at 1 1/2" x 1 1/2". The edges were sponged in Melon Mambo ink and the DSP was adhered to the Wisteria Wonder cardstock in the upper left hand corner. A piece of green Cheerful Treat (Hostess) DSP was cut at 1 3/4" x 2 1/2". The edges were sponged in Lucky Limeade ink and the DSP was adhered to the Wisteria Wonder cardstock in the lower right hand corner.

The Wisteria Wonder cardstock with DSP was then run through the Big Shot in the Elegant Bouquet Textured Impressions Embossing Folder. The Whisper White Craft ink pad was run directly across the cardstock inking up the raised images created by the embossing folder. This was set aside to dry.

Another piece of Cheerful Treat (Hostess) DSP was cut at 2 1/8" x 3 1/8". The flower silhouette image from Just Believe was stamped onto the DSP in Versamark and covered with Clear Embossing Powder. The embossing powder was heated with the Heat Gun and then the image was sponged over with Concord Crush ink. The embossing powder resists the ink so the pattern of the DSP shows through only where stamped. The remainder of the background is varying depths of Concord Crush. This was adhered to a 2 1/4" x 3 1/4" piece of Concord Crush cardstock. A piece of 1/8" Rich Razzleberry ribbon was tied around the panel and into a knot.


The textured Wisteria Wonder cardstock was adhered to the Concord Crush card front. The greeting from Teeny Tiny Wishes was stamped in Concord Crush ink in the lower left hand corner of the card front. The embossed panel was adhered to the card front with Stampin' Dimensionals. Basic Rhinestones Jewel Accents were added to the center of each of the flowers from the embossing folder that are visible, and three rhinestones were added under the greeting.

If you are a Stampin' Up Demonstrator you can find the sketch challenge thread HERE. If you are not a Stampin' Up Demonstrator I would still love to see what you create! Please post a link to your card in the comments section of this post!

Thanks for stopping by!


Friday, July 15, 2011

Bashful Posy

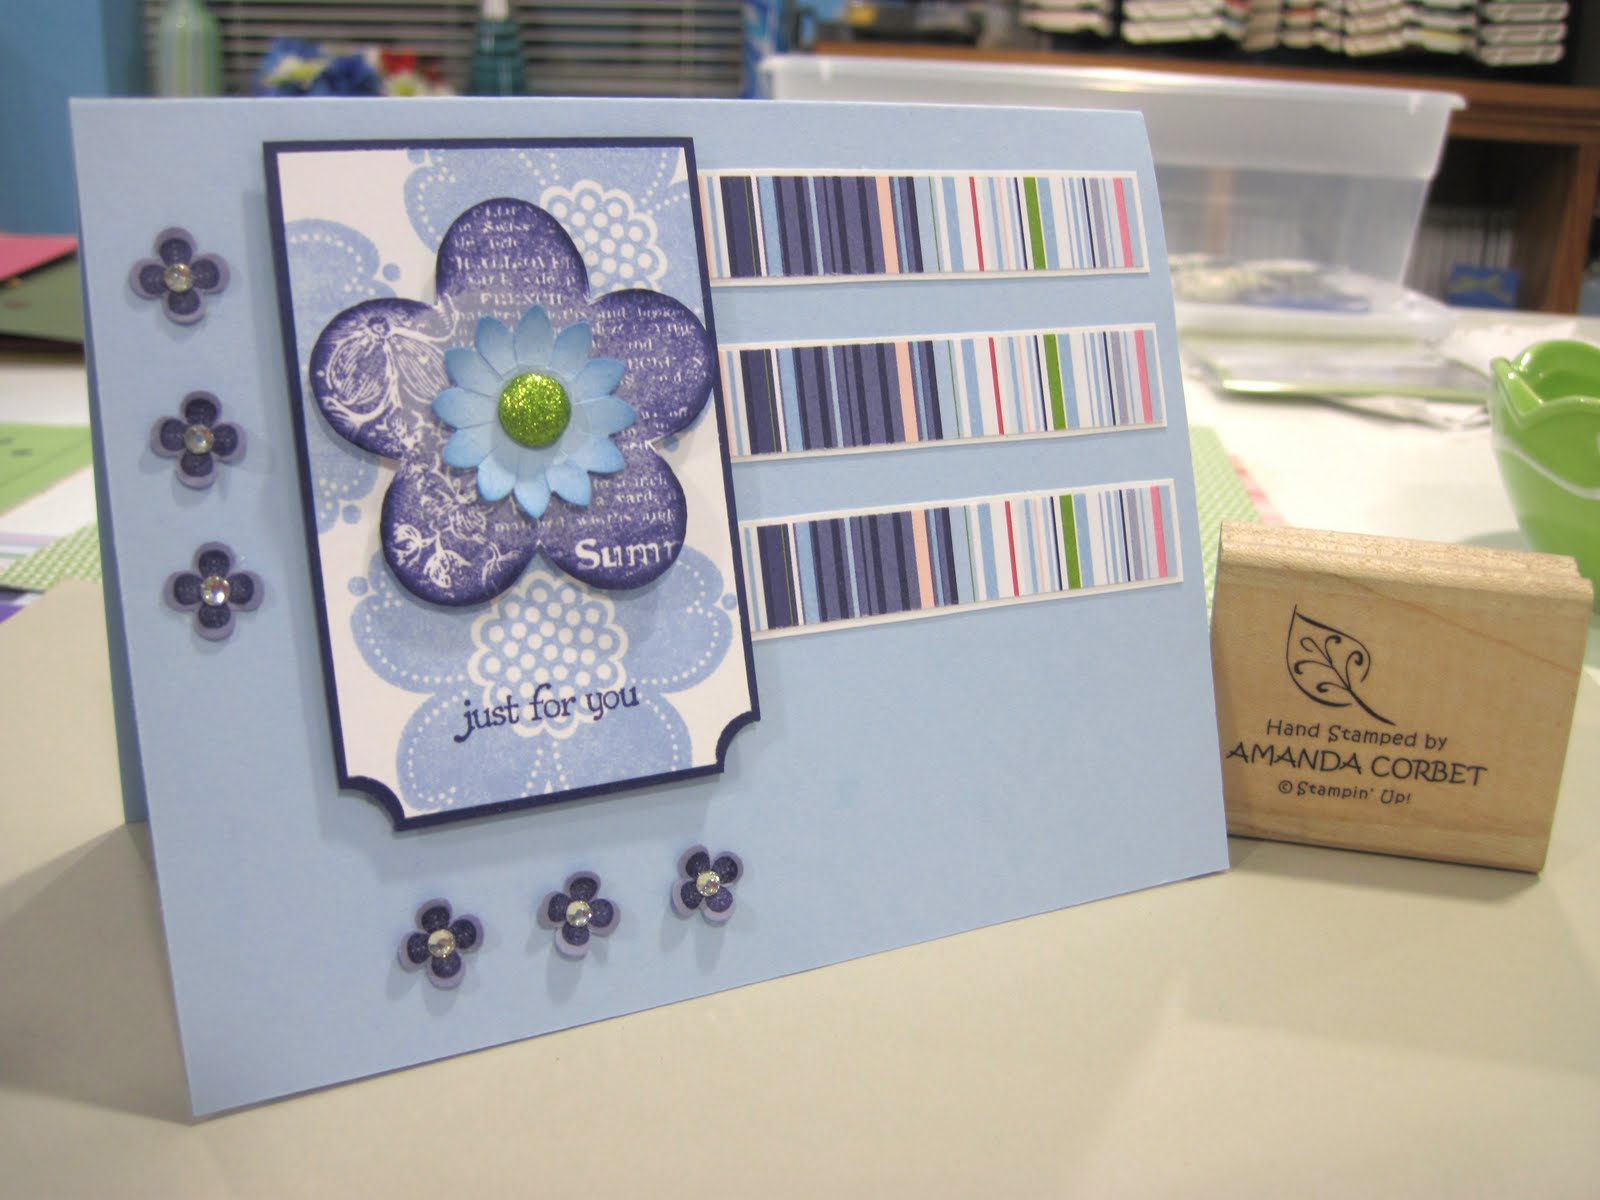
Good morning everyone! Happy Friday!!!! I created this card for the SCCSC74 sketch challenge on Stampin' Connection. Take a look:


Stamps: Posy Punch, Itty Bitty Bits, Teeny Tiny Wishes
Cardstock: Bashful Blue, Concord Crush, Whisper White, Wisteria Wonder
DSP: Cheerful Treat DSP (Hostess)
Ink: Concord Crush, Wisteria Wonder, Bashful Blue
Accessories: Ticket Corner Punch, Punch Pack (small flower punch), XL flower Punch, Needle Tool, Mat Pack, Paper Snips, Glimmer Brad, Basic Rhinestones Jewel Accents, Stampin' Dimensionals, Boho Blossoms Punch

I really struggled with what to do with this sketch:

But after a lot of thought a playing around I came up with the card above. The card base is Bashful Blue cardstock cut at 5 1/2" x 8 1/2" and scored at 4 1/4". I cut three pieces of Cheerful Treat DSP (Hostess) into 1/2" x 2 3/4" pieces and adhered each strip to a 5/8" x 2 7/8" piece of Whisper White cardstock. These were adhered to the card front in the upper right hand corner.

Next I cut a piece of Whisper White cardstock 1 7/8" x 2 7/8" and a piece of Concord Crush cardstock 2" x 3". The bottom corners were punched with the Ticket Corner Punch. The Whisper White cardstock was then stamped with the image from Posy Punch in Bashful Blue ink several times to create a background. The greeting from Teeny Tiny Wishes was stamped at the bottom of the tag shaped Whisper White cardstock in Concord Crush ink. The stamped Whisper White cardstock was adhered to the Concord Crush cardstock and this was adhered to the card front with Stampin' Dimensionals.

The other flower from Posy Punch was stamped on a scrap of Whisper White cardstock using the Rock-N-Roll technique with Wisteria Wonder and Concord Crush ink. The image was cut out with Paper Snips and the edges of the flower were sponged with more Concord Crush ink just to darken the edges.

The Boho Blossoms Punch was used on a scrap of Bashful Blue cardstock to punch out the largest of the three flowers. I then used the paper snips to cut a slit towards the center on either side of all the petals. The edges of this little flower were then sponged with a little Bashful Blue ink. This flower was adhered to the center of the large flower and the Needle Tool and Mat Pack were used to pierce a hole in the center of the flower and a Glimmer Brad was added. The flower was adhered to the stamped Whisper White tag shape with a couple Stampin' Dimensionals.

Next I used the four petal flower from Ittly Bitty Bits and stamped six flowers in Concord Crush ink on a scrap of Wisteria Wonder cardstock. The flowers were punched out with the four petal flower punch from the Punch Pack. The flowers were adhered to the card front. After the glue for the flowers set up I added a Basic Rhinestone Jewel Accent to the center of each of the flowers and folded up the petals to give the flowers some more dimension.

That's it! After I finally decided what direction I wanted to go with this card it came together pretty quickly. But that is the one thing I love about doing sketch challenges. They sometimes pull you out of your confort zone and make you try things you would vener have thought of otherwise.

If you are a Stampin' Up Demonstrator you can find the sketch challenge thread HERE. If you are not a Stampin' Up Demonstrator I would still love to see your creations. Please post a link to your project in the comments section of this post. Come back later to see the card I made for this week's sketch challenge!

Tuesday, July 12, 2011

Mom's Birthday Present

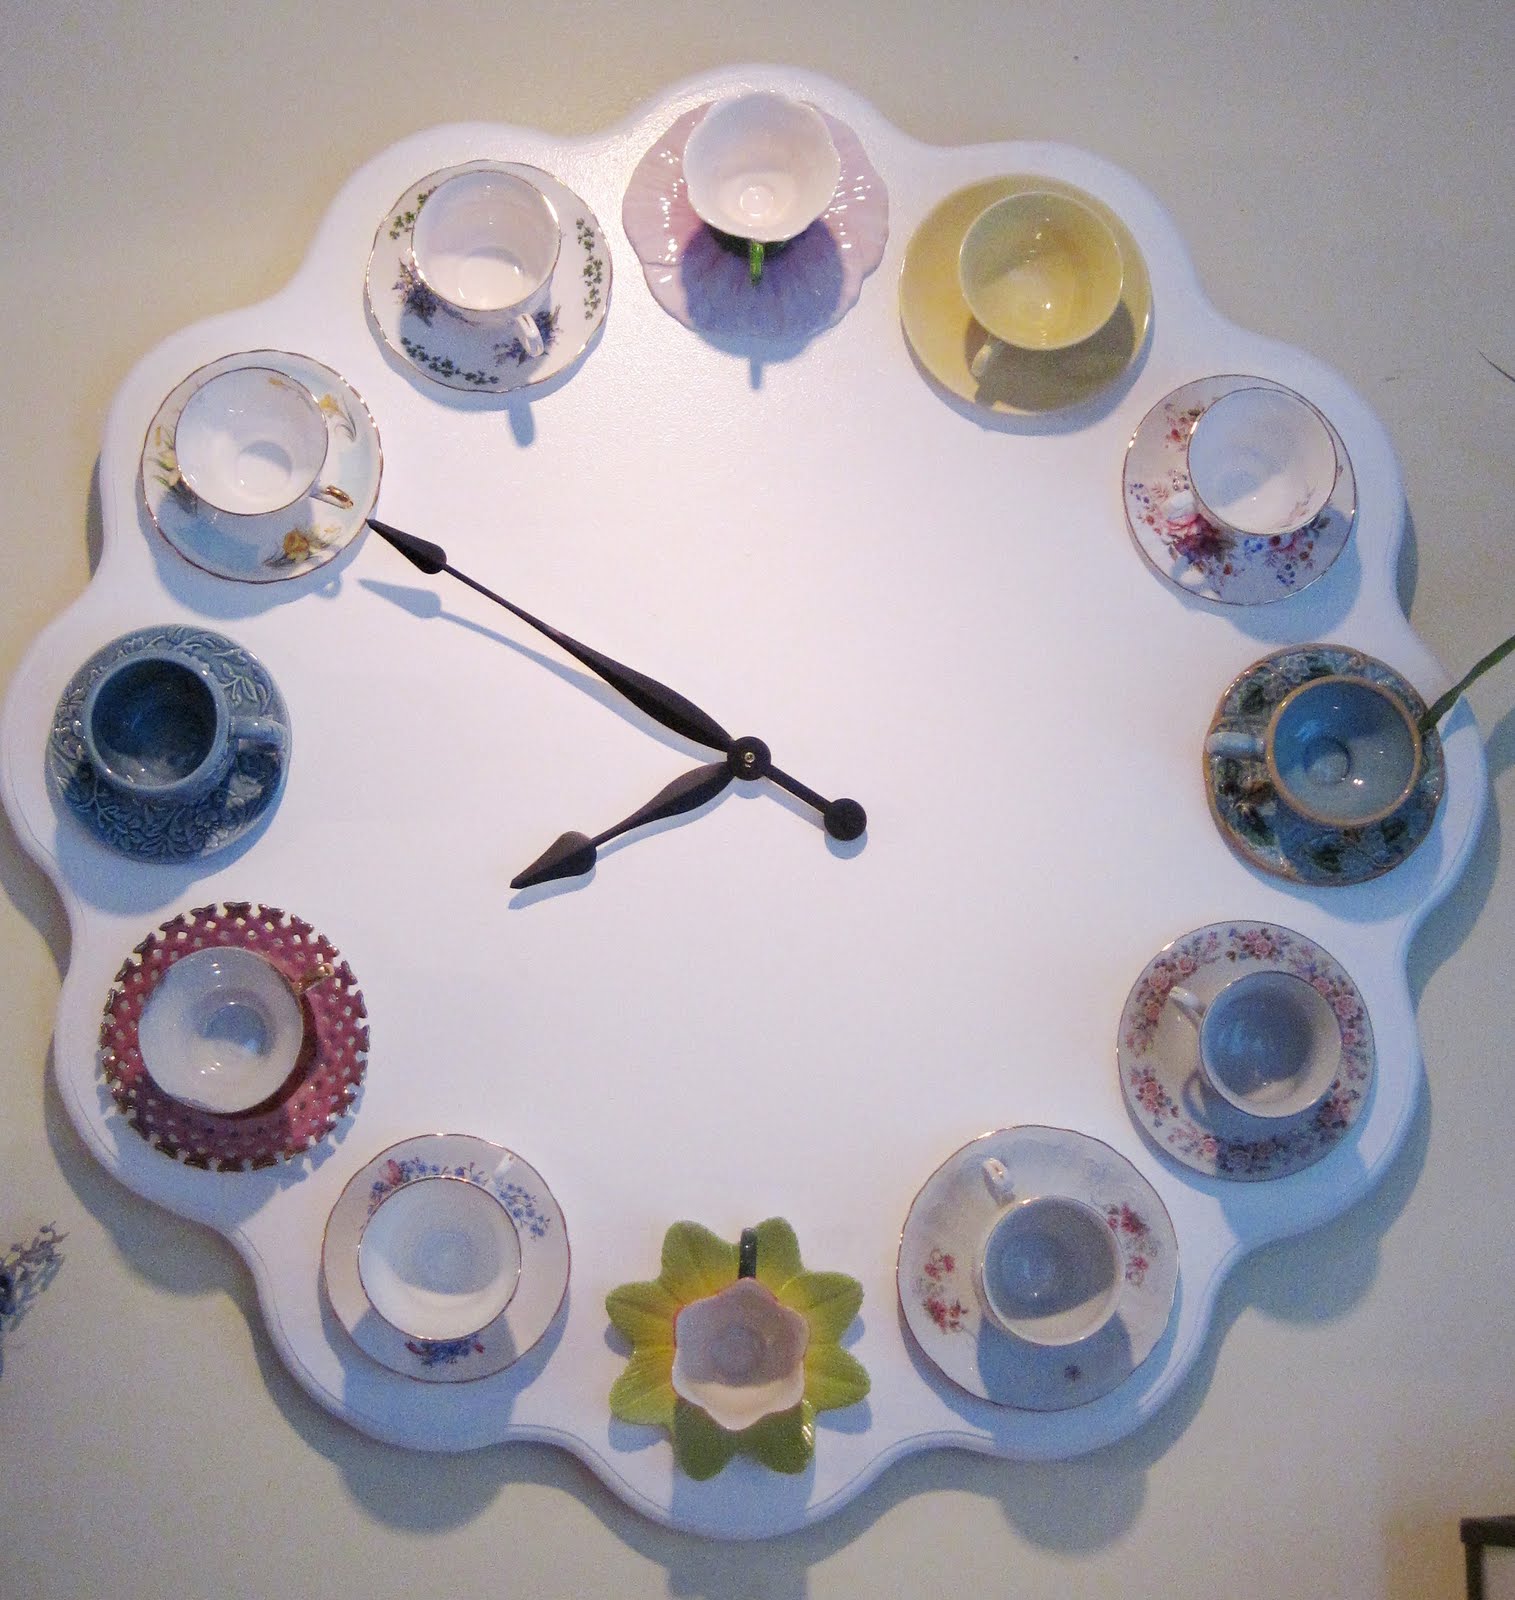
Good morning all! Both my Mom and my Husband had birthdays this last weekend so we had a party for both of them on Saturday. This is the present that Mom got from Me, my husband, and my sister Kelly. We make such a good team!


My sister found THIS pin. I thought that Mom would absolutely love it and that we could make it happen. So Kelly convinced Mom to hand over some of her tea-cup collection (knowing they wouldn't be usable again) and I found some of them online or at an antique store.

I drew up a pattern using a CAD program, printed it out on several sheets of letter size paper and taped it all together. Then my husband Bill helped cut out the pattern from 5/8" thick MDF. He then routed the edges and added the hole for the clock parts and the boards on the back to mount the clock to the wall.

The tea cups were cleaned well and glued together and then to the MDF with a resin epoxy. These things aren't going anywhere! Some hanging wire was added to the back and voila!

Mom really loves it! I'm really happy with it. Also, now that we have a pattern it would be super easy to make another one.


These photos were taken at night, so sorry for the poor photo quality.


I just love the little tea pot lamp and the tea-for-one pots that Mom positioned under the clock on the mantle!


Mom's Birthday Card

This is the card that I created for my Mom for her birthday. She absolutely loves yellow, so I used a combination of Daffodil Delight, Whisper White, and lots of glitter! Take a look:


 Stamps: Delicate Doilies, Create A Cupcake
Cardstock: Whisper White, Daffodil Delight, Shimmery White
Ink: Daffodil Delight, Versamark
Accessories: Modern Label Punch, Large Lace Border Punch, Heat and Stick Powder, Dazzling Diamonds Glitter, Heat Gun, Stampin’ Dimensionals, Paper Snips, Blossom Bouquet Triple Layer Punch, Two-Way Glue Pen.

The card base is Whisper White cardstock cut at 5 ½” x 8 ½” and scored at 4 ¼”. Another piece of Whisper White was cut at 3 7/8” x 5 1/8”. The two large doilies from Delicate Doilies were stamped all over the smaller piece of Whisper White cardstock in Versamark ink. Heat and Stick powder was poured over the stamped images and the powder was heated with the heat gun. Once sticky, Dazzling Diamonds glitter was poured over the images, excess was removed, and the heat gun was used again quickly just to set the glitter in the heat and stick powder. Iridescent Ice Embossing powder would have also given you the glittery images without having to use the heat and stick powder, but I was out so I used Heat and Stick powder with Dazzling Diamonds glitter instead. Either one would work though.

This now super glittery piece of cardstock was adhered to a 4” x 5 ¼” piece of Daffodil Delight cardstock and was adhered to the card front. The Large Lace Border Punch was used on a piece of Shimmery White cardstock. The lace was trimmed to the length of the card and set aside. Next I used the Blossom Bouquet Triple Layer punch and punched out five flowers using the middle setting. I then used paper snips to trim off the scallops and glued the “circles” behind the lace using a Two-Way Glue Pen. I’m sure that there is a circle punch that would cut these the size I needed, but I don’t have all of the circle punches….yet. The lace trim was adhered to the card front with Stampin’ Dimensionals.


The greeting from Create A Cupcake was stamped in Daffodil Delight ink on a scrap of Whisper White cardstock and then was punched out with the Modern Label punch. Two more modern labels were punched from scraps of Daffodil Delight cardstock. One label was cut length-wise and what was left of the center scallop in the side was trimmed off. These were adhered behind the greeting label at the top and bottom. The second Modern label was cut in half width-wise and adhered behind the Whisper White label. This creates a Daffodil Delight mat all the way around the greeting label. The label was adhered to the card with Stampin’ Dimensionals.


Although it sounds difficult and time consuming it only took me about 10 minutes to create this card. Even with the embossing! I really like the lace with the colors behind the openings. I am going to have to get the correct punch to make this easier to do.

I hope you give this easy card a try! Thanks for stopping by!

Thursday, July 7, 2011

Doilies and Lace

Hello everyone! I hope you like the new look of my blog. I made some changes to show off some of the new Designer Series Paper available for My Digital Studio. Both of the patterns came from the Flirtatious pack. The card I have to share with you is one I made a couple of weeks ago right after I received my pre-order goodies. I just had to play with the new toys right??? So here it is:


Stamps: Delicate Doilies, Because I Care
Cardstock: Whisper White, Concord Crush, Wisteria Wonder
Ink: Concord Crush, Wisteria Wonder
Markers: Pool Party, Lucky Limeade, Wisteria Wonder
Accessories: Modern Label Punch, Large Lace Ribbon Border Punch, Basic Rhinestones Jewel Accents, Paper Snips, Stampin' Dimensionals.


The card base is Whisper White cardstock cut at 5 1/2" x 8 1/2", and scored at 4 1/4". Another piece of Whisper White cardstock was cut at 3 3/8" x 4 5/8". The smaller piece of Whipser White cardstock was stamped with the doilies from Delicate Doilies. The largest one was stamped twice on the card front in Concord Crush ink. The second largest was stamped twice in Wisteria Wonder ink. Portions of the doilies were colored in with the Pool Party, Wisteria Wonder, and Lucky Limeade markers.

This panel was then adhered to a 3 5/8" x 4 7/8" piece of Wisteria Wonder cardstock, which was then adhered to a 3 3/4" x 5" piece of Concord Crush cardstock. The Large Lace Ribbon Border Punch was used on a scrap of Concord Crush cardstock and the lace was adhered to the panel and the excess was trimmed off. I used the Two-Way Glue Pen to stick the punched piece down. It seemed to work pretty well.

Large rhinestones were added in the center of each of the portions of the lace punch. The greeting was stamped in Concord Crush ink on a scrap of Pool Party cardstock. The greeting was punched out with the Modern Label punch and the edges were sponged with more Pool Party ink (I'm really loving this new color!). One rhinestone was added to each end of the label and the label was adhered to the stamped panel with Stampin' Dimensionals. The large panel was adhered to the Whisper White card base with Stampin' Dimensionals.

If you haven't seen the new catalog and would like to just click on the catalog button on the right. There are so many new and fun products to play with!

Thanks for stopping by!

Tuesday, July 5, 2011

Mother of Pearl Style

Today I have the final demo from the May workshop. This one features the wonderful Mother of Pearl Technique. If you would like to learn how to do this just go to the Tutorial tab at the top of the page and click on the Mother of Pearl Technique. Here is the card:


Stamps: Elements of Style
Cardstock: Elegant Eggplant, Whisper White
Ink: Black Stazon, Rich Razzleberry
Accessories: Frost White Shimmer Paint, plastic wrap, Sponge Dauber, Whisper White Organza Ribbon

The card base is Elegant Eggplant cardstock cut at 5 ½” x 8 ½” and scored at 4 ¼”. A piece of Whisper White cardstock was cut at 3 ¾” x 5”. The flourish from Elements of Style was stamped in the lower right hand corner of the Whisper White cardstock in Rich Razzleberry ink by stamping off on a piece of scrap paper before stamping on the cardstock. The greeting was stamped in Rich Razzleberry ink. This panel was adhered to the card front.

Next a piece of Whisper White was cut at 3 ¼” x 3 ¼”. The flourish was stamped in Black Stazon all over the cardstock to create a patterned paper. Then I used Frost White Shimmer Paint and Rich Razzleberry ink for the faux Mother of Pearl Technique. This panel was adhered to a 3 ½” x 3 ½” piece of Elegant Eggplant cardstock. A piece of Whisper White Organza Ribbon was wrapped around the panel and tied into a knot. This panel was adhered to the card front. That’s it!


This was a super simple card showcasing a wonderful new technique! I hope you get a chance to try the Mother of Pearl Technique; it really is fun and different!

Thanks for stopping by!