Thursday, September 2, 2010

Color Challenge!!!

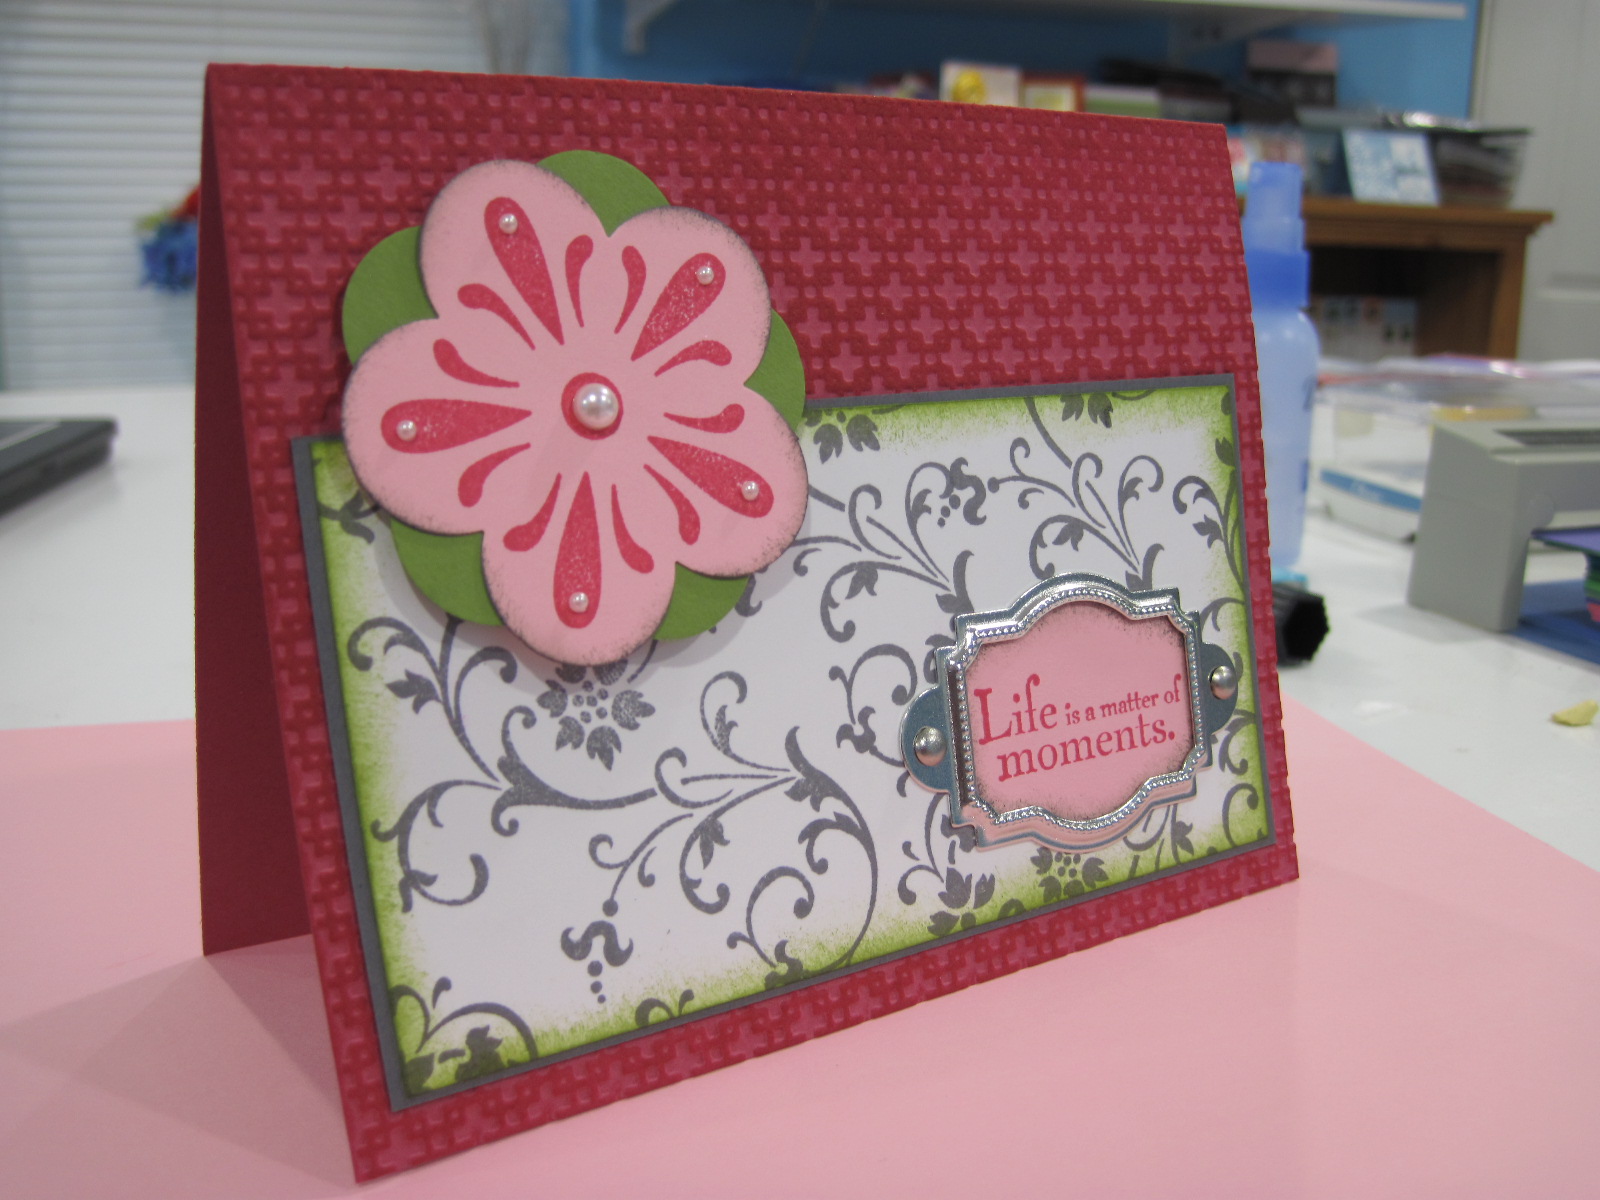
This card was created for the Color Challenge on Stampin' Connection. Here are the challenge colors: Melon Mambo, Pretty In Pink, Basic Grey, and Old Olive.

Stamps: Elements of Style, Heard From the Heart
Cardstock: Melon Mambo, Whisper White, Basic Grey, Old Olive, Pretty In Pink
Ink: Basic Grey, Old Olive, Melon Mambo
Accessories: Silver Hodgepodge Hardware, Designer Label Punch, Extra Large Flower Punch, Jewel Accents Basic Pearls, Square Lattice Textured Impressions Die, Brayer

The card base is 5 1/2" x 8 1/2" Melon Mambo cardstock that was scored at 4 1/4". The card front was run through the Big Shot in the Square Lattice Textured Impressions Die. I used the Brayer with Melon Mambo ink and inked up the texture on the card front. This makes the texture stand out more.

A piece of Whisper White cardstock was cut at 2 1/2" x 5". The swirls from Elements of Style were stamped all over the Whisper White cardstock in Basic Grey ink. The edges of the panel were sponged in Old Olive ink. This was adhered to a 2 5/8" x 5 1/8" piece of Basic Grey cardstock. The sentiment from Elements of Style was stamped in Melon Mambo ink on Pretty In Pink cardstock and punched out with the Designer Label  punch. This punched sentiment was attached to the panel with the frame and brads from the Silver Hodgepodge Hardware kit. The panels were then adhered to the card front.

I stamped the image from Heard From the Heart in Melon Mambo ink on a scrap of Pretty In Pink cardstock and punched it out with the Extra Large Flower punch. I also punched out an Old Olive flower with the Extra Large Flower punch. The two flowers were adhered together. Some Jewel Accents Basic Pearls were added to the center and points on the stamped image and the flower was adhered to the card front with a Stampin' Dimensional.

I hope this has inspired you to play with some interesting color combinations! I would love to see your creations, please post a link in the comments section if you played along! Come back tomorrow to see another challenge card! Have fun stamping!

Tuesday, August 31, 2010

Blue, White, and Silver Christmas

Here is the swap card for the Blue, White, & Silver group that I mentioned yesterday.

Stamps: Season of Joy, Snow Swirled
Cardstock: Whisper White, Marina Mist, Night of Navy
Ink: Marina Mist, Night of Navy
Accessories: 5/8" Night of Navy Satin ribbon, Perfect Polka Dots Textured Impressions Die, Silver Brads, Crystal Effects, Dazzling Diamonds glitter, Stampin' Dimensionals, Needle Tool, Mat Pack

The card base is 5 1/2" x 8 1/2" Whisper White cardstock scored at 4 1/4". A piece of Whisper White cardstock was cut at 3 3/4" x 5" and run through the Big Shot with the Perfect Polka Dots Textured Impressions Die. This was adhered to a 4" x 5 1/4" piece of Marina Mist cardstock. I used the Needle Tool and Mat Pack to punch two holes in the upper left hand corner and added two Silver Brads. Some 5/8" Night of Navy Satin ribbon was tied around the panel and into a knot. I just love how rich and pretty this satin ribbon is. It's just wonderful! These panels were then adhered to the card front.

On a 2" x 3" piece of Whisper White cardstock I stamped the tree from Season of Joy in Marina Mist ink. Then I stamped the "Seasons Greetings" from Snow Swirled on the bottom of the piece in Night of Navy ink. Some Crystal Effects was added on top of the star on the tree and then coated with Dazzling Diamonds glitter. This made the star really sparkle and shine! After the Crystal Effects dried this panel was adhered to a piece of 2 1/8" x 3 1/8" Night of Navy cardstock. This was adhered to the card front with Stampin' Dimensionals to make it pop up off the card.

I hope you have enjoyed these Christmas card swaps and get you thinking about making your own Christmas cards this year! Come back tomorrow to see a scrapbook page created in My Digital Studio!

Monday, August 30, 2010

Green, Red, and Gold Christmas

Sorry, no tutorial today. I've been busy lately preparing for a local festival that I will have a booth at. I will have to show you some pictures of the chaos. So instead for today I have a swap card. Yay swaps! This is one that I submitted for the Red, Green, & Gold Christmas card swap. It's never too early to start getting ideas for your Christmas cards!

Stamps: Season of Joy, Simple Snowflake
Cardstock: Bravo Burgundy, Always Artichoke, Old Olive, Naturals White, Brushed Gold
Ink: Bravo Burgundy, Old Olive, Versamark
Accessories: Gold embossing powder, Heat Gun, Brayer, Needle Tool, Mat Pack, Gold Brads, Embossing Buddy, 5/8" Old Olive Satin Ribbon, Stampin' Dimensionals

The card base is Bravo Burgundy cardstock cut at 5 1/2" x 8 1/2" and scored at 4 1/4". I used the Simple Snowflake stamp with Bravo Burgundy ink all over the card base to create a subtle patterned background. A piece of Naturals White cardstock was cut at 2 1/2" x 4 1/4" and brayered with Old Olive ink. When brayering start just off of the paper on one edge and work your way onto and down the paper as you roll back and fourth. This will give you a fading effect with your ink. "Merry Christmas" was stamped in Bravo Burgundy ink in the lower right hand corner. This cardstock was then adhered to a piece of Always Artichoke cardstock cut at 2 5/8" 4 1/4", and this was then layered on a piece of Brushed Gold cardstock cut at 2 7/8" x 4 1/4". These layers were then adhered to the card front.

On a 2" x 3" piece of Naturals White cardstock I used the embossing buddy, stamped the tree in Versamark, and heat embossed with Gold embossing powder. A piece of 5/8" Old Olive Satin ribbon was cut at 1 1/2" long and the ends were adhered together. This was adhered in the upper left hand corder of the cardstock. I then used the Needle Tool and mat pack to pierce a hole through the cardstock and the ribbon. Then I added a gold brad. This was adhered to a 2 1/8" x 3 1/8" piece of Old Olive cardstock. Then the panels were adhered to the card front with some Stampin' Dimensionals to pop it out a bit.

I hope that I've inspired you to start thinking about your own Christmas cards. Make sure to come back tomorrow to see what I submitted for the Blue, White, & Silver group! Have fun stamping!

Friday, August 27, 2010

Fancy Favor Box

Here is a super cute box that is super easy to put together. This was the 3D item at the Make & Take this month. This box was made using the Fancy Favor Box Die. Take a look:


Stamps: Baroque Motifs, Cute By The Inch
Cardstock: Pacific Point Textured, Not Quite Navy, Whisper White
Ink: Not Quite Navy
Accessories: Fancy Favor Box Die, Curly Label Punch, Paper Snips, Whisper White Organza ribbon, Hobby Blade,  1/2" Circle Punch

I started off with a 5 3/4" x 12" piece of Pacific Point Textured cardstock. I ran this through the Big Shot on the Fancy Favor Box Die. This wonderful die not only cuts out your shape but also adds all the score lines you need on the box! The box front was stamped with thw swirls from Baroque Motifs in Not Quite Navy ink. Sticky Strip was used on the side flap and one bottom flap to form the box. Adhere the side flap first and then fold the bottom flaps down and adhere the last bottom flap.

The 1/2" Circle Punch was used to punch holes at the top on both the front and back of the box. This is a hole for the ribbon to go through to tie the box closed, although the box would look just a cute left open. The image from Cute By The Inch was stamped in Not Quite Navy ink on a scrap of Whisper White cardstock. The square was cut out with paper snips and adhered to a scrap of the Pacific Point Textured cardstock and the Paper Snips were used again to cut a mat around the Whisper White square.

The Curly Label Punch was used to punch a label out of a scrap of Not Quite Navy cardstock. The layered squares were adhered to the bottom of the Not Quite Navy curly label. The Hobby Blade was used to cut a slit near the top of the curly label for the ribbon to slide through. Slide one end of the ribbon through the slot in the curly label and then through the holes in the box. Tie the ribbon into a bow on top of the box and trim the ribbon ends. Thats it!

These adorable little boxes would be easy to make in bulk for party favors and you can dress them up however you like! Thanks for stopping by!


Thursday, August 26, 2010

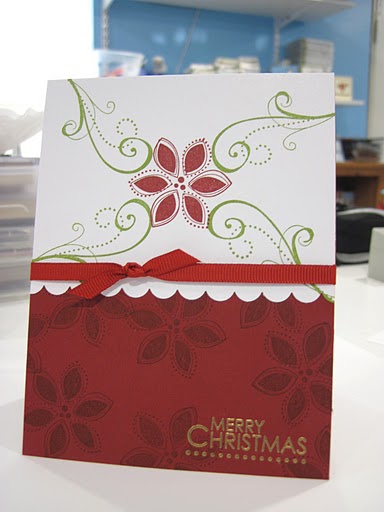
Simple Christmas Card

From August through December I will have at least one Christmas card at each Make & Take to help give others ideas of what they may want to do for their Christmas cards. So here is the first one. This card was inspired by a card created by Megan Burleson that she posted on Stampin' Connection. Take a look at my version:


Stamps: Season Of Joy
Cardstock: Cherry Cobbler, Whisper White
Ink: Old Olive, Cherry Cobbler, Versamark
Accessories: 1/4" Real Red Grosgrain Ribbon, Scallop Edge Border punch, Gold embossing powder, Heat Gun, Embossing Buddy

This card was super simple, but yet still pretty. A piece of Whisper White cardstock was cut at 4" x 9" and scored at 5 1/2". The end of the short side of the Whisper White cardstock was punched with the Scallop Edge border punch. The poinsetta was stamped in Cherry Cobbler ink in the center of the card front. The swirls were stamped in Old Olive ink around the poinsetta.

A piece of Cherry Cobbler cardstock was cut at 4 1/4" x 5 7/16". It needs to be just shy of 5 1/2" because this piece goes behind the Whisper White flap and will not meet up with the bottom of the Whisper White card back evenly if the Cherry Cobbler isn't cut slightly shorter. Make sense? The Cherry Cobbler cardstock was stamped with the poinsetta in Cherry Cobbler ink all over the piece of cardstock.

The embossing buddy was used in the bottom right corner and "Merry Christmas" was stamped in Versamark and heat embossed with Gold embossing powder. Then this panel was adhered behind the scalloped edged tab of the Whisper White cardstock. A piece of 1/4" Real Red Grosgrain ribbon was tied around the card front and into a knot. That completes a very simple Christmas card that only uses one stamp set! The poinsetta on the would look really good with some red glitter on top of it, but I already had two time comsuming cards at the Make & Take this month so I wanted to keep this one really simple.

These would be easy cards to make if you have a large number of Christmas cards that you send out. Come back tomorrow to see a cute little box that was the 3D item this month!

Wednesday, August 25, 2010

Owl Card

This adorable owl card is the next one that my guests made at the Make & Take. This one was by special request after my sister saw this card that I posted previously.

Stamps: Watercolor Trio
Cardstock: Sahara Sand, Whisper White, Cherry Cobbler, Old Olive, Early Espresso, Crumb Cake, Basic Black
Ink: Old Olive, Early Espresso
DSP: Greenhouse Gala
Accessories: Elegant Lines Textured Impressions Die, Scallop Oval Punch, Two-Step Bird Punch, Two-Step Owl Punch, Needle Tool, Mat Pack, Gold Brads, 5/8" Daffodil Delight Grosgrain ribbon, Stampin' Dimensionals, Two-Way Glue Pen

The card base is Sahara Sand cardstock cut at 5 1/2" x 8 1/2" and scored at 4 1/4". The next layer is Whisper White cardstock cut at 4 1/8" x 5 3/8" which is adhered to the card front. A piece of Cherry Cobbler cardstock was cut at 4" x 5 1/4" and run through the Big Shot in the Elegant Lines Textured Impressions Die. A piece of 5/8" Daffodil Delight Grosgrain ribbon was wrapped around the panel and adhered to the back of the Cherry Cobbler cardstock.

The sentiment from Watercolor Trio was stamped in Old Olive ink on a scrap of Whisper White cardstock and punched out with the Scalloped Oval Punch. I'm really going to miss the stamp set Watercolor Trio because the images and sentiments are so wonderful I find I'm using them all the time. If you want this stamp set make sure to order it within the next seven days before it is unavailable for order. Remember the Summer Mini Catalog items are no longer available after August 31st so order what you want soon! The scalloped oval was sponged around the edge with Early Espresso ink and then adhered on top of the ribbon on the Cherry Cobbler cardstock. Then the Needle Tool and Mat Pack were used to punch a hole on either side of the scalloped oval and two Gold Brads are added through the scalloped oval, ribbon, and Cherry Cobbler cardstock.

The Cherry Cobbler cardstock panel is then adhered to the card front. The Two-Step Owl Punch was used to punch the owl body from Early Espresso Cardstock, the large part of the eyes from Crumb Cake cardstock, the middle part of the eye from Whisper White cardstock, the smallest part of the eye from Basic Black cardstock, the heart from Cherry Cobbler cardstock, and the belly from a scrap of Greenhouse Gala DSP. The branch was punched with the Two-Step Bird Punch from Old Olive cardstock. The owl parts were adhered together with the Two-Way Glue Pen. The branch was adhered to the card front with the Two-Way Glue Pen and then the owl was adhered to the card front with a Stampin' Dimensional.

I just love this adorable little owl that you can make with the Two-Step Owl Punch because you can make so many cute expressions with the eyes and the owl is just so darn cute! You can add this wonderful Two-Step Owl Punch to your collection with item number 118074. You can click here to shop Stampin' Up online now!

Come back tomorrow to see a simple and quick Christmas card!