
This is a fun and relatively simple graduation card. For
the May Make and Take I wanted to use lots of Spring Catalog products that were
retiring. Since I haven’t gotten around to posting them until now you will see
lots of retired goodies.
- Stamps: Wishes Your Way (retired)
- DSP: Tea for Two (retired), Silver Glimmer Paper
- Card Stock: Sahara Sand, Whisper White, Lucky Limeade (retired)
- Ink: Black Stazon
- Accessories: Scallop Edge Border Punch, Cloudy Day embossing folder (retired), Paper Piercing Tool, Stampin’ Pierce Mat, Paper Snips, 2-Way glue Pen, Glue Dots, Mini Brads, Pinwheel Sizzlit Die (retired)
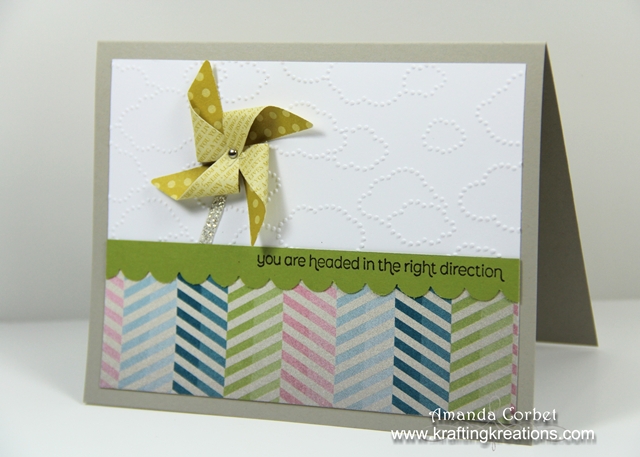
I started off by cutting a piece of Sahara Sand card
stock 5-1/2” x 8-1/2” and scored it at 4-1/4”. Next I cut a piece of Whisper
White card stock 3-3/4” x 5”. I cut a piece of Tea for Two DSP 1-1/2” x 5” and
adhered it onto the bottom of the Whisper White card stock. Then I ran this
through the Big Shot with just the top half of the Whisper White card stock
inside the fabulous Cloudy Day embossing folder.
Next I cut a piece of Lucky Limeade (that wasn’t very
“Lucky” after all since it was one of the retiring colors) card stock 3/4” x 5”
and punched one of the long edges with the Scallop Edge Border Punch. Then I
stamped the greeting from Wishes Your Way onto the right side of the card stock
strip in Black Stazon ink. Then I adhered the scalloped card stock onto the
card front covering where the DSP and Whisper White card stock met. Then I
adhered this layer onto the card front.

I cut a piece of Silver Glimmer Paper 1/8” x 1” and used
my Paper Snips to cut an angle at one end and adhered it onto the card front
with 2-Way Glue Pen so the angled end met up with the cut edge of the Lucky
Limeade scalloped strip. Then I used my Paper Piercing Tool and Stampin’ Pierce
Mat to pierce a hole in the card front right at the very top of the Silver
Glimmer Paper strip.

Next up I cut a piece of Summer Starfruit DSP 2-1/4 x
2-1/4” and ran it through the Big Shot on the Pinwheel Sizzlit die. Now this
pinwheel is absolutely adorable! Really cute! But a ROYAL pain in the
butt to put together!!! I ended up having to help most of the ladies at the
make and take with this part. Once the pinwheel was FINALLY together with the
brad through all four points I quickly inserted the brad into the hole in the
card front before it fell apart again.
So, other that the fact that it is a nightmare to try to
get that teeny tiny but totally adorable pinwheel together, this was a really
fun and simple card!
