Monday, April 28, 2014

Create

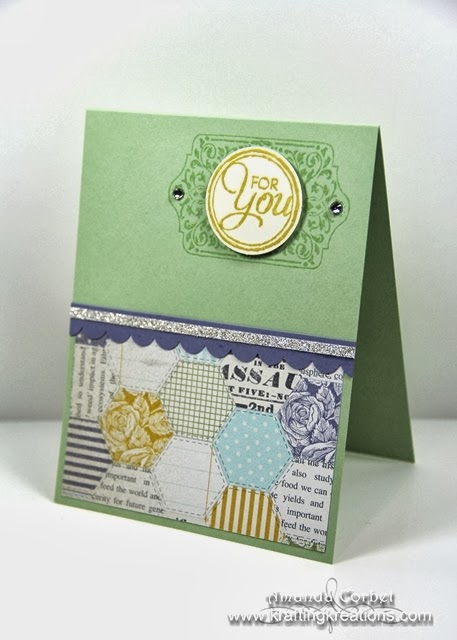
I had some fun with lots of layers on this card. I'm not sure who I will send it to or exactly what I will use it for, but it's cute! This also uses several retiring products. 


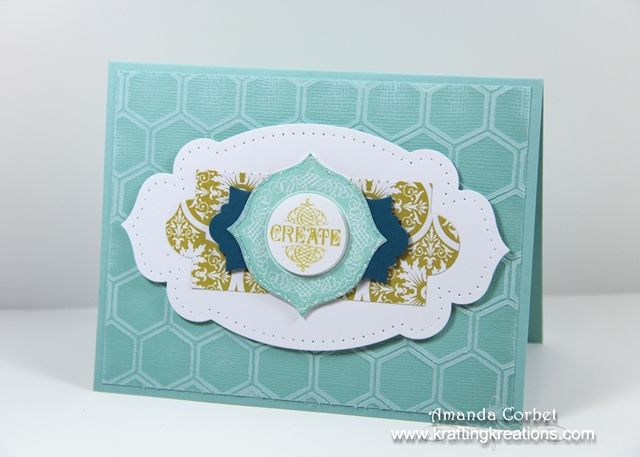
  • Pool Party card stock 5-1/2" x 8-1/2", scored at 4-1/4"
  • Pool Party Core'dinations 4" x 5-1/4"
  • Stamps: Layered Labels
  • Ink: Summer Starfruit, Pool Party
  • Accessories: Honeycomb embossing folder, Apothecary Accents Framelits, Stampin' Dimensionals, Stampin' Pierce Mat, Paper Piercing Tool, Essentials Paper Piercing Pack, Dazzling Details, Sanding Block
Start off by folding the Pool Party card stock on the score line. Then run the Pool Party Core'dinations card stock through the Big Shot in the Honeycomb embossing folder. Take the sanding block and sand off some of the raised texture. I love the grungy distressed look that this gives. I sure will miss having the Core'dination card stock.


Next run the largest Apothecary Accents Framelit through the Big Shot with a scrap of Whisper White card stock. Take you Stampin' Pierce Mat, Essentials Paper Piercing Pack, and Piercing Tool to add the piercing around the edge of the label.

Next take a scrap of DSP (I think this is some retired Sycamore Street DSP from last year) and cut it out with the next smaller Layered Labels Framelit. Now take the second from smallest Layered Labels framelit and use it on a scrap of Midnight Muse card stock. Finally stamp the create image onto a scrap of Whisper White card stock in Pool Party ink and cut it out with the smallest Layered Labels Framelit. Finally I stamped the create image again in Summer Starfruit ink and used a circle punch to punch out the center.

The labels were glued together with a combination of glue stick and Stampin' Dimensionals to make the labels pop up off the card front. Then the stack of labels were stuck onto the card front with a few Stampin' dimensionals. Finally I added some Dazzling Details around the edge of the Pool Party label just to add some sparkle.


Wednesday, April 23, 2014

For You

Oh my! This post has been sitting in the drafts folder since last summer. Well it's time to finish it up and share it with you. Albeit very late.  


  • Pistachio Pudding card stock 4-1/4" x 11", scored at 5-1/2"
  • Afternoon Picnic DSP 2-1/2" x 4"
  • Wisteria Wonder card stock 3/4" x 4-1/4"
  • Silver Glimmer Paper 1/8" x 4-1/4"
  • Stamps: Chalk Talk
  • Ink: Pistachio Pudding, Summer Starfruit
  • Accessories: Scallop Edge Punch, 1-3/8" Circle Punch, Stampin' Dimensionals, Rhinestone Basic Jewels

Start off by folding the Pistachio Pudding card stock on the score line. Glue the DSP onto the bottom of the card front with some Glue Stick. Next take the strip of Wisteria Wonder card stock and use the Scallop Edge punch on one long edge. Glue this right at the top of the DSP. Then glue this little strip of Glimmer Paper onto the Wisteria Wonder piece to add a little bit of sparkle.


Next up stamp the label image into the upper right hand corner of the card front in Pistachio Pudding ink. Stamp the "for you" image onto a scrap of Very Vanilla card stock in Summer Starfruit ink. Punch out the greeting with the 1-3/8" Circle punch and use a dimensional to stick it onto the card front.


Finally for just a little bit more sparkle add a couple Rhinestones onto either side of the stamped label. That's it! Simple and pretty!


Monday, April 21, 2014

Elegant Box and Card

Make this elegant gift box to anyone for any occasions, a birthday or a wedding. It can hold a gift card, jewelry, or candy. It also looks great on a desk holding office supplies. It is very easy to make and you don’t need a lot of craft supplies. You can leave it simple or add different embellishments to suit your style. Great for a stamp camp, or as a class project.

Elegant Gift Box & Card

This beautiful project was designed by Monika! If you have a chance please head on over to Craft Project Central and leave Monika a comment on her project! 

If you would like to subscribe to the April edition of Craft Project Central and get 10 wonderful tutorials for only $10 then click HERE!

More April projects that you may have missed: 


Tuesday, April 15, 2014

A Sweet Bunny Banner

I follow a lot of craft blogs and they have some really adorable Easter decor projects up lately. Well I saw this super cute bunny banner at My Craftily Ever After where she made a knock off version of the Pottery Barn Kids banner. The moment I saw it I knew that I had to make one! 


So I went browsing through the Silhouette store and found this adorable bunny file. Once I got it into my Silhouette Designer software I removed the cut out for the tail, copied the image, and then edited it so both ears were straight on one, then left another with the bent ear. 


I cut out eleven bunnies from several different patterns of Sweet Sorbet DSP from Sale-A-Bration. Then I also cut out eleven bunnies from Crumb Cake card stock. I used some Multipurpose Liquid Adhesive to glue the DSP bunnies onto the card stock bunnies just to make them a little bit stronger. Then I hot glued each bunny onto three pieces of twine from the Sweet Sorbet accessory pack. Next I hot glued on some cotton balls for the tails, tied the twine into a bow, and hung it up on my mantle! 


I think this project only took a little over an hour to make including altering the cut file. But it looks like you could just get this file and you wouldn't have to modify anything. So cute! Now I'm all decked out for Easter! 


Monday, April 14, 2014

Bravo!

I was just playing around with a few scraps on my table and put this lovely together in just a few minutes. I kinda went crazy with the arrows, but it's still cute. Even with the crooked greeting...


  • Crumb Cake card stock 5-1/2" x 8-1/2"
  • Card stock scraps: Coastal Cabana, So Saffron
  • DSP: Retro Fresh
  • Stamps: Gorgeous Grunge, Express Yourself
  • Ink: Coastal Cabana, Early Espresso
  • Accessories: Arrows embossing folder, Deco Labels Framelits, Label Card Thinlits, Chevron Ribbon, Silver Glimmer Paper, 2-Way Glue Pen, Stampin' Dimensionals


To make this lovely start off by folding the Crumb Cake card stock on the score line. Then run it through the Big Shot in the Arrows embossing folder. Now wrap a piece of Chevron Ribbon around the card front and tie it into a knot. 


Take a scrap of Coastal Cabana card stock and run it through the Big Shot with the 2nd from smallest Deco Labels Framelits. Stamp the splatter image from Gorgeous Grunge onto the label twice in Coastal Cabana ink. Then run this panel through the Big Shot again with the arrow framelit from the Label Card Thinlit set. Stamp "bravo!" from Express Yourself onto the label in Early Espresso ink.


Take a scrap of Retro Fresh DSP and glue it onto the card front with some glue stick. The piece just has to be big enough to cover the die cut arrow completely. Now stick the label onto the card front with Stampin' Dimensionals so the patterned paper is inside the arrow window. 

Now use the framelits to cut two more arrows, one from a scrap of So Saffron card stock and one from Silver Glimmer Paper to add some sparkle. Glue those arrows on pointing toward the greeting with some 2-Way Glue Pen. 

That's it! Super fun and simple!


Wednesday, April 9, 2014

A Simple Happy Birthday

Today I want to share the birthday card I made for my Dad. I was procrastinating as usual so I needed to make him a quick birthday card just a couple hours before actually going to the party. Nothing like planning ahead right??? So this big bold image from Another Great Year came to my rescue for this simple yet beautiful/manly birthday card! 


  • Bermuda Bay card stock 5-1/2" x 8-1/2", scored at 4-1/4"
  • Crushed Curry card stock 3-1/2" x 4-3/4"
  • Whisper White card stock 3-1/4" x 4-1/2"
  • Stamps: Another Great Year
  • Ink: Versamark
  • Markers: Bermuda Bay, Crushed Curry, Blender Pen
  • Accessories: Gold embossing powder, Embossing Buddy, Heat Tool, Stampin' Dimensionals


Start off as always by folding the Bermuda Bay card stock on the score line. Now take the Whisper White card stock and rub your Embossing Buddy over the entire piece. Now stamp the big image from Another Great Year onto the card stock in Versamark ink. Cover the stamped image with gold embossing powder, tap off the excess, and heat with your Heat Tool until it's nice and shiny.

Then take your Bermuda Bay marker to color in the banners. Color in the letters on the banners with the Crushed Curry marker. Then add some shadow to the banners by going over the ends again with the Bermuda Bay marker a couple times to make the ends darker.


Now simply glue the greeting piece onto the Crushed Curry card stock then stick the panel onto the card front with a few Stampin' Dimensionals.

On the inside I stamped another greeting from Another Great Year in Versamark ink and heat embossed it with more gold embossing powder.


So simple, yet so much fun! I love how heat embossing adds a nice pop and shine to card! 

So what have you been procrastinating on lately?