Monday, March 10, 2014

Celebrate Spinner Card

Here is a fun spinner card that my guests made at a Make and Take sometime last fall. It's been sitting in the drafts folder for a while waiting for me to do a tutorial on how to make a spinner card. Since I shared that tutorial last Friday I guess I can finally get this out of draft status and share it with you! Yay!


  • Crumb Cake card stock 5-1/2" x 8-1/2", scored at 4-1/4". 
  • Birthday Basics DSP 4" x 5-1/4"
  • Summer Starfruit card stock 3-3/4" x 5"
  • 16" Island Indigo ribbon
  • Stamps: Positively Chevron, Sketched Birthday
  • Ink: Black Stazon, Illuminate
  • Markers: Island Indigo, Summer Starfruit, Crisp Cantaloupe
  • Accessories: 1-3/4" Scalloped Circle Punch, Word Window Punch, Bitty Banners Framelits, Stampin' Dimensionals, Dazzling Details, two pennies


Click here to see the spinner card tutorial from last week. This card is basically built the same way. I glued the Birthday Basics DSP onto the card front with some Glue Stick. Then I stamped the Summer Starfruit card stock with the Positively Chevron background stamp in Illuminate ink and then punched the window.

The cupcake image from Sketched Birthday was stamped onto a scrap of Whisper White card stock, colored with the markers, then punched out with the 1-3/4" Scalloped Circle Punch. I attached the circle into the slot of the card stock with Stampin' Dimensionals and a couple pennies and stuck it onto the card front as shown in the tutorial.


I stamped the "eat cake" and "celebrate" banners onto a scrap of Crisp Cantaloupe card stock in Black Stazon ink then colored inside the banners with the Crisp Cantaloupe marker. These were cut out with the Bitty Banners Framelits in the big shot. I glued the small banner inside the slot with 2-Way glue Pen.

Next I wrapped the ribbon around the top of the card front and tied it into a knot then glued the ends of the other banner on either side of the ribbon. Finally, just to add a little more sparkle I dabbed some Dazzling Details onto the frosting on the cupcake.


I didn't get a picture of it, but on the inside I stamped several balloons in Black Stazon ink so it looked like they were floating up the card stock and colored them in with the markers.

So cute and so much fun! After I finished the sample I think I sat there for like 10 minutes just watching that little cupcake go round and round. What can I say... I guess I'm easily entertained.


Saturday, March 8, 2014

Smile

I had a little time to play and painted this cute hexagon canvas board. The canvas board itself came from one of my Frosted Designs kits. I painted on some Turquoise Waters Multisurface Satin. Then I took a polka dot stencil and dabbed on some Blue Chiffon Americana paint. I shifted the stencil and used some Maya Mist in White Out to spray on some brighter dots. 


After all that dried I used a variety of green paints to add a flower stem with a couple leaves. I took the flower (also from a previous kit) and sprayed it down with some water. Then I dripped on some Strawberry Slush re-inker then sprayed the flower with Forever Red Perfect Pearls and allowed it to dry.


I took some black sparkly Thickers I picked up on my last trip to Hobby Lobby and added "Smile" and used a fine point Sharpie to write below. No, I absolutely cannot write straight it always ends up slanting upward unless I have a line to follow. Oh well...

Once the flower was dry I just used some E6000 to glue it onto the canvas. I also glued a couple of magnets onto the backside of the canvas. Now this pretty little piece is hung up behind my desk at work. The backside of my desk is against a row of big metal file cabinets. I see this everyday while I'm at my day job and it reminds me that no matter how stressful the day may be, it's still a good day! 


Friday, March 7, 2014

Joy Ride Spinner Card Tutorial

A while back I needed a birthday card for my brother. He had just bought himself a motorcycle so I thought it would be fun to make a motorcycle spinning card. The Rev Up the Fun stamp set was sitting on my table waiting to be inked up for the first time so this is what I came up with! 


  • Island Indigo card stock 5-1/2" x 8-1/2", scored at 4-1/4"
  • Whisper White card stock (two pieces) 4" x 5-1/4"
  • Smoky Slate card stock (two pieces) 3-3/4" x 5"
  • Stamps: Rev Up the Fun
  • Ink: Black Stazon, Versamark
  • Markers: Tempting Turquoise, Daffodil Delight, Smoky Slate, Basic Gray
  • Accessories: Paper Snips, XL Oval Punch, Word Window Punch, Tempting Turquoise Embossing Powder, Embossing Buddy, heat Tool, Stampin' Dimensionals, two pennies


I just love this cute little motorcycle and how it spins across the card! Although, I did tell my brother that it probably wouldn't be a good idea to try this on his motorcycle...


I thought I had better go ahead and do a spinner card tutorial for you while I was at it. So here it is for your viewing reading pleasure!  


We're starting off difficult here so hold onto your chairs! Take one of the pieces of Whisper White card stock and glue it down onto the Island Indigo card front with some Glue Stick. Whew! That was hard! (Just kidding. This project is actually really easy). 


Now take your Word Window punch with one of your Smoky Slate pieces and line up the side of the punch about a 1/4" from the edge of the card stock and push the card stock all the way into the punch as far as it can go. Now punch. Slide your punch over to the middle keeping the card stock all the way in the punch and punch again. Then slide the punch over until it's about 1/4" away from the other end of the card stock and punch one last time. You get this nice long narrow window. 


Stamp the card stock as you wish. In this case I used the tire image with Black Stazon ink to add some tread marks across the card like the motorcycle zig-zagged across the top of it. Then I used Versamark to stamp the greeting in the upper right corner, covered it with Tempting Turquoise embossing powder and heated it with my heat tool. 


Now we need to work on the spinner piece. Take the motorcycle image and stamp it onto a scrap of Whisper White card stock then cut out the image with Paper Snips. Now would be a good time to color your motorcycle unless you like to do things the hard way (like me apparently) and wait until the card is nearly finished to add some color.


Use the XL Oval punch on a scrap of Island Indigo card stock and stick the motorcycle onto the oval with a Stampin' Dimensional. Really you just need a piece that is large enough to hide the penny that will be on the back. It doesn't have to be as large as the XL Oval. 


Stick a penny down onto the backside of the oval with a Stampin' Dimensional then add another Stampin' Dimensional onto the penny. Take your Smoky Slate window piece from earlier. Just ignore the tire marks on this side. This is how I had stamped the tire marks at first and decided I didn't like it. Place the Smoky Slate card stock on top of the backside of the oval so the dimensional on the penny is inside the window. 


Remove the liner from the dimensional and stick on another penny. In case you are wondering, you really do need the pennies. The weight of the pennies is what makes the spinner portion work. 


Now here is an important part. Stack up two dimensionals in several locations on the backside of the card stock. If you don't have two dimensionals stacked the card stock is too close to the card and the spinner portion won't work. Trust me. You don't want to have to pull this off your card because the spinner doesn't work. 


Now just take this piece and stick it onto the card front. 


 I wanted to add some fun to the inside so I added "Rev up the fun! Happy birthday" onto the other piece of Smoky Slate card stock in more Tempting Turquoise embossing powder just like I did before. Next I inked up the motorcycle with Stazon and stamped the motorcycle closer to the right side of the card stock then immediately stamped the image again three more times without inking it up. It makes the motorcycle look like it's moving across the card stock.


Use some Glue Stick to stick the Smoky Slate onto the other piece of Whisper White then use more Glue Stick to stick this down inside the card.


Now right after you make the card you need to take the motorcycle piece and move it in a small circular motion inside the groove. This knocks down the points on the Stampin' Dimensional and allows it to move freely. Then you should be able to just tilt your card and watch your motorcycle spin!

And like everyone else  (including me!) that makes one of these, just keep tilting the card back and fourth watching the image spin totally entranced by the spinning piece of card stock.

Back and fourth...
Back and fourth...
Ooohhh pretty spinning card stock...


Thursday, March 6, 2014

Wisteria Butterfly

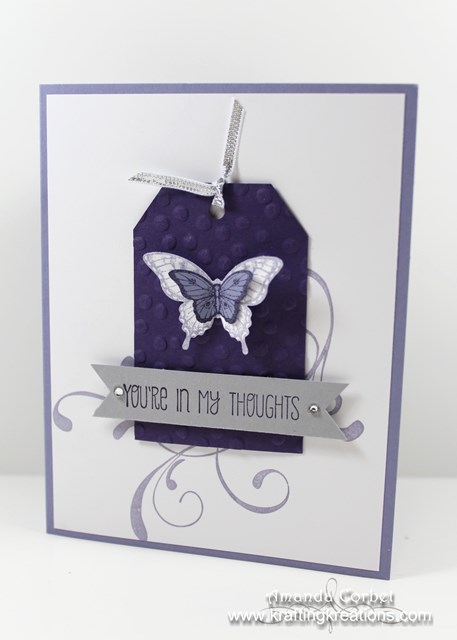
Have you seen the fab new tag topper punches in the Occasions Catalog? They are so awesome! I wanted to use both of them during the February Make and Take so my guests had a chance to get their inky fingers on them and try them out. So I used the angled tag punch on this card to add a fun detail. 


  • Wisteria Wonder card stock 5-1/2” x 8-1/2”
  • Whisper White card stock 4” x 5-1/4”
  • Elegant Eggplant card stock 2” x 3”
  • Smoky Slate card stock 5/8” x 3”
  • 4” Silver Ribbon
  • Stamps: A Dozen Thoughts, Papillion Potpourri, Everything Eleanor
  • Ink: Wisteria Wonder, Elegant Eggplant
  • Accessories: Angled Tag Topper Punch, Delicate Butterfly Punch, Bitty Butterfly Punch, Stampin’ Dimensionals, Decorative Dots embossing folder, Paper Snips, Rhinestones, 2-Way Glue Pen

First I took the large piece of Whisper White card stock and stamped the large beautiful swirl from Everything Eleanor on to the card stock in Wisteria Wonder ink. Then I stuck it down onto the Wisteria Wonder card front with some Glue Stick. Super simple. 

Next I took the piece of Elegant Eggplant card stock and punched one end with the Angled Tag Topper Punch then ran the tag through the Big Shot in the Decorative Dots embossing folder (which you can get for FREE during Sale-A-Bration if you order $50 worth of goodies). I took the silver ribbon and tied it onto the top of the tag then used more Glue Stick to stick the tag onto the center of the card front. 


I stamped the greeting from A Dozen Thoughts onto the strip of Smoky Slate card stock in Elegant Eggplant ink. A couple snips on each end with some Paper Snips and a couple Rhinestones turned this little strip into a lovely little banner. I glued the banner on top of the tag with a couple Stampin' Dimensionals.


Now for the butterflies! I stamped the large butterfly from Papillion Potpourri onto a scrap of Whisper White card stock in Wisteria Wonder ink then punched it out with the Delicate Butterfly Punch. I stamped the small butterfly onto a scrap of Wisteria Wonder card stock in Elegant Eggplant ink and punched it out with the Bitty Butterfly Punch. I used a little 2-Way Glue Pen to glue the butterflies together. After the glue dried for a minute or two I lifted up the butterfly wings with my fingers to give it a little more shape then used a little more 2-Way Glue Pen to stick the butterfly onto the tag.

Simple, monochromatic, and pretty! How have you been using these fun tag topper punches? 


Wednesday, March 5, 2014

Chevron Birthday

Chevrons are just about everywhere these days. In home decor, clothing, craft supplies, you name it. They are just incredibly popular right now. They're kinda fun too don't ya think? Well this bright and fun birthday card is full of them! I saw THIS lovely card on Pinterest and knew I wanted to re-create it. 

That piece with the chevrons going two different directions and meeting in the perfect location for the greeting banner was a royal pain in the tush. It took me an entire wasted sheet of Whisper White card stock to figure it out. So, to save your your sanity and a piece of card stock I have a tutorial for you so you can make your own lovely double direction chevron piece without pulling your hair out. Or saying a number of impolite words in frustration. 


  • Bermuda Bay card stock 5-1/2" x 8-1/2", scored at 4-1/4"
  • Whisper White card stock (two pieces) 1-1/4" x 5-1/2" 
  • Daffodil Delight card stock 1/2" x 3-1/2"
  • Whisper White card stock 4" x 5-1/4"
  • Stamps: Cycle Celebration
  • Ink: Tangerine Tango, Daffodil Delight, Pacific Point
  • Accessories: Chevron border punch, 1/2" Circle punch, 3/8" Circle punch, Silver Glimmer Paper, Sponge Daubers, Stampin' Dimensionals, Arrows embossing folder, Paper Snips, 2-Way Glue Pen
I started off by running my card front through the Big Shot in the Arrows embossing folder and folded the card stock on the score line. Easy peasy! Now for that chevron piece take a ruler and measure 5/8" from the right side of the punch and use a fine point permanent marker to mark directly on the punch. 


Take your 1-1/4" x 5-1/2" piece of Whisper White card stock and insert it into the punch. Line the right edge of the card stock up with the mark you just made and punch it. 


Now slide the card stock over to the left until the first chevron is lined up with the shiny image on the punch and punch it again. 


Now take your ruler and permanent marker and measure 1" from the left side of the punch and mark the punch. (Note: you are measuring from the actual edge of the plastic, not the little groove you see in the edge of the punch). My ruler isn't exactly lined up right here because, well... It's kinda hard to keep a ruler lined up with one hand and take a picture with the other. At least it is for me. But I'm not very coordinated. 


Now take your card stock that you have punched and flip it end over end. That way the edge that you had against the top of the punch before will still be at the top of the punch when punching the other side. Have I confused you yet? Now you don't have to do this, I have added numbers next to the first and second chevrons just so you can see which to line up where. 


Line up the point from the second chevron with the mark you made on the left side of the punch and punch. 


Now you should have something fairly close to this below! Yay! I went ahead and punched these in advance for the ladies at the make and take so they didn't have to pull their hair out trying to do this. Also, I was too tired that night to want to explain multiple times how to punch this piece. 


I took the second piece of 1-1/4" x 5-1/2" Whisper White card stock and used Sponge Daubers to sponge Daffodil Delight ink in the middle. Then I sponged Tangerine Tango on one end and Pacific Point on the other. I glued the chevron piece directly onto the sponged piece with 2-Way Glue Pen. I added this lovely chevron piece onto the left side of the card front with a few Stampin' Dimensionals. 


Next up I stamped the greeting from Cycle Celebration onto the strip of Daffodil Delight card stock in Tangerine Tango ink then used some Paper Snips to cut the strip into an arrow shape on either end. To glue the greeting onto the card front I used a dimensional on the right end and 2-Way Glue Pen on the other end. I made sure I stuck the greeting banner over the position where the chevron points meet.


I wanted to add a little bit of sparkly interest to the card so I used my 3/8" and 1/2" circle punches on some Silver Glimmer Paper. The smaller circles were glued down onto the card front with more 2-Way Glue Pen and the larger circle was stuck down with a Stampin' Dimensional.


For the inside I just sponged the right side of the card stock the same way that I did for the piece behind the chevrons and glued it in place with some glue stick. I totally LOVE how this card came out! So bright and cheerful and fun! 


Monday, March 3, 2014

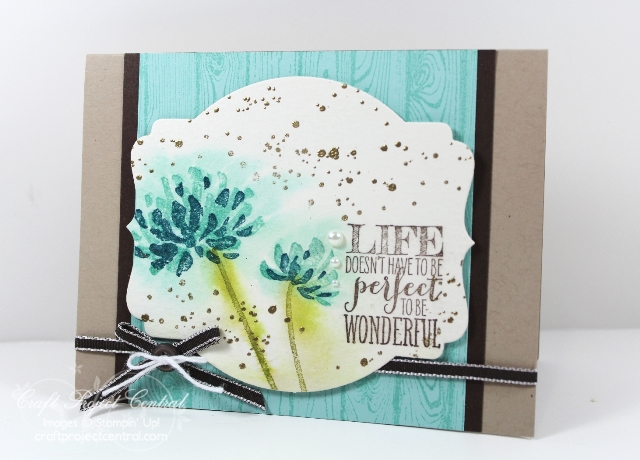
Life Doesn't Have to be Perfect...

Sorry for the lack of posts this last week. It has been crazy busy at my day job and by the time I got home I was just completely mentally exhausted. I had zero energy left to try to write up a blog post even though I still have plenty of older posts to share. 

I had the opportunity to design the Creating Pretty Cards sketch challenge over at Craft Project Central this month. Yay! So this is the card I made. 


Lots of fun things going on in this one, and I'm totally loving the watercolor look!


Too see the sketch and get the totally free mini tutorial just click here to head on over to the post!


Make sure you take a few minutes to browse around the CPC site and check out the fabulous projects that you can subscribe to! They really have some great tutorials!