Sunday, February 16, 2014

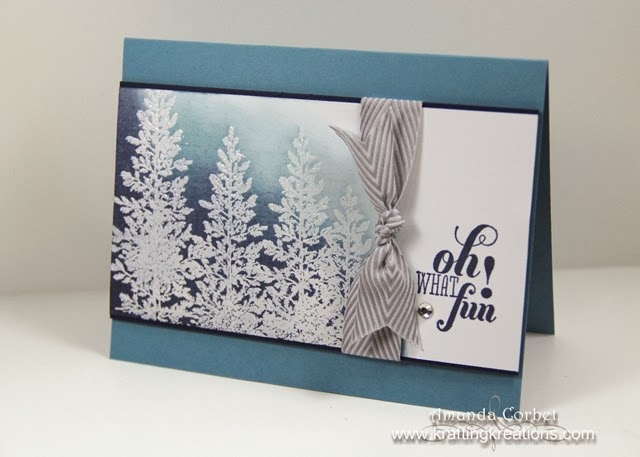
Oh What Fun!

This is one of the cards from the November Make and Take. I'm trying to get caught up on some of these cards from last year that I hadn't posted yet. This card was cased from Renee at the Colour Q blog. 


  • Stamps: Lovely as a Tree, Christmas Messages
  • Card Stock: Marina Mist, Night of Navy, Whisper White
  • Ink: Marina Mist, Night of Navy, Versamark
  • Accessories: Clear Embossing Powder, Embossing Buddy, Heat Tool, Stampin' Sponge, Smoky Slate Chevron Ribbon, Rhinestones, Stampin' Dimensionals

For this card I started off with a piece of Marina Mist card stock cut at 5-1/2" x 8-1/2" and scored at 4-1/4". Next I cut a piece of Whisper White card stock 3" x 5-1/2". I stamped the pin tree from Lovely as a Tree several times on the left side of the card stock in Versamark ink, covered the stamped image with clear embossing powder and heated it with my Heat Tool. 

Next I sponged on some Marina Mist ink making sure not to go past the right side of the trees and not covering the card stock completely. Then I sponged on some Night of Navy ink in the lower left hand corner making sure not to cover the Marina Mist ink completely. 


The greeting from Christmas Messages was stamped onto the right side of the card stock in Night of Navy ink. Then this panel was adhered onto a 3-1/8" x 5-1/2" piece of Night of Navy card stock.


I wrapped a piece of Smoky Slate Chevron ribbon around the panel and tied it into a knot. I adhered this panel onto the card front with Stampin' Dimensionals and added a large Rhinestone next to the greeting. 

This card was so much fun, with a great affect, but was really pretty easy. 


Saturday, February 15, 2014

Oh Christmas Tree

Here is another card from the December Make and Take. You'll notice that the last few months a lot of the cards for the Make and Take have been pretty easy. I thought that since the time of year when we made these is already pretty busy (so busy that I couldn't get these cards posted when the supplies were current) it would be nice just to keep things somewhat simple. I cased this card almost exactly from another one, but it's been so long that I have no idea where the original idea came from. 

  • Stamps: Special Season, Christmas Messages
  • Card Stock: Crumb Cake, Whisper White
  • DSP: Season of Style DSP
  • Ink: Gumball Green, Early Espresso
  • Accessories: Cherry Cobbler Ribbon 1" Ribbon, Champagne Glimmer Paper, 3/16" Corner Punch, Stampin' Dimensionals, Glue Dots
If you want to make this card start off by grabbing a piece of Crumb Cake card stock and cut it at 5-1/2" x 8-1/2" and score it at 4-1/4". Now cut a piece of the red plaid Season of Style DSP (if you still have some left) 3-1/2" x 4-1/2". Use the 3/16" Corner punch to round the bottom two corners of the DSP. Cut a piece of Cherry Cobbler ribbon 6" long, trim one end into a dove-tail shape, and adhere the ribbon onto the DSP with Glue Dots. Fold the end of the ribbon around to the backside of the DSP and glue it in place with a Glue Dot. Now adhere this onto the card front.

I really don't like seeing rough edges of ribbon on my cards so I always try to figure out some way to tuck them behind another panel or otherwise hide them. Mostly because I can't cut straight and want to hide the crooked end.


Next cut a piece of Whisper White card stock 2-3/4" x 3-1/2". Stamp the tree from Special Season onto the card stock in Gumball Green ink. Now stamp the greeting from Christmas Messages onto the card stock in Early Espresso ink. Cut a piece of Champagne Glimmer Paper 1/8" x 2-3/4" and adhere it onto the bottom of the card stock with 2-Way Glue Pen. Then adhere this panel onto the card front with Stampin' Dimensionals.


On the inside stamp the tree again in Gumball Green ink and stamp the message that accompanies the greeting from Christmas Messages in Early Espresso ink.

Now you've finished a simply yet fun Christmas card! It's not too early to get started working on next year's cards right???


Smile!

Here is a bright and cheerful card that is sure to bring a smile to someone's face. This card was inspired by Vicky from Crafting Clare's card. It was also one of the cards from the November Make and Take. Yep... November. As in last year. I'm still catching up....


  • Bermuda Bay card stock 4-1/4" x 11", scored at 5-1/2"
  • Strawberry Slush card stock 3-3/4" x 5"
  • Whisper White card stock 3-5/8" x 4-7/8"
  • 14" Basic Black Dotted Scallop Ribbon (that is apparently retired and I didn't realize it. Oopsie!)
  • Stamps: Happy Day, Gorgeous Grunge, Papillion Potpourri
  • Ink: Bermuda Bay, Pistachio Pudding, Strawberry Slush, Black Stazon
  • Accessories: Bitty Butterfly Punch, Glue Dots
You really can't get much easier than this one. Fold the Bermuda Bay card stock on the score line. Stamp the larger splatter image from Gorgeous Grunge onto the Whisper White card stock in Bermuda Bay ink. Stamp the small splatter a couple of times in Pistachio Pudding ink. Then stamp the greeting from Happy Day on top of your splatters in Black Stazon ink.


Stick that layer down onto the Strawberry Slush card stock, then stick that down onto the card front. Wrap your retired ribbon that you forgot was retired around the card front and tie it into a knot. Then just to add a little bit of whimsy stamp the small butterfly image from Papillion Potpourri onto a scrap of Whisper White card stock in Strawberry Slush ink. Punch out the tiny butterfly with the Bitty Butterfly punch and adhere it above your greeting with a Glue Dot. 

You're done! See? Super duper simple! 


Friday, February 14, 2014

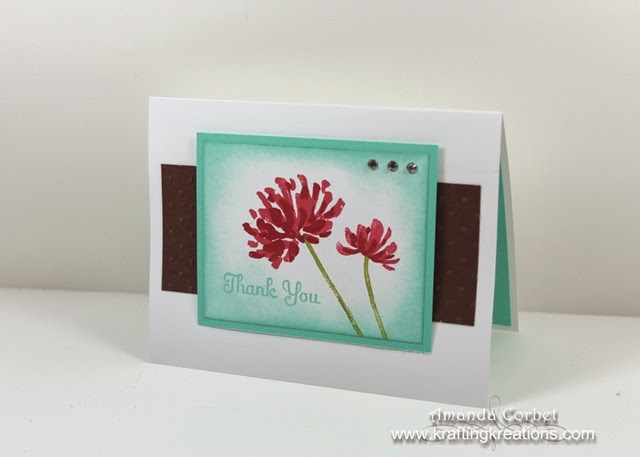
Floral Thank You

This lovely yet simple card was created for the December Make and Take. It's so simple it will be done before you know it and it uses one of my absolute favorite stamp sets of the year, Too Kind. 


  • Stamps: Too Kind, Four You
  • Card Stock: Whisper White, Coastal Cabana, Early Espresso
  • Ink: Primrose Petals, Raspberry Ripple, Old Olive, Coastal Cabana
  • Accessories: Stampin' Dimensionals, Rhinestones, Perfect Polka Dots embossing folder, Stamping Sponge

I started off by cutting a piece of Whisper White card stock 5-1/2" x 8-1/2" and scored it at 4-1/4". Next I cut a piece of Early Espresso card stock 2" x 5" and ran it through the Big Shot in the Perfect Polka Dots embossing folder before adhering it onto the card front.

Next I cut a piece of Whisper White card stock 2-3/4" x 3-1/2". I stamped the stems of the flowers in Old Olive ink, the larger flower images in Primrose Petals ink, and the detailed flower images in Raspberry Ripple ink. I sponge around the edge of the panel in Coastal Cabana ink and stamped the greeting from Four You into the bottom left corner in Coastal Cabana ink. I adhered this onto a 3" x 3-3/4" piece of Coastal Cabana card stock then adhered it onto the card front with Stampin' Dimensionals. Finally I added three rhinestones into the upper right hand corner of the panel just to add some bling.


For the inside I cut a piece of Coastal Cabana card stock 4" x 5-1/4" and stamped the flowers the same way that I did for the card front then adhered the panel onto the inside of the card.


So super easy! The stamp set really does all the work for you!


You Make Me Smile!

This fun little bag is what we made for the 3d project during the April Make and Take. It was my farewell to the Fancy Favor box that is now sadly retired. This is such a cute and easy gift box to make!


  • Stamps: Mixed Bunch, A Round Array, Floral Flourishes
  • DSP: Floral Districs (retired)
  • Card Stock: Daffodil Delight, Certainly Celery (retired), Tangerine Tango
  • Ink: Certainly Celery (retired), Daffodil Delight
  • Accessories: Fancy Favor Die (retired), Blossom Punch, 7/8” Scalloped Circle Punch, Labels Framelits, Simply Scored, Sticky Strip, Dazzling Details, Stampin’ Dimensionals

I started off by cutting a piece of Certainly Celery card stock 5-1/2” x 11” and running it through the Big Shot on my Fancy Favor Die. I really am going to miss this simple and pretty box die. I stamped the medium image from Flowering Flourishes all over the box in Certainly Celery ink. Then I folded on the score lines, added Sticky Strip onto the side tab and one of the bottom flaps, then formed the box like normal.

Now with your box sitting on the table take your middle finger and push in on the sides while you pinch the front and back of the box together. This will make it look more like a bag.

Next I cut a piece of Tangerine Tango card stock 4” x 4-3/4” and ran it through the Big Shot with the 4th from smallest Label Framelit. I placed the label on my Simply Scored with the points on the sides lined up with the score groove, and scored the label right in the middle and folded on the score line. I added a piece of Sticky Strip about 1” long on the inside of one half of the label and adhered the label onto the back of the bag.

Then I cut a piece of Floral District DSP 3-1/2” x 3-3/4” and ran it through the Big Shot with the 3rd from smallest Label Framelit. I scored the DSP just like I did with the Tangerine Tango card stock then used Anywhere Glue Stick to adhere the DSP label onto the Tangerine Tango label.

For the flower I stamped the image from Mixed Bunch twice onto a scrap of Daffodil Delight card stock and punched them out with the Blossom Punch. I used my Bone Folder to curl the petals up on one flower, and down on the other flower. Then I simply adhered the flowers together. I stamped the greeting from A Round Array onto a scrap of Whisper White card stock in Certainly Celery ink and punched it out with the 7/8” Scalloped Circle punch. I adhered the greeting inside the center of the flower and adhered the flower onto the front of the bag with a single Stampin’ Dimensional.


The label flap on the bag slides down behind the flower and the flower keeps the bag closed. Now of course I had to add some sparkle… so I added Dazzling Details onto the petals of just the top flower. Super cute, fun, and sure to make someone smile! 


Thursday, February 13, 2014

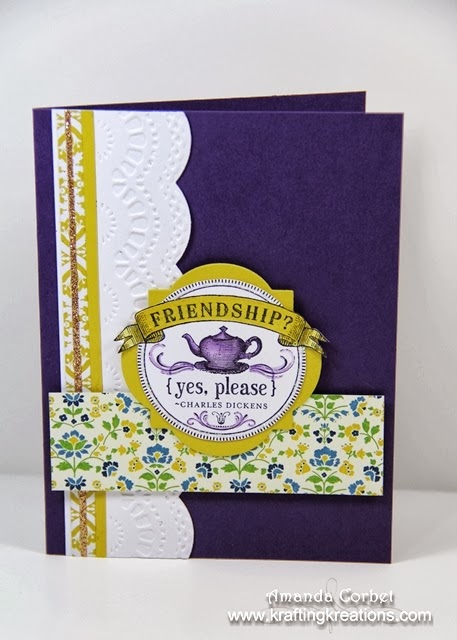
Friendship Please

I created this card quite some time ago. I'm trying to catch up on all the posts sitting in draft status that I haven't gotten around to posting yet. This beauty was the result of sorting through my scraps pile to put things away and I came up with the pieces of DSP, the narrow strip of Summer Starfruit card stock, and the narrow strip of glimmer paper. 


  • Stamps: From My Heart
  • DSP: Comfort Cafe
  • Card Stock: Whisper White, Elegant Eggplant, Summer Starfruit
  • Ink: Stazon
  • Markers: Elegant Eggplant, Summer Starfruit, Blender Pen
  • Accessories: Window Frames Framelits, Large Scallop Edgelit, Delicate Designs Embossing Folders, Champagne Glimmer Paper, Paper Snips, Stampin' Dimensionals, 2-Way Glue Pen
I started off with an Elegant Eggplant card base that was cut at 5-1/2" x 8-1/2" and scored at 4-1/4". I cut a piece of Whisper White card stock 2-1/2" x 5-1/2" and ran it through the Big Show with the Large Scallop Edgelit. I ran it through the Big Shot again in the Delicate Designs embossing folder to add the texture. Then I adhered the narrow strips of DSP, Summer Starfruit card stock, and Champagne Glimmer Paper onto the left edge with 2-Way Glue Pen. This layer was adhered onto the card front with some glue stick. 


Next I cut a piece of Comfort Cafe DSP 1" x 4" and adhered it onto the card front with Stampin' Dimensionals. Then I used the 2nd from smallest Window Frames Framelit on a scrap of Summer Starfruit card stock. 

Finally I stamped the greeting from From My Heart onto a scrap of Whisper White card stock in Stazon ink. I colored in the banner with my Summer Starfruit marker and used my Elegant Eggplant marker with my Blender Pen to add color to the teapot and the swirls. This image was cut out with Paper Snips and adhered onto the Summer Starfruit die cut. I adhered this onto the card front with a couple Stampin' Dimensionals. 


It's amazing how finding a few scraps can inspire you to make something wonderful!