Monday, May 6, 2013

So Kind of You

I've been playing with some sketches lately. Here is one of the cards I put together. It was mostly from scraps too!

 
  • Stamps: Sweet Essentials, Madison Avenue, Distressed Dots
  • Card Stock: Crumb Cake, Whisper White, Lucky Limeade
  • Ink: Lucky Limeade, Island Indigo, Illuminate Versamark
  • Accessories: Paper Snips, Stampin’ Dimensionals, Rhinestone, 2-Way Glue Pen


Here is the sketch that was created by Susie Nelson: 

SCCSC140 - Card Sketch

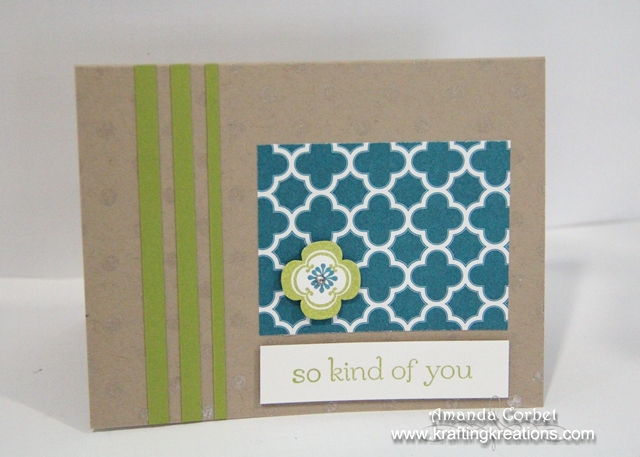
I started off by cutting a piece of Crumb Cake card stock 5-1/2” x 8-1/2” and scored it at 4-1/4”. I stamped the card front with the Distressed Dots background stamp in Illuminate Versamark to make subtle shimmery dots in the background.

I cut a piece of Sycamore Street DSP 3” x 2-1/4” and adhered it onto the card front. Next I cut a piece of Whisper White card stock 3/4” x 3” and stamped the greeting from Sweet Essentials onto the card stock in Lucky Limeade ink. I adhered this onto the card front directly under the DSP with some Stampin’ Dimensionals.


The three Lucky Limeade strips were just from my scrap bin and I adhered those into place with some 2-Way Glue Pen then used Paper Snips to trim them even with the edge of the card front. I stamped the flower image from Madison Avenue onto a scrap of Whisper White card stock in Lucky Limeade ink. Then I stamped the flower center in Island Indigo ink. I used Paper Snips to cut out the image and adhered it onto the DSP with a single Stampin’ Dimensional. A small Rhinestone in the center of the flower finishes the flower off.

Simple and fun! 


Friday, May 3, 2013

Congratulations!

I have another Friday Mashup Challenge for you! It just so happens that the day I was getting ready to head to my craft room to make the card for this challenge, I got an invitation to my Niece’s graduation. What luck!


  • Stamps: Everything Eleanor, Sassy Salutations
  • Card Stock: Lucky Limeade, Whisper White, Brushed Silver
  • Ink: Versamark, Certainly Celery
  • Accessories: In Color Designer Brads, Apothecary Accents Framelits, Stampin’ Dimensionals, Silver embossing powder, Iridescent Ice embossing powder, Heat Tool, Embossing Buddy, Paper Piercer, Stampin’ Pierce Mat


Here's your Mashup Challenge:
  1. Create a project for "Graduation".
  2. Create a project with "any kind of Embossing".
  3. Or Mash it Up and create a project with "Embossing for Graduation".


My niece loves lime green, so I went with Lucky Limeade as my primary color. I cut a piece of Lucky Limeade card stock 5-1/2” x 8-1/2” and scored it at 4-1/4”. I stamped the swirls from Everything Eleanor all over the card front in Versamark ink. I covered the stamped images with Iridescent Ice embossing powder, tapped off the excess, and heated it with my Heat Tool.


Next I cut a piece of Brushed Silver card stock 2” x 5-1/2” and adhered it into the center of the card front. Next I stamped a scrap of Whisper White card stock with the swirls from Everything Eleanor in Certainly Celery ink. 


I stamped the greeting from Sassy Salutations onto the card stock in Versamark ink, covered the stamped image with Silver embossing powder, tapped off the excess, and heated it with my Heat Tool. I cut out the greeting with the label from the Apothecary Accents Framelits. I used my Paper Piercer and Stampin’ Pierce Mat to pierce a hole in each end of the label and added a Lucky Limeade designer brad. I adhered the label onto the card front with Stampin’ Dimensionals.


I was in a hurry so I kept this card really quick and simple. What do you think? 


Thursday, May 2, 2013

Craft Project Central!

Hat's Off Graduation Decor: 

Make this graduation set for your upcoming graduation party!  The individual graduation caps can be filled with treats for party favors!  Then you can fill the centerpiece graduation caps with money for the grad’s gift.  And, of course, a coordinating card ties it all together!


This wonderful graduation project comes to you designed by Julie!

If you would like to subscribe to the May edition of Craft Project Central and get 10 wonderful tutorials for only $10 then click HERE


Wednesday, May 1, 2013

Craft Project Central!

Oh, Whale! Box and Cards Set: 

Have a creatively fun time making this box and set of cards using the adorable, Oh, Whale! stamp set!  Included in this project are three different card folds that you will be able to use again and again during your card making!  The box and cards are a great gift or a fun class project!


This fun and adorable project comes to you designed by Sharon!

To get the instructions for Sharon’s bonus project, just subscribe to April and meet one of the bonus project requirements of subscribing to two or more months in a row, putting the Craft Project Central badge on your blog, or referring a friend and when they subscribe, letting us know.


There’s Only One You

I have another Make and Take card to share with you! This one is from the March Make and Take! It’s simple, yet pretty.


  • Stamps: Secret Garden, Vintage Verses
  • Card Stock: Raspberry Ripple, Daffodil Delight, Whisper White
  • Ink: Daffodil Delight, Raspberry Ripple
  • Accessories: Whisper White Organza ribbon, Dazzling Details


I started off with a 5-1/2” x 8-1/2” piece of Raspberry Ripple card stock that was scored at 4-1/4”. Next I cut a piece of Whisper White card stock 3-5/8” x 4-7/8”. I stamped the flower image from Secret Garden several times on the card stock in Daffodil Delight ink. Next I stamped the greeting from Vintage Verses onto the bottom of the card stock in Raspberry Ripple ink.


I adhered the stamped Whisper White card stock onto a 5” x 3-3/4” piece of Daffodil Delight card stock. Next I wrapped a piece of Whisper White organza ribbon around the panel, tied it into a knot, then adhered the panel onto the card front. Just to add some glimmer I added some Dazzling Details into each of the flower centers on the card stock.


Quick and easy…and pretty too! What do you think? 


Tuesday, April 30, 2013

Bloomin’ Marvelous!

I was wishing thoughts of Spring all through January. As a result, this is a fun springy card that my guests made at the February Make and Take using the Bloomin' Marvelous Sale-A-Bration stamp set. 


  • Stamps: Bloomin’ Marvelous
  • Card Stock: Raspberry Ripple, Old Olive, Whisper White, Baja Breeze
  • Ink: Baja Breeze, Primrose Petals, So Saffron, Black Stazon
  • Accessories: Primrose Petals Stitched Satin Ribbon, Bitty Butterfly Punch,  Rhinestones, Glue Dots


I started off by cutting a piece of Raspberry Ripple card stock 5-1/2” x 8-1/2” and scored it at 4-1/4”. Next I cut a piece of Whisper White card stock 3-1/2” x 4-3/4”. I stamped the blossom image in Primrose Petals, So Saffron, and Baja Breeze ink across the card stock in a wavy type pattern. I stamped the greeting onto the card stock in Black Stazon.


I adhered the stamped Whisper White card stock onto a 3-3/4” x 5” piece of Old Olive card stock. Then I wrapped the panel with a piece of Primrose Petals Stitched Satin ribbon and adhered the panel onto the card front. I stamped the butterfly image onto a scrap of Baja Breeze card stock in Baja Breeze ink then punched it out with the Bitty Butterfly punch. I adhered the butterfly onto the card front with a Glue Dot then added Rhinestones into the center of the butterfly.


Simple, cute, and fun!