Sunday, April 6, 2014

Create

This is a fun doodle I finished up last year (Thanksgiving actually) that I just realized I never photographed or posted. So here it is. Drawn with fine point sharpie and colored in with Tombow markers and an Aqua Painter. 


Saturday, April 5, 2014

Love Banner

Here is a fun card I made a while back.. like before Valentine's Day. What can I say... I'm still getting caught up on posts. I just had an idea to create a heart banner and went with it! 


  • Crumb Cake card stock 5-1/2" x 8-1/2", scored at 4-1/4"
  • Sweet Sorbet DSP, Strawberry Slush DSP, Pool Party card stock, Whisper White card stock
  • Stamps: Hardwood
  • Ink: Baked Brown Sugar, Versamark
  • Accessories: Expressions Thinlits, Heat and Stick Powder, Dazzling Diamonds glitter, Heat Tool, 2-Way Glue Pen, Trio Heart Punch (retired a long time ago), Small Heart Punch, Full Heart Punch, Whisper White Baker's Twine, Glimmer Brads, Paper Piercing Tool


So I started off by folding the Crumb Cake card stock on the score line and stamping the fabulous Hardwood background image onto the card front with Baked Brown Sugar ink. Next I took a length of Whisper White Baker's Twine and tied a bow onto each end. I stuck this down at the top of the card front with a couple glue dots. I took the tip of my Paper Snips to fold the glue dots in half before putting them on the card so I wouldn't have a huge spot of exposed glue dot behind the cute bow. 

Next I used the Trio Heart Punch, which retired a long time ago but it's so cute I've hung onto it, to punch a bunch of hearts in DSP and Whisper White scraps. I also used the Small Heart Punch a couple times on Pool Party card stock and DSP. All the hearts were stuck onto the banner and card with some 2-Way Glue Pen. 


I punched a large heart with the Full Heart Punch from some Sweet Sorbet DSP and glued it down in the bottom right corner of the card. Next I cut the greeting from Crisp Cantaloupe card stock with the Expressions Thinlit die. I wanted my "love" to sparkle so I tapped the Versamark pad over the entire word, covered it with Heat & Stick Powder, heated it up with my Heat Tool, then dumped Dazzling Diamonds glitter onto it and heated it up just little more to set the glitter in the adhesive. Then I stuck the greeting onto the card front with more 2-Way Glue Pen.


I decided it needed something more so I used my Paper Piercing Tool to poke a couple holes above the bows of the banner and added a Glimmer Brad into each hole. So now it looks like I have two glimmery "nails" holding the banner up.

So cute and fun! 


Friday, April 4, 2014

Happy Flowers

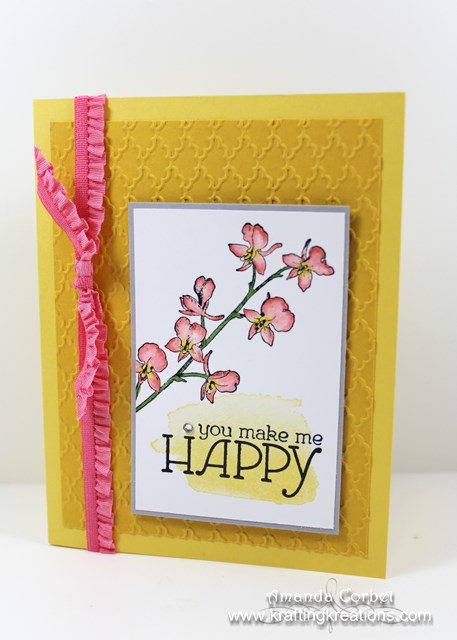
This is a fun and cheery card that my guests made at the March Make and Take. I was really wishing hard for spring, so everything is pretty spring colors! This is also the last card from the March Make and Take. To see the other Make and Take projects just click on the Make & Take Projects button on my sidebar. 


  • Daffodil Delight card stock 5-1/2" x 8-1/2", scored at 4-1/4"
  • Crushed Curry card stock 3-3/4" x 5"
  • Smoky Slate card stock 2-1/2" x 3-3/4"
  • Whisper White card stock 2-3/8" x 3-5/8"
  • 18" Strawberry Slush ribbon
  • Stamps: Happy Watercolor
  • Ink: Daffodil Delight, Stazon, Calypso Coral
  • Markers: Gumball Green, Blender Pen
  • Accessories: Fancy Fan embossing folder, Rhinestone Basic Jewels, Stampin' Dimensionals, Strawberry Slush Ruffle Stretch Trim

Okay, here we go! Fold the Daffodil Delight card stock on the score line. Then run the Crushed Curry card stock through the Big Shot in the Fancy Fan embossing folder. Use some glue stick to glue this layer onto the card front. 

Now take the watercolor brushstroke type image from Happy Watercolor and stamp it onto the bottom of the Whisper White card stock in Daffodil Delight ink. Stamp the greeting on top of the brush stroke image in Stazon. Now stamp the flowers above the greeting in Stazon. 

With your Daffodil Delight and Calypso Coral ink pads closed, squeeze the center of the ink pad, then open the ink pad half-way and use a Blender Pen to pick the ink up off the lid to color in your flowers. Use the Gumball Green marker to color in the flower stems. Use some more glue stick to glue the stamped Whisper White card stock onto the Smoky Slate card stock. Stick this layer onto the card front with a few Stampin' Dimensionals. Then simply take the Strawberry Slush ribbon, wrap it around the card front, and tie it into a knot. 


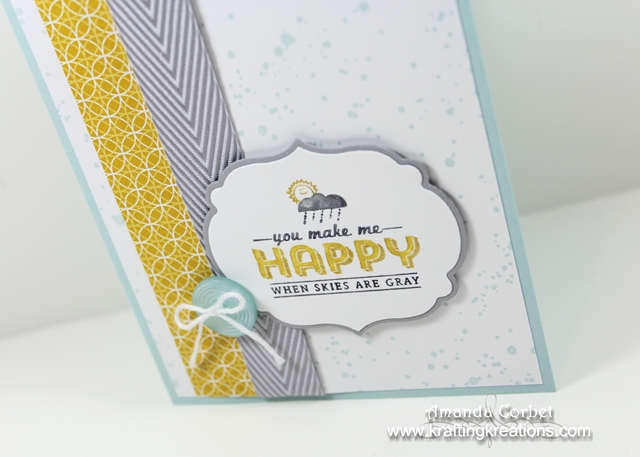
To make the inside a little pretty stamp the watercolor brushstroke image several times along the side in Daffodil Delight ink. Then stamp the dots image several times in Calypso Coral ink.


You're done! Now you can send someone a little happiness, sunshine, and spring wishes!


Thursday, April 3, 2014

When Skies are Gray

You are my sunshine, my only sunshine... that's the rhyme I think of each time I see this stamp set. So I absolutely HAD to use it before the set retired! 


  • Soft Sky card stock 5-1/2" x 8-1/2", scored at 4-1/4"
  • Whisper White card stock 4" x 5-1/4"
  • Eastern Elegance DSP 3/4" x 5-1/4"
  • Smoky Slate Card Stock 2-3/4" x 3"
  • Whisper White card stock 2-3/4" x 3"
  • 7" Smoky Slate Chevron Ribbon
  • 8" White Baker's Twine
  • Stamps: See Ya Later
  • Ink: Soft Sky
  • Markers: Crushed Curry, Basic Gray
  • Accessories: Label Card Thinlit, Labels Framelits, Subtles Buttons, Stampin' Dimensionals, Glue Dots, Smoky Slate Chevron Ribbon, White Baker's Twine

For this sweet card start off by folding the Soft Sky card stock on the score line. Take the large piece of Whisper White card stock and stamp the small dots image from Gorgeous Grunge all over in Soft Sky ink. I wanted it to mimic rain drops while adding some interest in the background. 

Next glue the Eastern Elegance DSP strip onto the left side of the Whisper White card stock with some glue stick. Then use wrap the ribbon around the card stock and use a few Glue Dots to hold the ribbon ends onto the back. Stick this layer onto the card front with some more glue stick. 


For the greeting color in the image with Crushed Curry and Basic Gray markers. Then grab your smaller piece of Whisper White card stock, breathe on the stamp to re-moisten the ink, and stamp the image onto the card stock. Take the label framelit from the Label Card Thinlit set to cut out the greeting. Then take the 2nd from smallest Labels framelit to cut out the Smoky Slate card stock. Use some glue stick to glue the labels together, then stick the label onto the card front with a couple Stampin' Dimensionals.

Now to add a little cute factor take the Whisper White baker's twine and thread it through a Soft Sky button and tie it into a bow. Stick the button onto the card front with a Stampin' Dimensional.


A really simple pattern on the inside of this one... just take the diagonal lines image from Gorgeous Grunge and stamp it three times in Soft Sky ink.

Now you can brighten up someone's day with this adorable card!


Wednesday, April 2, 2014

You're Lovely!

This lovely is another card from the March Make and Take. I really wanted to show off the pretty pattern from the Sweet Sorbet DSP pack from Sale-A-Bration. Pretty and simple! 


  • Coastal Cabana card stock 4-1/4" x 11", scored at 5-1/2"
  • Sweet Sorbet DSP 3" x 4"
  • Summer Starfruit card stock 2-3/4", x 3-1/4"
  • Whisper White card stock 2-3/4" x 3-1/4"
  • 18" Crisp Cantaloupe twine
  • Stamps: Peaceful Petals, You're Lovely
  • Ink: Coastal Cabana
  • Accessories: Deco Labels Framelits, Stampin' Dimensionals, Rhinestone Basic Jewels, Sweet Sorbet Accessory Pack, Beautifully Baroque embossing folder, 3/16" Corner Punch

Fold the Coastal Cabana card stock on the score line, then run the card front through the Big Shot in the Beautifully Baroque embossing folder. Take the 3/16" Corner punch and use it on just two of the corners on the DSP piece (top left and bottom left). Then glue the DSP onto the card front with some glue stick. 


Stamp the greeting from You're Lovely onto the Whisper White card stock in Coastal Cabana ink. Then run this piece through the Big Shot with the 2nd from smallest Deco Labels framelit. Also run the Summer Starfruit card stock through the Big Shot with the 3rd from smallest Deco Labels framelit. Then just use some Stampin' Dimensionals to stick the labels together and to stick the layered labels onto the card. Add a couple Rhinestones on either side of the greeting label just to give it a little sparkle. 


Finish it up by wrapping the Crisp Cantaloupe twine around the card front and tie it into a bow.


To dress up the inside a little take the image from Peaceful Petals and stamp it several times across the bottom in Coastal Cabana ink. Done! That's it! 


Tuesday, April 1, 2014

Celebrate!

For the March Make and Take I wanted to squeeze as much Sale-A-Bration goodness in as I could before Sale-A-Bration ended. So here is the first of the cards that my guests made. This card was cased from Tina Gillespie's card that you can find HERE. I just loved her gold embossed dots with the dotted DSP. 


  • Bermuda Bay card stock 4-1/4" x 11", scored at 5-1/2"
  • Basic Black card stock 2" x 4-3/4"
  • Sweet Sorbet DSP 1-7/8" x 4-5/8"
  • Basic Black card stock 1-7/8" x 3-5/8"
  • Gold 1-3/4" x 3-1/2"
  • Basic Black card stock 1/2" x 3-3/8"
  • Whisper White card stock 3/4" x 3-1/2"
  • Basic Black card stock 3/4" x 4-1/4"
  • Sweet Sorbet DSP 1/2" x 4-1/4"
  • Stamps: Express Yourself, Perfect Pennants
  • Ink: Bermuda Bay
  • Accessories: Decorative Dots embossing folder, Stampin' Dimensionals, Paper Snips, Banner Punch, 1-3/8" Circle Punch, 1-1/4" Circle Punch

This really was simple enough to do, just a lot of different pieces. I folded the Bermuda Bay card stock on the score line. Then I stuck the large piece of Sweet Sorbet DSP onto the large piece of Basic Black card stock. I glued this down directly onto the card front with some Glue Stick. 

Next I embossed the gold paper in the Decorative Dots embossing folder in the Big Shot. This was glued onto the next smaller piece of Basic Black card stock and then stuck onto the card front with some Stampin' Dimensionals. 

I took the 3/4" wide strip of Whisper White card stock and stamped the banner from Perfect Pennants on it in Bermuda Bay ink. I used Paper Snips to trim out the banner, glued it onto the 3/4" wide strip of Basic Black card stock and trimmed the banner end. This was glued onto the card front by sliding it under the gold panel. 


Next I stamped "celebrate" from Express Yourself onto a scrap of Whisper White card stock in Bermuda Bay ink. This was punched out with the 1-1/4" Circle punch. A scrap of Basic Black card stock was punched with the 1-3/8" Circle punch. I stuck the two circle layers together then stuck it onto the gold paper with a Stampin' Dimensional.


For some fun on the inside I stamped the banner from Perfect Pennants three times in Bermuda Bay ink. To get the faded look ink up the stamp once, then stamp three times without inking again. Glue the narrow strip of DP onto the narrow strip of Basic Black. Glue this inside the card at the top. Then I just took the Banner Punch and used it on a scrap of gold paper and stuck the shiny banner against the Basic Black card stock. 

So other than having to cut all those pieces it really is a pretty easy card! Thanks Tina for the wonderful inspiration!