Monday, January 6, 2014

Happy Birthday or Halloween

There are a lot of people that don't really send Halloween cards including me. But I wanted to have a Halloween option at the October Make and Take last year. So I created a card that could either be a Halloween card or a masculine birthday card depending on which stamp sets were used. That way my guests could decide for themselves which they would like to make. 


  • Basic Gray card stock 5-1/2" x 8-1/2"
  • Basic Black card stock
  • Whisper White card stock
  • Sweater Weather DSP
  • Basic Black Chevron ribbon
  • Whisper White
  • Basic Black
  • Stamps: Best of Halloween, Halloween Happiness, Perfectly Penned, Best of Birthdays
  • Markers: Marina Mist, Pumpkin Pie, Rich Razzleberry, Old Olive
  • Ink: Midnight Muse, Black Stazon, Pumpkin Pie
  • Accessories: Basic Black chevron ribbon, Paper Snips, Chevron embossing folder

Both cards had the exact same cut dimensions and just used different stamp sets. You have to be a bit creative the with the card design to make sure that it will work for both options, but it's an easy way to let my guests chose what they would like to make. 

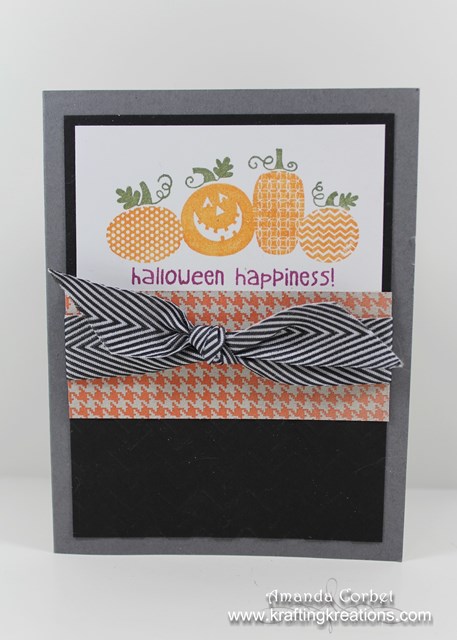
For the Birthday option the greeting from Perfectly Penned was stamped onto the small piece of Whisper White card stock in Night of Navy ink. I glued this layer down onto the top of the big piece of Basic Black card stock. Then I ran this piece through the Big Show with just the bottom of the Basic Black card stock inside the Chevron embossing folder. Then just glue on the DSP, wrap the ribbon around the card stock, tie it into a knot, and stick this layer onto the card front with a few Stampin' Dimensionals.

On the inside I simply stamped the present and "celebrate" from Best of Birthdays onto the top of the large piece of Whisper White card stock in Black Stazon ink and colored in the images with Marina Mist and Pumpkin Pie markers. I stuck this down into the card with Glue Stick. The strip of Basic Black card stock was glued down with 2-Way Glue Pen just under the stamped images to add a little more interest to the inside of the card.

For the Halloween card I just colored in the Halloween Happiness stamp with Old Olive, Pumpkin Pie, and Rich Razzleberry markers, breathed on the stamp to re-moisten the ink, and stamped it onto the card stock. Then for the inside piece I stamped the haunted house and "Trick or Treat" from Best of Halloween in Black Stazon and Pumpkin Pie ink. 

A fun and simple card with two very different occasions! 


Thursday, January 2, 2014

Sycamore Street Madness!

I have another fun sketch challenge card for you today! When I made this almost a year ago I wanted to show off the wonderful Sycamore Street DSP that is, unfortunately, now retired. This one uses the SCCSC161 sketch on Stampin’ Connection.

  • Stamps: Pretty Petites
  • DSP: Sycamore Street
  • Card Stock: Sahara Sand, Whisper White
  • Ink: Summer Starfruit, Pool Party, Island Indigo
  • Accessories: Baker’s Twine, Petite Label Punch, Stampin’ Dimensionals, Stampin’ Sponge, SNAIL Adhesive
I started off with a piece of Sahara Sand card stock cut at 5-1/2” x 8-1/2” and scored it at 4-1/4”. I one piece of the pinwheel pattern DSP 1-1/4” x 2-1/2”


and sponged it with Summer Starfruit ink. I adhered this in the upper left hand corner of the card front. I cut a piece of the Pool Party pattern 1-1/4” x 1-5/8”, sponged it with Pool Party ink, and adhered it onto the bottom left hand corner of the card front.

I used the pinwheel pattern again to cut two 1-1/4” x 1-1/4” squares, sponged them with summer Starfruit ink, and adhered them on the top and bottom of the right side of the card front.  Next I cut a piece of the dot pattern DSP 1-1/4” x 2-1/2”, sponged it with Pool Party ink and adhered it between the two pinwheel squares on the right side.

Finally I cut the Island Indigo pattern piece 1-1/4” x 5-1/4”, sponged it with Island Indigo Ink, and adhered it into the center of the card front. I added a little bit of SNAIL Adhesive into the center of the Island Indigo panel and pressed the end of my Baker’s Twine into the adhesive. I wrapped the Baker’s Twine around the card front a few times and pressed the remaining end into the adhesive and trimmed off the extra Baker’s Twine with Paper Snips.


I stamped the greeting from Pretty Petites onto a scrap of Whisper White card stock in Summer Starfruit ink. The greeting was punched out with the Petite Label Punch and adhered over the SNAIL Adhesive in the center of the card with a Stampin’ Dimensional.

Although there was a lot of cutting, and precise measuring/calculating, this card wasn’t too hard. Especially now that I’ve given you the dimensions! J


Tuesday, December 31, 2013

Craftaholics Anonymous Winter Gift Exchange 2013 Part 2

Today I want to share with you what I received from Lindsey for the Craftaholics Anonymous Winter Gift Exchange. If you missed yesterday's post where I shared the gifts I sent you can find it HERE


She made me a lovely camera strap that matches the colors in my craft room, a pretty wall plaque, and a lovely burlap banner! Thank you so much Lindsey! I love it all! 

If you want to see some of the other gifts that were given or received take a look at the link party HERE

Now I'm sure you're wanting to know how you can join in on the fun right? Well the next exchange probably won't be until the summer but you can sign up to receive an email when Linda sends out the invite by clicking HERE


Monday, December 30, 2013

Craftaholics Anonymous Winter Gift Exchange 2013 Part 1

It's always so much fun participating in the gift exchanges over at Craftaholics Anonymous! Basically you get paired up with someone else somewhere in the country. You get to ask them questions to figure out what to make. Then make a handmade item or a few and mail them to your exchange buddy. You also get some crafty goodness sent to you from your buddy. So I would like to start out with sharing what I made for Lindsey. 


Her favorite colors were pink and green. So I made her a necklace and earrings with pink crystals, pearls, and silver chain all packaged up in the cute little glass jar with a pink bow. 


Next is a personalized pincushion with a shiny clear button in the center. 


Then finally the lovely "create" banner for her work space that has been sprayed with Strawberry Slush and Lucky Limeade inks that were mixed with rubbing alcohol. The pink banners were also sprayed with Blushing Bride Smooch Spritz to make it sparkly. Then I added the pink and turquoise buttons with baker's twine bows and some pink and green ribbon between the banners. This was so simple and fast to make! I actually made one almost identical for my sister for Christmas. 


I hope you like your gifts Lindsey! 

If you want to see some of the other gifts that were given or received take a look at the link party HERE

Now I'm sure you're wanting to know how you can join in on the fun right? Well the next exchange probably won't be until the summer but you can sign up to receive an email when Linda sends out the invite by clicking HERE

Come back tomorrow to see what wonderful goodies Lindsey sent me! 


Friday, December 20, 2013

DIY Let it SNOW Sign

Dress up your home for winter with this adorable snow inspired sign! 


~ Supplies ~
Don't be afraid to try this project. It is so easy! Since we're going for a vintage distressed look you don't have to worry about each step being perfect. 

1. Start off by sanding your 1 x 4 with the 80 grit sand paper just to smooth out the top, corners, and sides. Then paint a coat of Charcoal Gray on the top. It is actually a very nice dark brown. Allow that to dry for about 15 minutes or so. 

2. Layout the following on your Silhouette software and cut some vinyl. It doesn't matter what color you use because we are just using it as a template. For the "Let it" I used the font ALS Script and made it 2-1/2" tall x 7" wide. For the "SNOW" I used the font Algerian and made it 2-1/2" tall x 9-3/4" wide. Weed out the bits of vinyl you don't want and use transfer paper to pick up your vinyl. Once it's on the transfer paper I cut my words and snowflake clusters apart so I could add each one separately. 

3. Now that your Charcoal Gray layer is dry add the "Let it" closer to the top left of the board. Coat the top with a layer of Decou-Page. This will prevent any seepage of color from the next layer of paint. 


4. After the Decou-Page is dry add a layer of Deep Midnight Blue paint over the top and all four sides. Allow this layer to dry.
 

5. Apply the "SNOW" vinyl closer to the bottom right of the board. Paint on another layer of Decou-Page on the top. 


6. Once the Decou-Page is dry paint on a layer of Whispering Turquoise just on the top. Allow to dry. 


7. Apply the snowflake clusters in both corners and coat the top with a layer of Decou-Page Now apply two coats of Cool White allowing the paint to dry between coats. 


The thing I love about acrylic paint is that it only takes about 15-20 minutes for the paint to dry so you don't have to wait very long between coats. When your waiting for a layer to dry is a great time to straighten up or organize a little bit of your craft room while your waiting for it to dry. Or to work on another project between coats. 

8. Now take a needle tool and start pulling up your vinyl layers starting with your snowflake clusters, "SNOW", and finally "Let it". The layers of Decou-Page between each coat of paint prevented the paint layers from seeping 


9. Now take your sand paper and sand the edges until you like how it looks. On mine you can see some of each layer of paint and even some of the pine below. I love it! Then coat with one final layer of Decou-Page on the top and sides just to seal everything in. Right after you finish applying the Decou-Page sprinkle on some ultra fine glitter just lightly over the whole thing. Allow to dry completely. 


10. Take a paper towel or Swiffer sweeper wipe to brush off the excess glitter. 


Crafting Tip: Keep a box of the Swiffer sweeper refills next to your craft area. They are great for               cleaning up glitter! 

11. Screw two eye hooks in the top of the board. You can just screw these in by hand or use some pliers to get it screwed in all the way. If you're having a little bit of trouble getting the eye screws started just take a hammer and tap it a couple times to get the threads to grip the wood. 


12. Cut a piece of 20 gauge craft wire 32" long. Bend up one end about 2 inches from the end of the wire. Add a small handful of clear beads onto the wire then bend up the other end about 2 inches from the end of the wire. Now take the wire and twist it around your finger to create a few decorative loops in the wire. Make sure to let a few beads slide into the loop. Add a loop in the center of the wire to hang your sign from. 


13. Insert the wire ends into the eye hook, then twist the short end of the wire around the wire. Use pliers to pinch the end of the wire close to the wire so you don't get scratched by it. 


Now simply hang up your lovely sign and enjoy! 


This sign was really easy to make even though it requires a few steps. I worked on it across a few evenings and I am so happy with how it came out! Don't you just love it when a project turns out almost exactly how you saw it in your head? 

I hope you've enjoyed this fun tutorial and get a chance to make one of these for yourself! If you would like to check out some other snowflake inspired projects like my Snowflake Gift Box and Snowflake Wine Glass Tutorial just click on the pictures and it will take you to the post! 

Snowflake Wine Glass Tutorial
Snowflake Gift Box Tutorial

Thursday, December 5, 2013

Guest Posting!

I'm guest posting today over at Sugar Bee Crafts! Swing on over and take a look at the holiday decor tutorial I've put together for you!