Tuesday, May 18, 2010

Rich Regals - Rose Red

Here is the second card I made for the Rich Regals swap! You can view the first card that I made for the Rich Regals swap here. As I mentioned before I just love doing these swaps and it’s so hard to only do one. They get very addictive after a while!


Stamps: Bella’s Bloom
Cardstock: Rose Red, Sahara Sand
Paper: Rose Red DSP
Ink: Rose Red, Sahara Sand
Accessories: Ticket Corner Punch, Whisper White Organza Ribbon.

For this one the card base is Sahara Sand. This is a color that I previously did not use much, but through these swaps I have found that it is a great neutral tone to use with just about any color. The Sahara Sand card base is cut at 4 ¼ in. x 5 ½ in. and scored at 4 ¼ in. The next layer is Rose Red cardstock cut at 4 in. x 5 ¼ in. The three narrow panels begin with Rose Red DSP cut at 1 3/8” x 3 3/8” and adhered to Sahara Sand cardstock cut at 1 ½” x 3 ½”. The three panels are adhered to the Rose Red cardstock and Whisper White organza ribbon is added and tied in a knot. This layer is then adhered to the card base.
The main image panel is Whisper White cardstock cut at 2” x 2 ¼” and Sahara Sand cardstock cut at 2 ¼” x 2 ½”. I used the ticket corner punch on the corners of both the Whisper White and Sahara Sand cardstock. I stamped the flower from Bella’s Bloom in Rose Red on the Whisper White cardstock then I stamped the sentiment at the bottom of the panel in Sahara Sand ink. Both panels were sponged around the edge with Rose Red ink and adhered together. These are added to the card front with scrap rubber to pop this layer up off the card front. This card has lots of layers, but is pretty easy to put together. Hope you like it!

Monday, May 17, 2010

Rich Regals Swap - So Saffron

It is just so much fun to participate in these swaps with other demos! For those of you who don’t know, a swap is where several demonstrators create a specific number of cards following whatever rules the hostess gives and all the swappers mail all of the cards to the hostess. She sorts them out and mails back one card less than the number you sent in. That way there is a card for the hostess too. The swapped cards are mailed back to you. I’m like a kid at Christmas when I see a swap box in my mail. There are so many great ideas for cards and this is a way to share them and actually see and feel the cards. Not to mention it gives you lots of samples to show off a workshops, make-and-takes, and classes. As a matter of fact I will be casing a card I received from the Soft Subtles swap for my next make-and-take because my guests saw one of the cards I received in the swap and said “I want to make that!”

Well here is one of the cards that I made for the Rich Regals swap:


Stamps: Pocket Silhouettes, Warm Words
Cardstock: Sahara Sand, So Saffron, Whisper White
Paper: So Saffron DSP
Ink: Sahara Sand, So Saffron
Accessories: Scallop Border Punch, Silver Brad, Elegant Bouquet embossing folder

First I cut the Sahara Sand card base at 6 ¼ in. x 5 ½ in. and scored it at 4 ¼ in. Then I use
d the Elegant Bouquet embossing folder with my Big Shot on the inside of the card. This will show through to the front since the card front only covers half of the inside. I cut the So Saffron DSP at 2 in. x 5 ½ in. and the So Saffron cardstock at 2 ½ in. x 5 ½ in. I used the Scallop Border punch on the So Saffron cardstock and adhered the So Saffron DSP on top of the So Saffron cardstock. This was then adhered to the card “front” or the 2 in wide flap on the front.

For the main image panel I cut the Whisper White cardstock 2 ¼” x 2 ½”, the Sahara Sand cardstock 2 3/8” x 2 5/8”, and the So Saffron cardstock 2 5/8” x 3 7/8”. On a scrap piece of cardstock I used the Curly Label Punch to create a reverse mask. I put this on top of the Whisper White panel, held the scrap with my left hand, and sponged So Saffron around the edges with my right hand. Pick up the mask and you have a beautiful So Saffron curly label in the center of your image panel. I then stamped the image from Pocket Silhouettes in Sahara Sand ink on top of the So Saffron curly label. Then I stamped “happiness” from Warm Words in So Saffron ink at the bottom, added a silver brad in the bottom right corner, and adhered the Whisper White, Sahara Sand, and So Saffron layers together and to the card front. Then you’re done! This is such a fun and interesting layout to try.

Come back tomorrow to see the second card I made for the Rich Regals swap using the color Rose Red!

Sunday, May 16, 2010

Decor Mirror

I know it's been a long time since I've posted and I apologize. It's been kind of crazy around here lately, but I have lots of projects to post for you in the next couple weeks so come back to see all of the fun creations.

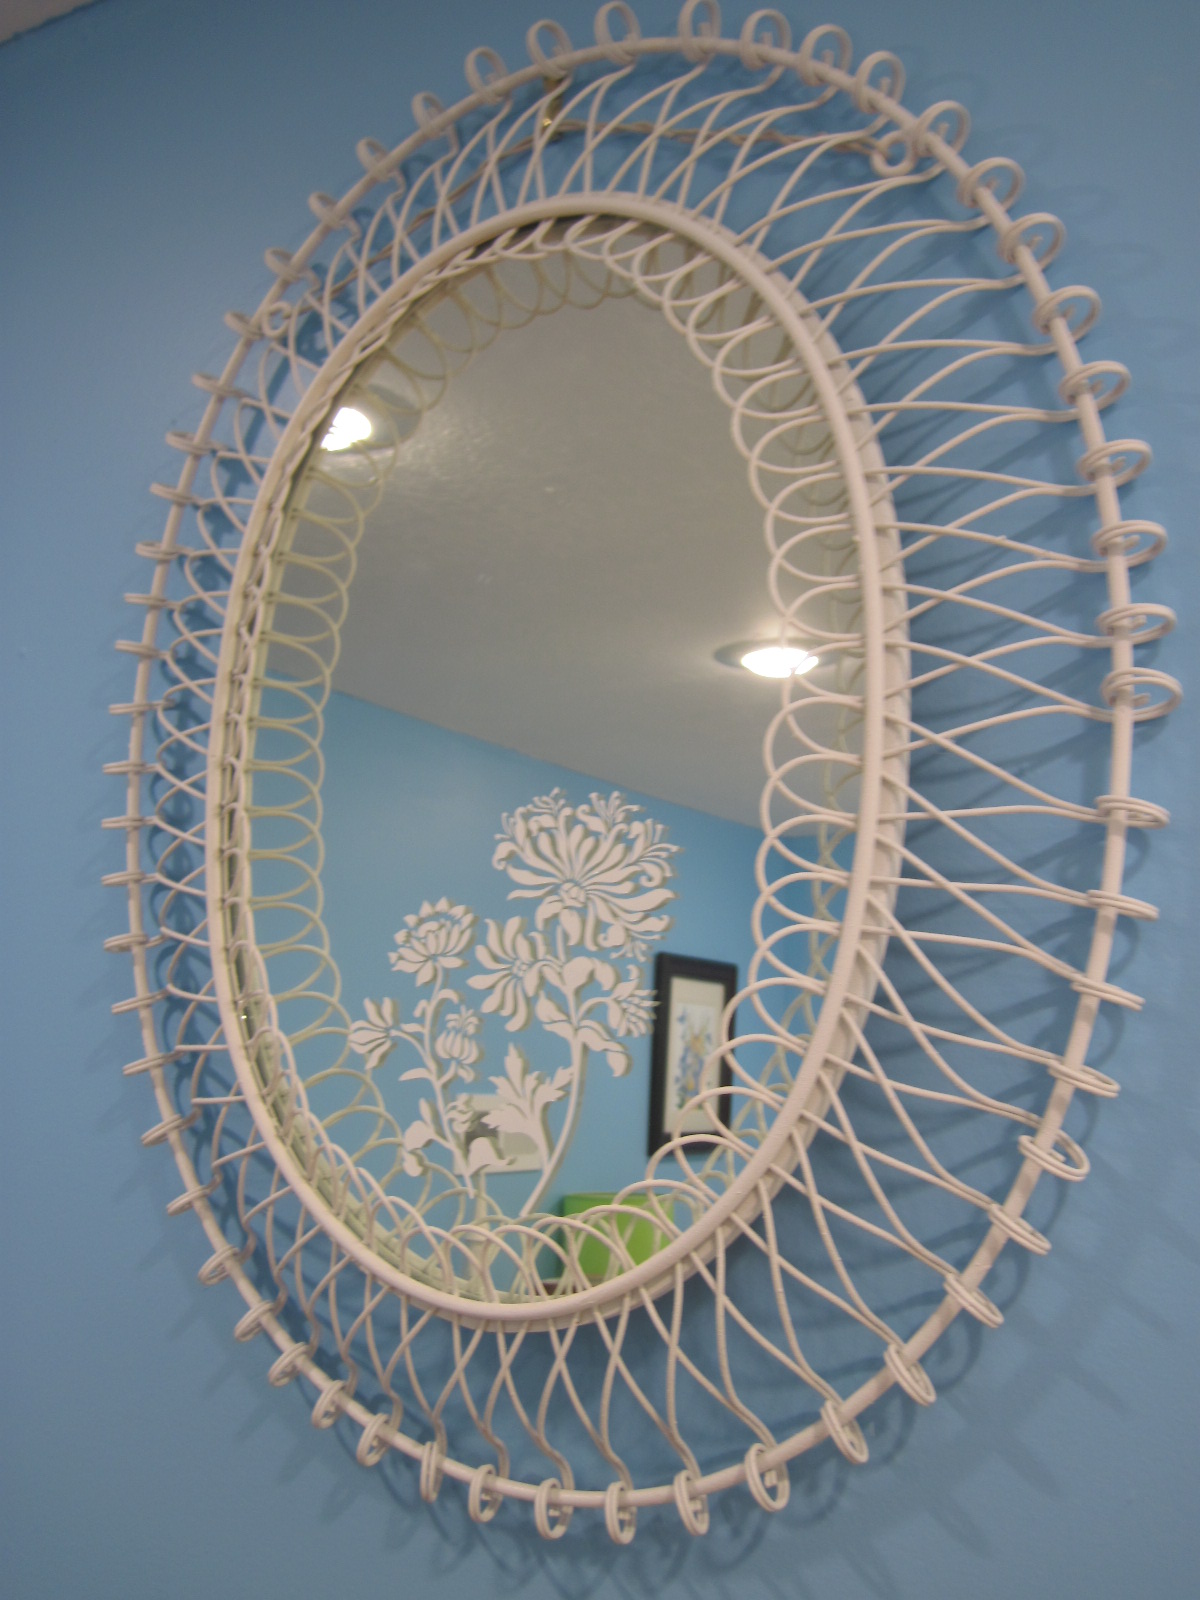
My mom and my husband frequently go over into Missouri to look in antique stores and I found this great mirror in a store in Parkville, Missouri. I spray painted the frame white and added this beautiful Ornate Flower Decor Elements.


If you're not familiar with Decor Elements by Stampin' Up they are self adhesive vynil art that can be used on smooth walls, glass, canvas, or a scrapbook page! To find more information on Decor Elements and see the other styles of vynil art click here.

This hangs in my craft room and I just love how something ordinary like a mirror can be transformed into an art piece with very little effort!


Come back later this week to see what other fun things I've been busy making!

Monday, April 19, 2010

April Make & Take

These are all of the projects that my guests created at my very first make and take. I am going to have a make and take once a month for those who are in the Leavenworth, KS area. If you are interested please e-mail me at amanda.c09@hotmail.com and I will e-mail you the invite one week prior to the make and take. Anyway, these are the projects that everyone got to make.

Stamps: Vintage Vogue, Very Vintage Wheel
Paper: Chocolate Chip, Whisper White, Bashful Blue
Ink: Bashful Blue, Ballet Blue, Old Olive, Chocolate Chip
Accessories: Eyelet Border Punch, Pretty In Pink Sending Love Epoxy Brads, Stampin Dimensionals

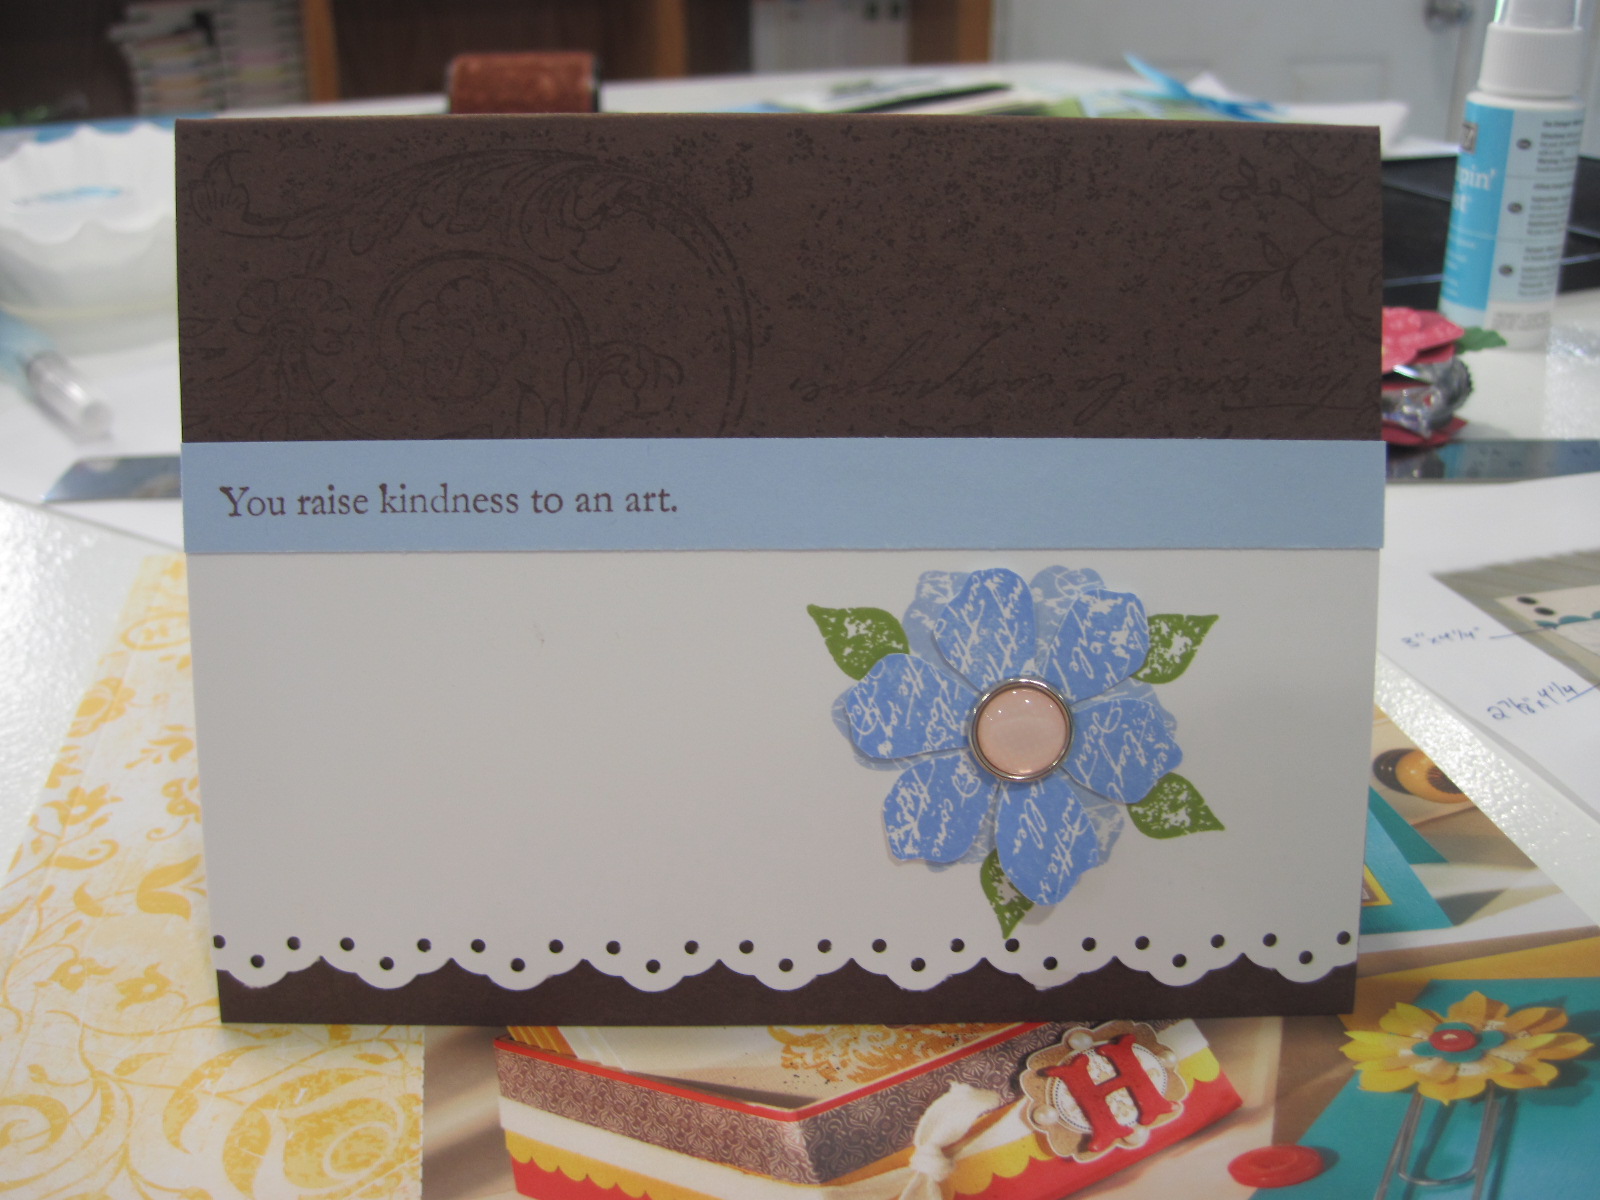
I first used the Very Vintage Wheel with Chocolate Chip ink on the Chocolate Chip card base. Then I used the Eyelet Border Punch on the edge of my Whisper White cardstock. On the right of the Whisper White I stamped the large flower from Vintage Vogue in Bashful Blue and the leaf several times in Old Olive. I then stamped the large flower in Ballet Blue on scrap cardstock and cut it out with Paper Snips. I used a needle tool to punch a hole in the center of the cut out flower and added a Pretty In Pink Sending Love Epoxy Brad. I used a Stampin Dimensional to pop up the flower off the card front. The sentiment from Vintage Vogue was stamped in Chocolate Chip ink on a strip of Bashful Blue cs. This card was inspired by a card created by lena95469 on Stampin Connection.


Stamps: With All My Heart, Wood Grain Background
Paper: Dusty Durango, Barely Banana, Chocolate Chip, Whisper White, Crushed Curry
Ink: Dusty Durango
Accessories: Ticket Corner Punch, Old Olive 5/8” Grosgrain Ribbon, Dusty Durango and Chocolate Chip markers.

The Dusty Durango card base was stamped with the large flower from With All My Heart in Dusty Durango ink. I then inked up the Wood Grain background stamp with Crushed Curry ink, placed my piece of Barely Banana cs on top of the stamp, covered this with a scrap piece of paper and rubbed over the cardstock. This easily transfers the entire image with less effort than trying to push down on the stamp on top of the cardstock. The now wood grained Barely Banana is adhered to the card base. I used a Hobby Blade to cut through the fold of the card base so I could run my Old Olive 5/8” Grosgrain ribbon through the slot and around the card and tied a knot. I then used the Dusty Durango and Chocolate Chip markers to color my “Friend” stamp from the set With All My Heart, breathed on the stamp, and then stamped my image on the Whisper White cs. The ticket corner punch was used on the corners of both the Whisper White and Chocolate Chip cs. These were then adhered to the card. This card was inspired by a card created by Carrie Gaskin on Stampin Connection.


Stamps: Well Scripted
Paper: Pink Passion, Whisper White, Barely Banana, Lavender Lace, Lovely Lilac, Old Olive, Sending Love DSP
Ink: Summer Sun, Perfect Plum
Accessories: Two-Step Bird Punch, Scallop Border Punch, Two-Way Glue Pen, ¼” Pretty In Pink Grosgrain ribbon, Mini Glue Dots, Scor-Pal

The card base is Pink Passion with a Whisper White layer. The Whisper White was scored on the Scor-Pal at 1 ½”, 1 ¾”, and 2”. The sentiment from Well Scripted was stamped on the Whisper White cs using Perfect Plum ink. The Sending Love DSP was punched with the Scallop Border Punch and adhered to the bottom of the Whisper White cs. I then punched three wings from the Two-Step Bird Punch out of Barely Banana, Lavender Lace, and Lovely Lilac cs. The Barely Banana wings were sponged with Summer Sun ink. The Lavender Lace and Lovely Lilac wings were sponged with Perfect Plum ink. These were then glued together using the Two-Way Glue Pen in the shape of a tulip. Three branches with leaves were punched from the Two-Step Bird Punch from Old Olive cs and glued to the front of the card with the Two-Way Glue Pen. The tulips were glued to the top of the branches to look like a bunch of flowers. A bow was tied from ¼” Pretty In Pink Grosgrain ribbon and adhered to the card front with a Mini Glue Dot.


Stamps: Well Scripted
Paper: Whisper White, Ballet Blue, Bashful Blue, Certainly Celery, So Saffron DSP, Thoroughly Modern DSP
Ink: Bermuda Bay, Ballet Blue
Accessories: Two-Step Bird Punch, Certainly Celery ¼” Grosgrain ribbon, Stampin Dimensionals, Scallop Border Punch, Two-Way Glue Pen

The card base is Whisper White with two pieces of DSP adhered near the bottom. The So Saffron DSP was punched with the Scallop Border Punch and a piece of Thoroughly Modern DSP below it. The Certainly Celery ¼” Grosgrain ribbon covers up the seam between the two DSP pieces. The bird was punched with the Two-Step Bird Punch from Ballet Blue cardstock and sponged with Bermuda Bay ink. The wing was punched from Bashful Blue cardstock and sponged with Ballet Blue ink. At the make and take my guests used Bermuda Bay ink to sponge the wing because I realized I needed the Ballet Blue ink at another table. It still looked really great though. The branch and leaves were punched from Certainly Celery cardstock and glued to the card base with a Two-Way Glue Pen. The bird was adhered over the branch and the wing was attached with a Stampin Dimensional to make the wing stand up off the page. The finishing touch was to stamp the sentiment from Well Scripted in Bermuda Bay ink. This card was inspired by a card created by Laura Fitzgerald on Stampin Connection.


Paper: Rose Red, Barely Banana, Garden Green, Melon Mambo DSP
Accessories: Fancy Flower Punch, ½” Circle Punch, Scalloped Oval Punch, Paper Crimper, Mini Glue Dots, Peppermint Patties

The final project was a flower peppermint patty. Two flowers were punched from both Rose Red cardstock and Melon Mambo DSP using the Fancy Flower Punch. Two ½” circles were punched from Barely Banana cardstock. Two scalloped ovals were punched from Garden Green cardstock using the Scalloped Oval Punch. One Rose Red flower was layered under a Melon Mambo flower and glued together. One ½” Barely Banana circle was glued into the center. The scalloped oval was folded in half and run through the Paper Crimper at an angle, then unfolded. This makes a really great looking leaf when you’re done. The leaf was glued to the back of the flower. Repeat for the other flower. Then glue both flowers to either side of your peppermint patty with a Mini Glue Dot.

All of the ladies had such a wonderful time chatting and creating together and I had fun helping those who needed it and chatting. I can’t wait until next month’s! I’ve already started planning the projects and they are going to be wonderful!

Monday, April 5, 2010

The Men In Our Life Swap

A while back I participated in a swap for masculine cards on Stampin Connection. If you would like to see the cards I submitted you can find the post here. Here are the wonderful cards I received a couple of weeks ago from the swap.

Top left was created by: Unknown
Top right was created by: Tina Taves
Bottom left was created by: Michelle Lynch
Bottom right was created by: Tina Taves


Top left was created by: Michelle Lynch
Top right was created by: Unknown
Bottom left was created by: Unknown
Bottom right was created by: Kay Zamer


Left was created by: Sandy Carlson
Right was created by: Nancy Horn

Thank you everyone for the great samples. If I did not list your name with your card please let me know and I will correct it. A few of the cards did not have a name with it or on it. Thank you Cynthia Umbach for hosting this swap!

Thursday, April 1, 2010

March Christmas Card Challenge

These cards I created for the month of March for the Christmas Card Challenge on Splitcoaststampers. I had these finished a couple of weeks ago, but completely forgot to post them until now. Oh well...better late than never I guess.


Stamps: Serene Snowflakes (holiday mini), Christmas Greetings
Paper: Whisper White, Night of Navy
Ink: Night of Navy, Not Quite Navy
Accessories: Silver elastic cord (holiday mini)

These were really fun and relatively easy to make. I used Serene Snowflakes (holiday mini) and stamped with Versamark on Whisper White cs and embossed with clear embossing powder. Then I used a sponge dauber to apply Night of Navy ink and then Not Quite Navy ink over the snowflake. I wiped off the embossed image with a paper towell to reveal the white snowflake. Then I used the two-way glue pen and filled in the center and four points of the snowflake and then applied Dazzling Diamonds glitter. I let this dry for a while and brushed off the excess glitter, then used Crystal Effects over the glittered areas. I wanted it to look icy and shiny without the glitter falling off all over the place.

Once the Crystal Effects was dry I mounted this on some Night of Navy cs, tied some silver elastic cord around the panel, then adhered the panel with some scrap rubber to pop it up. The card base is Whisper White and the greeting is from Christmas Greetings stamped in Night of Navy.

I also stamped a snowflake in Night of Navy on the envelopes to make them match. I love having matching envelopes! Well, that is my set of 10 Christmas cards for this month, or should I say last month? Oh well. Now I get to decide what to create for my April Christmas cards...and hopefully remember to post them on time! Lol!